Thursday, December 20

DIY Gel Candles for your li'l joys

I love the idea of making my own candles. But have a long long way to learn them. As kids, we did experiment our share of candle making, by melting shop-bought candles into containers of different shapes.

Candle making is a lovely art though. And nothing like making your own exquisite ones at home.

My friend Sarita from Muscat sent me pictures of gel candles that she made. And without doubt, I fell for the lovely set.

Take a look at her effort that gives them that royal feel!


Don't you feel like grabbing them for your centre table?

These carefully made pieces are simple to make, despite looking like some artist worked magic on them by filling them with water and lighting up the wicks

Here is her list of things to make them:

Gel wax (available at craft stores)

Small glasses

Fevicol or Craft glue

Wicks

a few shells 

liquid colour

and a thick vessel to melt wax


She melted gel wax in the thick vessel on a low flame, till the wax became transparent, and added colour to it.

She then cut a wick each for the glasses and stuck them up firmly to the centre on the glass bottom.

Next step, arranging the shells in the glasses. Makes all the difference, turning a mere candle to a work of art.

And then, it came to pouring the gel wax into glasses slowly, to avoid air bubbles.

``Hold the wicks straight while pouring the wax,'' is her word of caution.

The final step is to leave these candles to set for a while and cut excess wick thread.

Want to try this? You might as well usher in the festive spirit with this DIY.

Pictures courtesy: Ratnala Sarita

For use of pictures, contact: radicreative@gmail.com


Thursday, November 29

Cute kiddy costume bookmarks

Have there been times when a pile of ad-fliers got thrown around home for no reason? You had to toss them into the basket, but wondered what else could have been done!

Out here in US, that weekly mailbox flood of coupon fliers from local stores is a routine. Their volume and weight vary with changing occasions. And piles of fliers get heavier during the halloween-thanksgiving-christmas season.

Ahead of Halloween this year, my mailbox got full too, with some fliers of party stores. Cute pictures of kid costumes. I have not much use of them, as I do not have kids. Even if I did, am not sure the idea of all those cute but expensive costumes would draw me to the store.

So, I did what comes best to my head. Made bookmarks using some of those pictures.


It was not so much of an effort, considering I had supplies ready.
  • a pair of scissors, glue
  • felt pens, of the colour of paper that had to be used
  • cardboard from cartons of products that I buy
  • wooden beads, paper punch and yarn to match
  • most importantly, pictures cut out from coupon mail or ads 
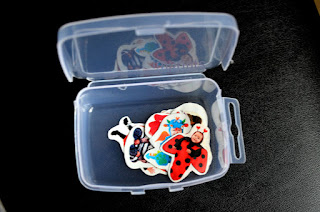
First step, cut the strips or blocks of the pictures from the main flier.


Get to work next, with each of those pictures. Choose individual pieces that have minimal or no pricing prints on them.

Here, they resemble stickers that you buy at a bomb of price from stationery and craft stores.

If you do not make bookmarks, consider using some double-sided tape on their rear so you can use for some other projects, or simply stick them up on your kid's shelves and storage boxes.


 I love the `prisoner' costume at the bottom of this picture.

I cut out enough to store for later use. After all, it is not all times of the year that you get such pictures on fliers!

I cut some cardboard from cartons to size, sand-papered its glossy side, stuck brown craft paper on its sides for one bookmark, and patterned `tablecloth design' paper on the other.

I also made use of a heart shape that I had cut out from a used gift-wrap or wrapping paper.

Next step: Stuck the pictures up, and used felt pens to touch the bookmarks up. I used the paper punch on one of the two bookmarks, and strung some thread into a bead for its `tag' feel.

Here goes another picture.
That's not all,

I used another picture, of a baby, that I had cut out from another ad, to make the following bookmark. This one can be used as a gift tag too.


Try this using pictures you see around home. It only needs some patience, the paraphernalia apart.

For use of pictures, write to: radicreative@gmail.com

Photo courtesy: Radhika M B


Sunday, November 18

Wrap your gift in coconut shells

I've always wondered what to do with an empty coconut shell. That fleeting pang after I have used up its kernel and have to toss it in the trash can! Wish I had ideas - am saying this in spite of having bought coconut shell earrings, and growing up with a cutely painted coconut shell `face powder dabba' as a kid.

With Diwali and a post-Sandy relief slowly allowing sheen back into my life, it has only been a pleasant doodle-time on Facebook, watching all the different rangolis and diyas. My good friend Lalitha Menon sent me pictures of her latest gifting effort. And I loved it.

She made Magaj - the Gujarati sweet, for a start.

She kept it aside, and got ready with dressing coconut shells up. She wrapped the two halves in aluminium foil that is so handy in kitchens.

Using motifs she had cut out from old clothes, she decorated the outside of the shells.

Now, she filled sweet into the bowl shaped insides.


Does not that look delicious?


Using the violet satin ribbon, she packed the rest.


What a yummy gift? And an innovative gift pack too! My cells have begun working now, and the idea-thought trail has begun its journey, on what else to do with coconut shells.

Guess coconut shells can be used to gift wrap other knick-knacks and gifts too!

If you have any ideas, please share.


Pictures by Lalitha Menon


Wednesday, October 24

Creativity: From a Fall Fair

I adore visiting craft fairs. Imagine my pleasant surprise when I got to see one without knowing it was on!

And delights of delights - loads of visual treat in the form of handmade wares among other things I loved!

Here are some pictures of the craft fair that ran as part of the October Fest 2012 at Bear Mountain State Park's walkway.

Isn't the wolf cloth painting lovely? And check out these caps for kids. Owls, Smileys, simple Native American patterns.

These bead pendants and necklaces caught my eye though. Intricate. Painstakingly made. They are part of the collection by Bonnie's Bead Art.


The maker in question was kind enough to pose for a snap.

Her blog http://bonniesbeads.wordpress.com talks of beads and embroidery for the work. Lovely designs as a result, bracelets and necklaces!

Other stalls were as interesting too.

I love this European vase from a yard sale kind of stall.

And these miscellaneous home things are as interesting. This wool balls were part of another stall's collection.


 And so were these colourful hangings, giving that homely Native feel.
I love these thread earrings from another stall...specially the ones in the centre, in the shape of butterflies. Colourful bags such as the ones below, that otherwise are a staple with Indian handicraft stores, are a feast for eyes here.

 And here is the stall that looks as gorgeous!
Aren't these dolls made of wool grab-worthy?
 Wanna take home one of these tortoises or birds?

 I love this ode to the woman of the home, and making kitchen the centre space of a home instead of the living room! In the board's centre are the words - Mom's Kitchen and the description around says The Heart of the Home. 


This stall has a vintage feel to it, with quotes and captions galore on Armed forces of UK. Irish style I guess.

I left the fair content about finally making it to a crafts fair in the US. After a whole year that is. And was relieved to find colour, which I thought was the forte of us Indians!


Picture Courtesy: Radhika M B
Related post: Cerebral Toothbrush, Writing on Sand

Sunday, October 21

Cereal Boxes turn Paper Holders


Have you not looked at your cereal box or other cardboard cartons around home and felt a little pang when you trashed them?

The Net is full of ideas on how to turn cereal boxes into something useful around home. The trouble is, we view such projects as not so upmarket and `jaded' in front of those stylish cases we find in showrooms.

Time we changed our thinking, and put some value to creative use of such waste. Didn't we do these things as kids? Why not continue these into our adult lives?

Ashwini, who sent me the precious homemade soap and lotion gifts, sent me these pictures of cereal boxes that she converted into household paper and coupon mail holders.


Materials that she made use of for this one, include wrapping paper and shelf liner that she glued to the box. The longish height of the box comes in handy for the size of full-scape sheets and files.

She picked up the shelf-liner (the woody paper on the box's top and bottom) from Dollar store.


This is a box of relatively lesser height, that she used to wrap and store coupon mail besides gift bags. She wrapped an extra cereal box of a smaller size to create a partition inside of the box.

This may look temporary, but isn't it cute? And so much better than the plastic dabbas that fills pockets of the plastic-ware industry! You could try one step at a time. Out of 10 boxes around on your shelves, try filling in one or two with these boxes.


Who knows, you may soon try more innovations!

Picture courtesy: Ashwini Deshpande
For permissions to use: radicreative@gmail.com
Copyrights of pics rest with Ashwini

Thursday, October 18

Precious gifts come by post!

Some gifts are priceless. Not because of their translation into dollars or rupees, but the sheer love and effort that goes into them.

Last week, I waited desperately for a post to arrive. And what a wait it was, flipping open my metal mail box at least twice a day! When the post did arrive, I squealed with joy. My dear friend Ashwini of http://indulge-ashscorner.blogspot.com sent me a cute set of handmade gifts.


You may figure out that the little felt ball on the left in this picture, is a flower. Yes it is. But with a purpose. It is a coat-pin for my black winter coat!

The other two gifts,


 a lovely little soap bar that she made at home! And...

some body lotion, or butter as you would call it.

Ashwini's homemade soaps and lotions are a hit with her friends. I have met her, and let me tell you her skin is perfect, thanks to such lovely work with essential oils, basic home oils such as almond oil, olive oil and the likes from the kitchen shelf, and some soap base from the craft store!

I consider these my birthday gifts, even if she did not know and yet sent them over.

Big hugs to you Ashwini! Am inspired to make my own soaps now!

Brown sheet gift wrap

We have all gone past those good old days when we wrapped newspapers over a saree with a jute thread and gave it gladly as a gift. Or dropped some tinies into a brown paper sachet and stapled it. Or so we think.

All-ubiquitous brown sheet! That continues to get wrapped around school notebooks and parcels! It can still make a gorgeous gift wrap, with some embellishments in tow.

That's what Lalitha Menon did recently when she gave her friend a gift.

Here it is. With her love for balloons intact!


Her embellishments here, are design pieces cut out of an old invitation. Some white and blue satin! Notice how the party-feel factor comes through from a super traditional looking window. Another piece of satin goes into making a bookmark with a cute message.


Grab your brown sheets now, and experiment. All you need is glue, scissors, and some satin. Thank you Lalitha.

Tuesday, October 9

Rangoli on a jewel box

How do you store your jewellery? For that matter anything precious that's tiny?

``Jewel box, silly!!!'' you'll exclaim.


I love to do that too. But when I travelled from Chennai to Newark, Delaware, it was simply not possible to load heavy jewel boxes into the heavy suitcases. Jewel boxes are the last thing that occupy your mind when all you want to make sure is, if the medicines you need got in. Still, I love those jewel boxes you get in India.


So intricate, earthy and inviting! This picture is only an example of the thousands of richly made jewellery boxes.

Imagine my excitement when I found at Hobby Lobby, that you can do some DIY! On a jewel box! One look at the $ 1 box and I grabbed it. Decoupage. Sequins or chamki work. Fabric wrap. So many ideas raced in my head on the `what to do with it' front!

I settled for painting it. After all, rangolis on bookmarks has been a fancy that I caught on like fish to water!


Now for the choice of colours. Instant memory flash: my mother spreading cow dung with a broom stick over road in front of our house, an rice powder with medium to make beautiful designs.

And why not? Why stick to sequins glory when earthy colours can make your jewel box look just as gorgeous!

In comes the olive green craft paint. And I get started.


Painting it was not as simple as I thought it would be. Dabbing the brush on the wood...I began with the insides as that would prevent smudging my hands. Working from outside to inside would make it look clumsy I decided.

One coat. And two coats. It did not look glossy enough. So I let it dry. Third coat...phew!


This is how the insides looked later on. Once done with at least three coats on all sides, I picked up a super thin brush for the white. When you begin with something so experimental, it is better to stick to simple designs among rangolis. That's what I did. Am pleased with the design yes. But wracking my brains how it could get a glossy look.


I love those folksy footprints designs. Footprints of God, in whatever form we imagine. The border design is basic. It was on the back side of this box that I thought I messed up the rangoli a bit. So I made do with neat outlining of the dotted design, and some mehndi touch to it.


Here it is, the front side. Reminds me of grandma trunks of yore. Still, it looks alright.


Here they are, pictures with the mini-bookmarks. As home (India I mean) gears up for Dasara and Diwali, am dreaming up the festivities as I make this. Painting your own Indian designs can make up for gifts to give to friends in the coming weeks, instead of having to spend a fortune on gift cards.

If you're getting ready instead for Halloween, Thanksgiving and Christmas, you could think of flowery designs, or some decoupage. Or simply go ahead and gift something like this!


Picture courtesy: Radhika M
Picture of wooden jewel box (second from top): Crafts in India

For permissions to use, mail radicreative@gmail.com