Showing posts with label old boxes. Show all posts

Tuesday, May 2

Travel tic tac toe case from Jewellery box DIY

What do you generally do with the jewellery cases from stores? I have forever been fascinated by the size and sturdiness of the jewel boxes that would find their way to mom's large cupboard made of iron, and get hidden away from prying eyes.

A box of that size can be put to umpteen uses after its original purpose gets served. I decided to embellish it, but not much. I love, love and love tic tac toe games.I love making tic tac toe boards. And the jewel box obviously came in handy. I have seen this game get used in umpteen spaces.

What I used for the piece:

-- a jewel box

-- cardstock to match or contrast it

-- optional is a thick felt sheet

-- a pair of scissors

-- hot glue gun loaded with a glue stick

-- embellishments are optional

-- paint pen (I chose metallic silver) to match the jewel box


In the jewellery case that I had at home, the velvet piece covering the hood of the box on its inside was missing. The other half it was half stuck on the inside. The first step, was to glue hanging pieces towards the cardboard.


I cut out a piece of cardboard from the cardstock I had. You get cardstock the width of large bookmarks. It is about trimming it to fit into the box. Insert it on the surface. I did not want to glue away everything. Just inserting worked.


Once you have adjusted them, use a paint pen to mark out the lines for tic tac toe game.


I used a popsicle stick, or an ice cream stick to mark out the straight lines.

For a tic tac toe box of this size, we would need small items to make it for the game. So the best bet for me was buttons.


You can also use beads.


If you noticed, there was an ugly sticker on the box. I just cut out another piece from the cardstock and stuck it on top of the jewel box. And your on-the-go tic tac toe case is ready. Tuck it into your bag or slide it into your pocket with the wallet, and indulge yourself with a fellow player on that plane, train or automobile.


Pictures and content: Radhika M B

Monday, February 29

Cardboard Coasters with Washi Tape DIY

The most ubiquitous of things that can be trashed at home, are corrugated cardboard boxes and pieces of cardboard that come with products.

I dream of seeing such cardboard get compressed and carved into sturdy designer furniture some day. Until then, it is about wracking my brains about what can be done with those beige-brown pieces that invade our household lives.

About three years ago, Vidya Nair of Whatsurhomestory blog showed a radically different idea for wall decor. She used newspapers on a canvas and gingko leaves as glued brush strokes for her seasonal decor. I have been enamoured by her effort to this day, and it is one of those inspiring projects that prompts me to come up with ideas - mundane and unique for cardboards.

This time I decided to do away with the idea of buying coasters for home, and picked up cardboard pieces that come with our home delivered food.

It's that typical project for a lazy afternoon.

What you need:

-- Cardboard pieces that are sturdy
-- Washi tape of different colours
-- a paper trimmer
-- a pair of scissors
-- a marker pen for decorating cardboard edges
-- another thin marker to draw curves at corners
-- a guide curve (I used the plastic opener of a wet-tissues sachet)
-- optional, glue or Gorilla glue in case Washi tape does not stick
-- optional, is a ruler


Place your cardboard pieces alongside between the flap of the paper trimmer and its base, in such a way that you can cut them in the same size.


Place the base of your palm over the rotary blade cover, cup it and move it over the cardboard pieces in swift vertical movements a few times. The cardboard pieces get trimmed to your desired size. If you see them cut a little unevenly, use a pair of scissors to trim off.


Use the plastic guide-curve piece to mark out curves along the corners of these pieces using a ball-point pen, pencil or a fine tip marker pen.

If you have a corner rounder, nothing like it. But you can use a pair of scissors to shape off the corners into elegant curves.


 Now pick up the Washi tape and use it to decorate the beige coasters.
The tape may not stick well at times, which is why you need to keep some extra glue handy.

I have used the tape to entirely embellish my coasters.

I used a blue fine tip marker pen to outline the edges partly.


The cardboard coasters are ready - super quick and simple to make at home. Until after I was done with the colour combination, I did not realize that it resembers sea, foam and sand in its own unique way.

Enjoy your cup of tea or coffee with the earthy pieces.


Pictures courtesy: Radhika M B


For permissions to re-use, write to: radicreative@gmail.com  

Monday, February 8

DIY mini golf set for your workstation

Ever tried your hand at workstation game? I had a habit of folding bus tickets into tiny folds and hit them a couple of inches like a carrom board coin.

The most classic of them all is the Newton's Cradle, but today we have office desk basket ball, mini nine pins, desktop snooker, Rubik's cube.

Office desks and workstations are a world in themselves. Their look and feel reflects the nature of a corporate office and at times its hierarchy in variations, despite the mundane nature that has come to define all things corporate in the current era.

You can jazz up your office cubicle in many ways. It does not matter if you are start-up, self employed struggler or a top management person in a multi-billion dollar corporation.

An office desk game to distract your eyes and brain briefly from those stress-inducing emails and phone calls, is one such option. Here is an example of a golf set that you can make with things around home to use at your workstation.

It is low cost and worth your time.
.
What you need:


-- a tray base: I used a wrapping case that came with a gadget purchase (You could also try the lid of a shoe box, or an old tray around home that you want to discard. Make sure it has edges to contain the felt sheet)

-- green felt sheet that fits into the container

-- a crochet needle 

-- a large bead that rolls well

-- a styrofoam cup, or another throw-worthy container that you can use scissors on

-- a pair of scissors or a craft knife

-- marker pen or pencil

-- optional - ice-cream stick/popsicle stick/ craft stick

-- optional - tacky glue

-- optional - a ruler

Am saying tacky glue is optional because, if your base is the right size with good edges that will not let the big bead or tiny ball roll off the board, you can always stick the felt to its base. I decided to make this not as a serious golf set or a toy set to learn the game's rules, but simply as something to take the anxiety off someone's workstation time.

As for me, I did not worry too much. I picked the styrofoam cup and marked out a U-shape to cut. In my head, I could not forget those little hiding holes of Jerry in Tom and Jerry series.


And it is to help mark the shape of U out that the popsicle stick comes in handy.

Next on, it is about cutting it along of course. 


When you cut this hole, make sure your bead/ball goes in easy.

I kept it aside. And cut the sheet of felt to fit into the tray. This is a no-fuss project and I did not prefer decor of any sort, lest it clutter the desk space.


Remember, when you fix the sheet on the base, there is a bit of trimming, and rounding off that you will need to do depending on the corners of the walls.

You will also need to even out the felt sheet over the base. Here is where the tacky glue comes in handy in case you want to glue it up on to the tray. In case you stick it through, try roughing the base a little to let the surfaces stick better.

If you want a hilly terrain for the golf holes, you can use a lump of cotton here and there under the felt sheet. I decided otherwise to avoid a mess.

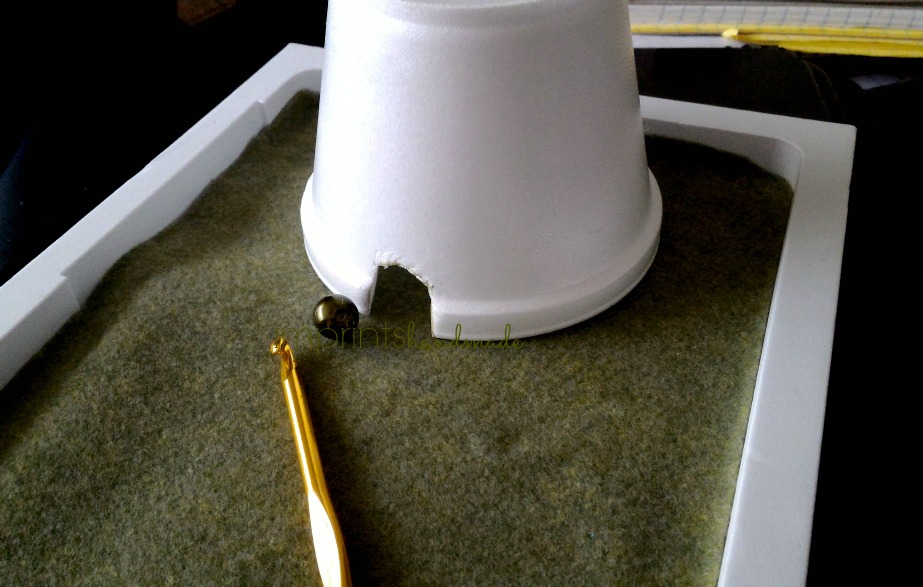
After this, invert the styrofoam cup where the U-hole sits perfect on the felt-sheeted tray.


And, it's time to play! If you want the ball to roll better, you may try out a smoother surface - maybe a green coloured sheet of construction paper. 


This one does not have a hole on its base, unlike a normal golf course would. If you want a hole on the base, an option is to raise the felt base using cotton or packaging styrofoam below it, cutting a hold big enough to fit the bead or tiny ball, and using a tiny bowl from a doll kitchen set.

Try and think of other objects that can come in handy for the piece.


PICTURE COURTESY: Radhika M B

For permission to reuse, write to: radicreative@gmail.com


Monday, August 19

Gift-wraps from the backyard!

After a long gap on Imprints Handmade, my dear friend Lalitha Menon is back with her original gift-wrap ideas!

Nothing says it like a sustainable gift wrap. Before you reach out to those expensive sheets at the gift store, try this. You're super lucky if you have a treasure trove named - garden! Lalitha has the knack of picking up little somethings from behind her home to use on her gifts.

Here's a quick look at what she did to pep up her recent gifts.

Surprise Soiree: that's what I'd call this first gift-wrapping project of hers (not sure how much wrapping goes on into it). Read on.

If you're wondering how a bunch of flat coloured marbles embellished with mint sprigs could make up for a gift as in the picture below, dig in. Beneath those aquarium marbles lies the real wow.

gift wrap with plants and leaves
 The gift started off somewhat like this:
Gift wrap eco-friendly
- an empty wooden box, the kind that holds jewelry
- actually, it is an old square handmade soap box she had, that she decorated in such a way  that it resembled table decor
Jewellery for gifts
Lalitha filled it with the cute jewellery set, a chain with locket and earrings, and placed the marbles over these, in a transparent plastic tray that fit into the box perfect.

marbles and sprigs gift wrap
 All this needed, was some dressing up.
eco-friendly gift wrapping
And a satin ribbon to embellish!
how to gift wrap with garden stuff

wrap your gift with leaves and sprigs
Her second gift project, was with a tiny mud-pot, or kulhad.
Clay pot gift wrap
 Instead of opting for garish sequins and paints, she simply glued mint leaves for the decor element. And taped satin over the gift wrapped in a banana leaf piece.
Clay pots and banana leaves

Please bear with the fuzzy pictures here. Inside the earthen pot, are Dilmah brand tea-bags as the gift.

Next, she shared with Imprints Handmade, something similar to what she had done many months back. Read here.
Coconut shell gift
Instead of the mud pot, it was a coconut shell that came in handy, with the banana leaf from her backyard.
Ayurveda soap
This moisturizer tempts me enough to grab one! Lalitha wrapped the piece with the banana leaf. Not available here, is the picture of satin tape tied up to finish the gift wrap. Any guesses about how she revved up this natural soap?


Goat milk soap natural
Banana leaves of course!
Goat milk natural soap wrapped in banana leaf

Paperless gift wrap
These gifts were for friends who visited Lalitha Menon. Those who've seen her previous work would remember how she wrapped a shirt in a teak leaf before! Here is a link.
As for the shirt below that she gifted to her son for his birthday, Lalitha did not worry much.

Men's gifts
Stole recycle - gift wrap for shirts
An old dupatta or stole in bright red did the work, besides some silvery satin. Also seen in this picture above, are mugs that Lalitha's students gifted to her.

Thank you Lalitha Menon, for sharing pictures of these thoughtfully wrapped gifts!

And the rest of us! Time to get inspired and look in our own backyards for some wrapping ideas!

Try them at home, and share with Imprints Handmade.

Pictures courtesy: Lalitha Menon

For permission to use, write to: radicreative@gmail.com

All pictures are watermarked.