Tuesday, June 28

DIY patterned paper to wrap small gifts

How often have you bought a little gift and run short of gift envelopes, or gift wrap paper? Or fretted over gift wrapping papers that get more pricey than the gifts themselves?

The truth is, a world of ideas exist to wrap gifts creatively. You can use paper bags, brown sheets, used envelopes, just about any paper that will allow you to put some paint on it. I pulled out some construction papers of A4 size from my stash and scoured objects around home. This project is fun to do and brings about the convenience of you getting to store it away in your desk. Try it on larger sheets and roll them for future use, or spend an hour ahead of an upcoming event and quick-make your wrapping sheets.


Some of the materials I used for this project, or kept handy:

-- gold finger fryums or tube crispies

-- used end or leftover roll of clear tape

-- lid of an old ointment tube

-- tissue roll cardboard from used toilet tissue

-- bubble wrap sheet

-- used sauce dip container

-- a pair of scissors

-- wool

-- construction paper - light colours (plain sheet)

-- acrylic paints - three colours including gold

-- paint brush

For the first paper, spread the paper out, take the tissue roll and some wool, knot the wool around one and of the tissue roll tube, roll it around the tube randomly.


Towards the end, knot it again.

Dab some paint on these threads using a paint brush.


Place this on one end of the plain sheet and gently roll on it.


Roll on till the end of the sheet. Dab some more paint with the paint brush on the rolled thread, and move to the second half.


Once you are done with the whole sheet, keep aside to let it dry.

Pick another sheet. 

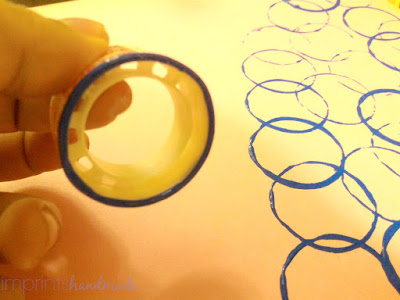
Use the leftover end of a clear tape, which is usually made of either thick cardboard or plastic. 

Pour some paint into a container, dab the piece on it, and start stamping. Stamp random circles, or an imagined design. Spread the design out evenly.


Allow the sheet to dry.

I picked up the gold finger fryums for the next sheet, with some gold paint.


With the frym, there is a possibility of an air bubble forming when you dab it by pressing into the container with paint. You can get over the problem, by blowing a little air into the tiny tube.

Continue for the rest of the sheet.


You can stick to stamping the fryums into rows. But there is no need of fretting over precision with distance between each stamped spot.


After they dried, I simply tucked these papers away between other office files. I made them for gift wrapping of small gifts. But you can always use them to wrap little notebooks, decorate a file, Or simply frame them as art. You can also use them to wrap gift cards, make envelopes and so on.

It is a project your kids will love on a leisurely afternoon.


You do not have to spend fortunes on gift wrapping paper. And little things like your toilet tissue roll, bottle caps and the likes can be kept for such projects.


For permission to re-use, write to: radicreative@gmail.com


Pictures courtesy: Radhika M B

Tuesday, June 21

Fragrance stick holder from bottle cap DIY

It is fashionable to grab those colourful and sometimes exquisite kundan work incense stick holders and diyas during festival season.


Incredible home based businesses have sprung up for the sticks, wooden holders, metal stands, earthernware...

What if you have run out of them around home? Or need something for daily use?

The narrow mouth of some toothpaste tubes can come handy to make your own piece. I tried the experiment with the squeeze-opener of a chocolate syrup bottle. You can look around for shampoo bottle caps, face-pack tube caps, and a host of other objects around home.

These products invariably have some plastic on them. And the caps are usually plastic.

Just make sure the bottom half of such caps has a narrow spout.

 You will need:

-- used bottle cap with a squeeze hole

-- a nail clipper or a pair of scissors, or ...any small tool that can shear plastic

-- modelling clay

-- paper plate, preferably a used one, which does not have oil stains

-- paint pen or embellishments

-- optional is a stamp ink pad and stamp to decorae

-- keep glue and tissue paper handy


Wash the cap thoroughl and dry.

Use the nail clipper or a jewellery plier to clip off the upper half of the hole-type cap. It takes some effort, but is possible.

Take some modelling clay that kids or other friends may be playing with -- I had a packet of modelling clay stashed away for a while. And pulled it out for this project.


The chocolate brown among the colours suited fine for the bottle cap I had. Take about half a small cane and roll between your palms to form a small ball and a roughly shaped diskette.

Press this on to the inside of the spouted cap half. If you feel it is not enough, take a little more clay and add to the mound. Thanks to the clay, the cap will acquire some weight. You can place this over a small plate or the large lid of some other bottle, or glue it on to the paper plate.

I made the mistake of trying to put some design on the paper plate, by using a stamp on it. The plate turned out to be too smooth for the stamping ink.


So I had to quickly wipe it clean.
The next step, was to use some craft glue (multi-surface) to glue this cap on to the paper plate's center. Let it dry.


 After this, my paint pen came in handy. And no, I did not want to embellish the plastic cap.

I did not want to make it design heavy. And so made do with a simple dot-style one.

The fragrance stick holder is ready.

You can also use it as a toothpicks tray when hosting a party or dinner. Or maybe crochet sticks when you are into crafting.


The project costed me hardly anything. It can come in handy as a centerpiece for my next party. Am mulling over what to do with the other half of this cap.


Pictures courtesy: Radhika M B

Write to: radicreative@gmail.com


Tuesday, June 14

DIY standby dustpan from plastic jug

Ever faced the odd no dustpan at home situation? Rare, but something as universal as a dustpan can send you scurrying to the shops to buy another one.

What if home situation does not let you step out? Or you simply do not want to spend right away on a new dustpan? If you have a plastic jug that is shaped into a quadrilateral, it can turn into your temporary dustpan with simple DIY.

All you need, is to look for a plastic jug - water or milk, or of the juice variety, and get those easy tools out.

I used a water jug for my project.


The handle for my jug was on its corner, and not centered on one of its sides.it was a matter of taking advantage of its available ridges and contours.

Things you possibly need for this super quick DIY:

-- plastic jug

-- sharp craft knife

-- a pair of scissors

-- marker

-- ruler

-- paint pen

-- embellishments (optional)


It is always easy to cut along the ridges of a plastic container. But really, before you begin anything at all, make sure to remove any labels from the jug.

A quickie way to remove product labels, is to run a hair-dryer over the stickers for about 10 seconds, and then pull the stickers out carefully.

Wash the jug thoroughly if it is a drinks one.


Next step is to mark out along the contours - first at the bottom, The flat end of the dustpan, should be diagonally opposite to where the jug's handle is placed.


Mark a line using a ruler and marker pen. And use the tip of the craft knife to cut.


After you are done with the base, mark the cut ends of the base by connecting them with the pen, towards the handle. Leave enough gap between the handle and the edge you want to cut. Run the knife.


You can use a pair of multi-purpose scissors to cut. The only trouble with using scissors is that plastic cutting lessens their sharpness. I used scissors to trim the cut surface. When you reach the mouth of the jug, cut it off the dustpan design.

The resultant piece looked alright.


The rough cut piece, you can use your scissors to smoothen through trimming. I would not advise running these edges along a lit candle flame, as that can leave uneven curves on the dustpan.


During the trimming process, I left a little curve at the dust-gathering edge of the pan, which did not work. The dust would not slide on to the pan because of the curvature.

I had to straighten it out.

If you need to keep the dustpan for longer use, make sure to pick up a jug that is made of thicker plastic.

This piece comes in handy to gather small objects that have spilt on the floor, kitchen disasters such as rice and lentils falling off, and the likes.

I kept embellishing the pan to minimum - just a white paint pen along the edges. The piece cannot match the thickness of market bought pans. It can work as a secondary one, and also as a makeshift piece before you go off to get a new one.


You can use the left over plastic from this project for other things around home. I plan to use my pieces for handmade jewellery.

This is a project best suited for adolescents and adults. Kids need to be kept far far away from it.


Pictures and content courtesy: Radhika M B

For permission to re-use, write to: radicreative@gmail.com

Tuesday, June 7

Soda bottle earrings DIY

It is amazing how many ways plastic soda bottles can be recycled and reused. I detest the idea of the drink turning up every time in plastic containers. Nostalgia makes me want to see them again in glass bottles that would get supplied in re-used, like in the 80s.

If the soda bottle comes in handy for your trinklets and a million other household items, nothing like it. I had a leftover piece from an earlier project, and decided to cut away with a pair of scissors, after coming across a project online.


Out came my pair of scissors, and more.

Things I used for this super quick DIY - a pair of earrings --

-- soda can or drink bottle, washed and dried

-- a pair of scissors

-- candle

-- small hole punch

-- jump rings

-- fish hooks

-- candle with matchsticks or lighter

-- jewellery/jewelry plier

It was something I did not think of before, but the curvy quality of this plastic makes it easy to melt and bend when it is hot.


Cut the bottle into pieces that have no regular shape, but hover around an inch and half in size. Light a candle and try melting the edges of the plastic pieces lightly. It will make the pieces all curvy and irregular. That's the idea.


Once these pieces are ready, use a small hole punch and pin holes on each piece - at one end.


The next step, is to fix jump rings. Use the jewelry plier to do this, and make sure you use more rings that make the pieces be able to dance without much ado.


All you need now, is to fix fish hooks. A set of summery green plastic earrings are ready for use.


Wear them over a plain work shirt or accessorize for that fun look.


Pictures and content by Radhika M B

For permissions to reuse, write to radicreative@gmail.com