Showing posts with label re-use. Show all posts

Tuesday, February 14

A ribbon hanger for your make up pencils

The biggest of challenges in organizing my cosmetics is where to tuck my eye pencils and lip pencils. It is similar to what I face with toothbrushes and tongue-cleaners. Sadly products related to organizing are too focused on plastic boxes and cylindrical containers. I recently found how a foot long ribbon and sometimes a small bangle or bracelet can do a lot to help with organizing the pencil-stick kind of paraphernalia. 

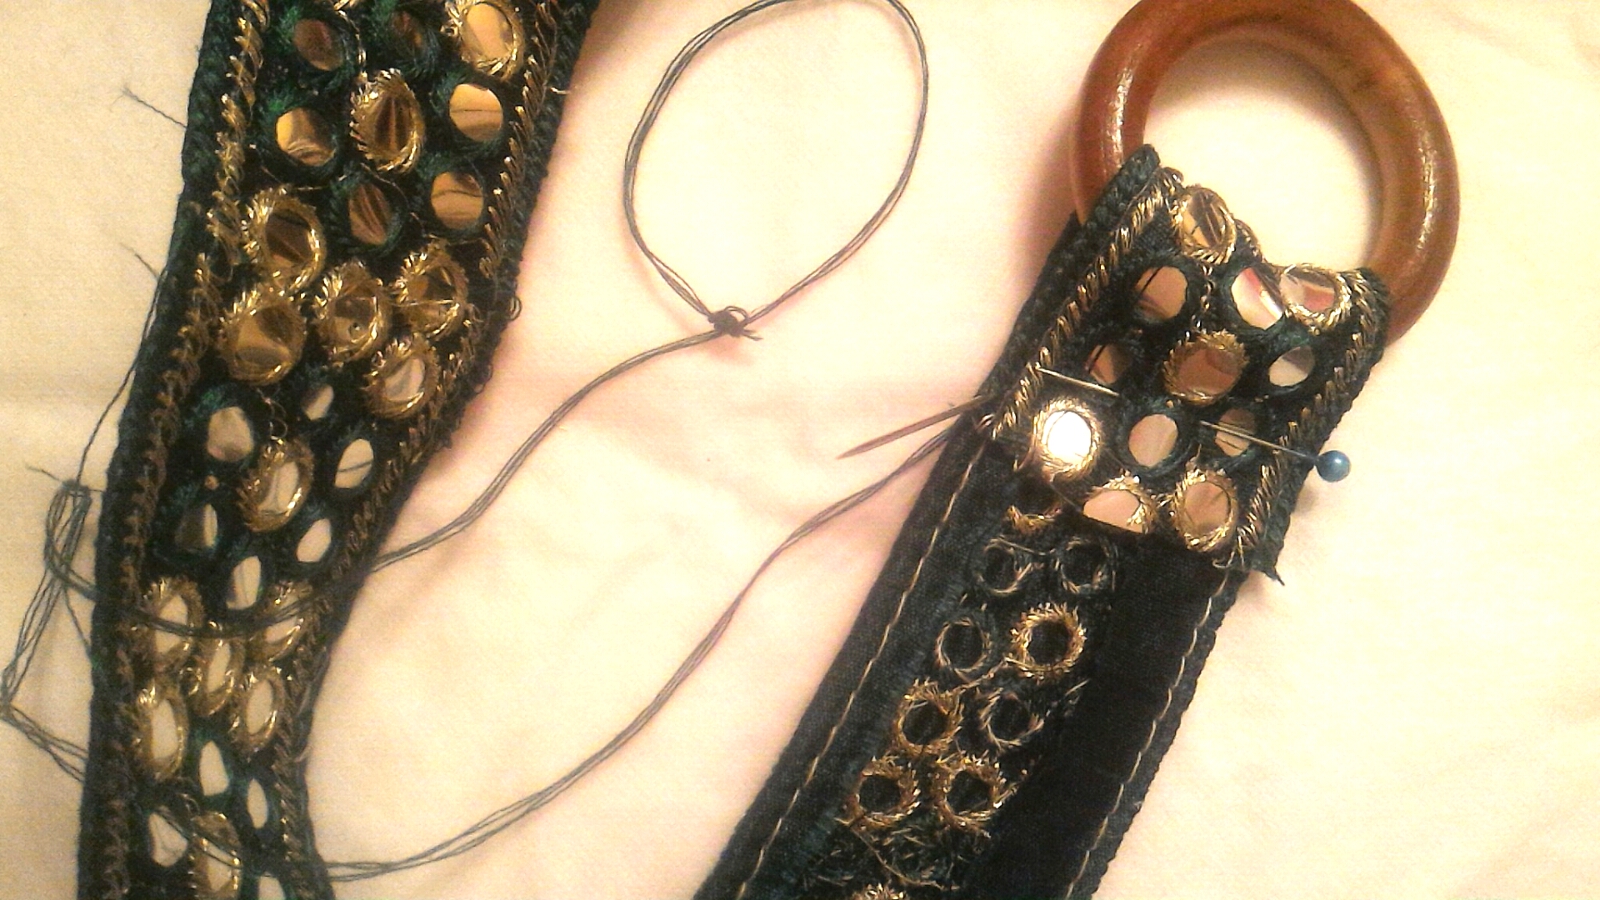
Grab your needle and thread, a pair of scissors, and some ribbon. I chose decorative sequins ribbon that we utilize to embellish sarees with patchwork designs. This is rich in texture, and can blend into your wardrobe easily. Or simply stick it up on your office cubicle wall for that all important pen, eraser-marker, or a hair clip that you cannot allow to be thrown around.


You will also need a wooden ring or a bangle. This ribbon or cloth tape or saree border, is over an inch wide. And I used up over a feet of it in length for the project. If you want to stick this up on a cardboard after finishing, grab a glue gun. Or go after a double sided tape. I also kept some quilting headpins handy to keep the ribbon intact with folds while I stitched up.


Start by inserting the ribbon into the ring and bringing it over. Spare an inch of the inserted or protruding bit and pin it up against the longer part of the ribbon. Now grab a spool of matching thread, a large sized needle, and hem the piece up. I used four strands of thread to give it the necessary strength.


Once the hemming is done, leave a five inches' gap from the point of hemming downwards on the ribbon. Gently use your fingers to create a fold, such that you can insert your index finger into the fold's hole. Pin it up and stitch. If you want to insert and store wider objects such as combs, fold accordingly.

Create three such folds or more and stitch up. Once this bit is done, you may trim the length of the ribbon holder, by cutting it. Fold the end inwards and hem-sew.


You have the option, of sticking the finished piece on a cardboard or hard surface and hanging it. Or simply find a hook on the wall and hang it up.


I tucked in my toothbrush and tongue cleaner, and a make up brush.  This hanger is useful for storing your child's head or hairbands, colour pencils, marker pens and the likes.


So if you have a spare fabric lying around, waste not your time. Try this for yourself, or to give as a party favour.

Pictures Courtesy: Radhika M B

Content: Radhika M B

For permissions write to radiscribe@gmail.com

Tuesday, July 5

Simple spinning top with bottle caps DIY

One of the childhood games I have loved is the spinning top, something boys in our neighbourhoods rollicked in and we girls yearned to master. It is so universal that babies can watch with their mouths open when you as much as spin a lid.

It's why used plastic bottle caps that often cannot be recycled by the recycling companies, can find a new life as spinning tops.

The only other major material you will need, is the toothpick. You can never have enough of them around.

Use these spinning tops while running your head over some corporate hassle, or get your child to make it and play. It's a tiny toy for children and adults alike.

I made a set of three with the bottle caps I have had lying around home.

Here, are some tips through the project that takes barely a few minutes.


Materials you need:

-- of course the plastic bottle caps - ideally small in diameter for a good spin

-- toothpicks of good quality

-- a long needle

-- nail cutter (if your bottle cap has protrusions)

-- crimp tools or nail cuticle pushers, or thicker tapestry needle

(I used a tiny nose-plier that is part of my jewellery tools stash)

-- optional - paint pens to decorate

-- craft glue - optional - if you want to embellish with sequins or stickers that is


The bottle caps need a thorough wash and dry before you start off with anything.

With an orange juice bottle cap, I found the center of the cap and used the long needle to poke it. An option they say, is to heat up the center of the cap. But it makes it too tricky because you never know the right amount of heat you need to poke a hole. It can simply melt it, and instead you may end up making a nozzle cap.

How quickly an easily you poke a hole depends on the thickness of the cap and the sharpness of the needle.

I started with an orange cap an it was a thick one, needing more push and some gentle taps with my nail clipper and plier.

\


Once the needle went in and I managed to pull it out through the other end, Here is where, my tiny nose plier came in handy.


I inserted the cone-nose of the plier to expand the hole a little. You need to be careful with this part. Push only as much as you need. Pick up a paint pen and draw in a design on the cap. 


Insert the toothpick. It is a bit of push and pull. Leave about an inch of the toothpick below the cap's lid.


I next tried this with a blue tetra-pack drink pack's lid. Barely an inch and a half in diameter, it was the most available colour. 


This was fairly easy to poke the hole into.


I used the nail cuticle pusher tool that has a pointed end similar to toothpicks, to widen the hole a little.

The next step was to paint it. I used a while paint pen.


This bead that you see in the picture did not really work for me.So i had to remove it. Leave the paint for five minutes so it dries well. The next step was to insert the toothpick. 

And another spinning top was ready. A tip you may find useful, is that I used a nail clippler to cut off the protective protrusions that came with the bottle cap. It took care to lift some weight off the cap and made the spin better.


I used a white cap too, that came with packaged drinking water bottle.


The spinning tops are ready to spin.

.\
You can try this with caps of different colours. Make sure they have a smaller diameter if you plan to use toothpicks.

For bottle caps and lids slightly larger in size, you may need to explore other spinning sticks.


When you poke holes, keep your hands safe. Be careful when you do this project with children.


Pictures Courtesy: Radhika M B

For permissions to use, write to:radicreative@gmail.com


Tuesday, June 28

DIY patterned paper to wrap small gifts

How often have you bought a little gift and run short of gift envelopes, or gift wrap paper? Or fretted over gift wrapping papers that get more pricey than the gifts themselves?

The truth is, a world of ideas exist to wrap gifts creatively. You can use paper bags, brown sheets, used envelopes, just about any paper that will allow you to put some paint on it. I pulled out some construction papers of A4 size from my stash and scoured objects around home. This project is fun to do and brings about the convenience of you getting to store it away in your desk. Try it on larger sheets and roll them for future use, or spend an hour ahead of an upcoming event and quick-make your wrapping sheets.


Some of the materials I used for this project, or kept handy:

-- gold finger fryums or tube crispies

-- used end or leftover roll of clear tape

-- lid of an old ointment tube

-- tissue roll cardboard from used toilet tissue

-- bubble wrap sheet

-- used sauce dip container

-- a pair of scissors

-- wool

-- construction paper - light colours (plain sheet)

-- acrylic paints - three colours including gold

-- paint brush

For the first paper, spread the paper out, take the tissue roll and some wool, knot the wool around one and of the tissue roll tube, roll it around the tube randomly.


Towards the end, knot it again.

Dab some paint on these threads using a paint brush.


Place this on one end of the plain sheet and gently roll on it.


Roll on till the end of the sheet. Dab some more paint with the paint brush on the rolled thread, and move to the second half.


Once you are done with the whole sheet, keep aside to let it dry.

Pick another sheet. 

Use the leftover end of a clear tape, which is usually made of either thick cardboard or plastic. 

Pour some paint into a container, dab the piece on it, and start stamping. Stamp random circles, or an imagined design. Spread the design out evenly.


Allow the sheet to dry.

I picked up the gold finger fryums for the next sheet, with some gold paint.


With the frym, there is a possibility of an air bubble forming when you dab it by pressing into the container with paint. You can get over the problem, by blowing a little air into the tiny tube.

Continue for the rest of the sheet.


You can stick to stamping the fryums into rows. But there is no need of fretting over precision with distance between each stamped spot.


After they dried, I simply tucked these papers away between other office files. I made them for gift wrapping of small gifts. But you can always use them to wrap little notebooks, decorate a file, Or simply frame them as art. You can also use them to wrap gift cards, make envelopes and so on.

It is a project your kids will love on a leisurely afternoon.


You do not have to spend fortunes on gift wrapping paper. And little things like your toilet tissue roll, bottle caps and the likes can be kept for such projects.


For permission to re-use, write to: radicreative@gmail.com


Pictures courtesy: Radhika M B

Tuesday, May 24

Mobile holder with chocolate syrup bottle:DIY

Ever wondered what to do with those ugly shampoo and chocolate syrup bottles around home? We come up with a ton of ideas with newspaper and magazine recycle crafts. Seldom do most of us venture into experimenting with plastics around home that glare at us in insidious ways and often oblivious to the eye.

Shampoo bottles, plastic jugs, syrup bottles, choco-drink bottles, they all come in handy in ways we do not predict. I have come across a bunch of online pictures about using a shampoo bottle to hold a smartphone while it charges. And decided to give it a try.

The result did not exactly meet my expectations - of it working as a smartphone holding station. But it works fine as a table top mobile holder. This project is meant for adults or college goers. Kids a strict no no.

You can limit a child's participation in decorating the piece after all the cutting.

Here is how I went about it.


What you need for the project:

-- a plastic bottle that can fit in your smartphone or cordless phone


-- craft knife

-- marker pens - thick and fine tip

-- paint pens of two colours

-- the plug or adaptor of your mobile charger for dimensions

-- optional - a pair of scissors

-- optional - embellishments that stick well on curved plastic (multi surface glue otherwise)


Start by thoroughly washing the bottle and drying it.

Next step, look for any available contours and mark out with your marker pens. My bottle was in the dark chocolate shade, which is why I picked up a gold colour and a bright red paint pen. But use the fine tip marker pen or a ball point pen to mark out for cutting.


Make sure to give it an arch-cut on the rear side and a straight horizontal cut to join the arch from its front side.


To ease your cutting process with the knife, mark out on the sides along the curved contours.


I am not a pro at cutting with craft knives. And you can see it in the way it got cut. Be careful with the blade of the knife. A destroyed bottle is any day better than a cut finger.

I flipped while cutting along the marked contours. And made use of the red border on the bottle sticker instead.


Here it is - the cut bottle. If you are a pro at it, the arch behind can become a smooth one, easing into the bottle's front portion.

The cut is not accurate, but who said you must get it right the first time?

I added a slit on the arch, with the hope of letting it hang on the plug while the smartphone sat in its pouch. And that is where it did not work out. The smartphone with the plastic pouch got too heavy to hang from an adaptor or charging plug.


So I let that be, and proceeded to colour away using the paint pens. This bottle did not have a removable sticker. The product label looked as if it was printed on the bottle. I did not want to mess with the embellishing part further, and simply chose to colour it.

Here it is after about two coats.


Using paint pens on this plastic needed several coats. When you colour with the pens, it is likely the print beneath smudges or mixed with the paint colour. Make sure to blot the pen into a tissue paper each time it happens.


Let the paint dry enough after each coat. At some point you realize the coating must stop. My bottle finally shone.

Paint the rear side of the container.


You can use sticker embellishments, but make sure to add in some multi-surface adhesive. Run the paint pen along the 1 mm thickness of the container in gold or red. Let dry for a while. And your smartphone holder is ready. My cordless phone fit i perfect in the piece.


When you do not use it for mobiles on your desktop, the container can double up to hold pens and pencils, and tools such as the craft knife.

If your bottle has a sticker, soak it in soapy warm water overnight, clean out the sticker label, scrub and rinse it well for use later.

Use this on your desktop or as a stash.


Pictures courtesy: Radhika M B


For reuse of content and pictures, write to: radicreative@gmail.com

Tuesday, May 10

Barrette clip and key chain charm with plastic bottle

Ever wondered what to do with a barrette hair clip whose decor element has fallen off? At times we wish that companies that made such fragile pieces learnt a lesson or two from vintage accessory makers. 
I bought a bunch of barrette clips and I have a few at home that look like boats lost in the sea. 
A large soda bottle that we bought recently for a family do got me started. I had a key chain, with its charm broken.
So the bottle worked for a two in one project. This one must be done in the absence of kids. At best, you can do this with a teenager.
Among the materials you need is of course a plastic soda bottle.


The other things you need:


-- tacky glue
-- paint pen
-- barrette clip - a piece with decor that has fallen off, or a bare new one
-- key chain with no charm
-- multi-surface glue
-- a pair of scissors
-- a craft stick 
-- sequins to embellish
-- small hole punch
-- jewellery plier
Wash the bottle thoroughly and dry before you begin.
You need to use a plastic cutting shear for the project. Using a pair of scissors that you have set aside for cloth or paper would affect the sharpness of the tool.
Cut part of the bottle.

You will notice the curve on this bottle that may vary from the bare clip's curve. A larger sized bottle is a better option than a smaller sized one, to help set over the barrette clip's arch. Cut a smaller piece from the bottle. But before that, measure the barrette clip against the bottle.

Jpeg


Cut a piece from the bottle to hold the clip in between, with a half inch space between the edge of the piece and the clip.

Jpeg


Optionally you may light-swipe the edges over a lit tea-light to give them a finished feel.Glue the clip to the piece with multi-surface glue and press hard.

Jpeg


If the difference in the arch of the bottle piece and clip is a problem, place a heavy object over the barrette clip. Leave it aside for at least half an hour so the glue sets and dries.

Jpeg


I meanwhile picked up another piece that I cut off from the bottle's chassis. And ran its edges over a tea-light.


Jpeg
The next bit, was to punch a hole in the piece that roughly resembles a water drop.


Jpeg

I then fixed a large jump ring to this hole, and connected it to the key chain using a jewellery plier.


Repurpose your large plastic drink bottle + key chain DIY

Before fixing it though, I doodled with my gold colour paint pen. The key chain with its charm is ready for use.


Plastic bottle upcycle, recycle, repurpose, re-use


The barrette clip with the bottle piece almost dried.

You will need some sequins to embellish the piece using tacky glue. The picture here shows it yet to dry. It could take a whole day or two to completely dry.


DIY Barrette clip from soda bottle


The pieces I made can go with dresses in white, off-white, golden or mustard colours, greens and yellows. I set aside the bottle's mouth for use on plastic sachets later. 

For now I dream of making use of every bit o the plastic. The bottom half I hope to use as a pen stand soon.

This project needs some patience. But hey, the plastic bottle did not go into trash. The other half of the plastic bottle I have preserved for making another item. Am currently Pin-storming on Pinterest. Yeah, Pinterest can make you addictive:)


Pictures courtesy: Radhika MB

For permission o re-use pictures or content, write to radicreative@gmail.com