Showing posts with label Bookmarks. Show all posts

Monday, October 3

Make your own cardboard stencils

Stencilling as an art has gained momentum in the recent years. The creative form that bore the burden of disregard as an uninteresting one, is today the toast of interior decorators.
At home you do not have to invest on expensive damask or chevron stencils if you want them on smaller objects that get get a new lease of look. Grab the cardboard of household boxes and get started. Go for easy to make designs. Intricate cuts are for experts. And think of how little objects can be used.

You will need:

- household products cardboard, plain and pieces with packing slits

- a pair of scissors

- marking pen

- used 3 D or thick stickers or collants

- pen knife or craft knife

- small hole punch

- bangle

- cardboard strip of dark colour

- craft paper or construction paper of light colour

- some brush pens, or stamping pad with paint sponge

- colour pens or pastels


For my little project, I pulled out a flower shaped sticker from my stash of used 3D stickers and outlined it on a piece of product cardboard.

Next on, it was about carefully cutting the shape off with a craft knife. I used this on a sheet with brush pens to colour away.

You can also use paper punches to create some stencil designs.

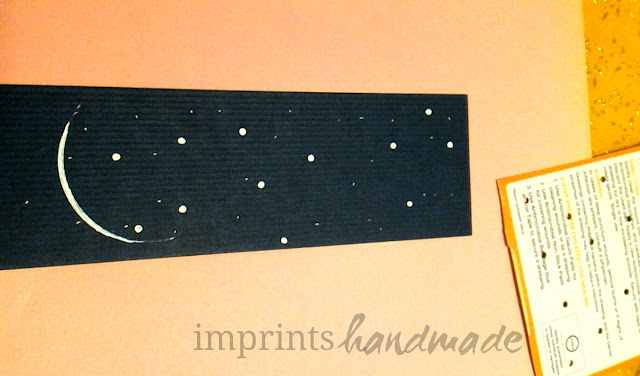
I used a small hole punch on a piece of cardboard, to create random small holes.
I the placed this cardboard on a royal or navy blue strip of cardboard to create a design for a bookmark.


It was stars, and a crescent moon. I used a bangle to get the shape of the moon right. And dots with a pen to create a night sky.

If you get cardboard with pre-punched shapes to hold a product, you can utilize it to make other designs. 
The piece I had was useful.

I simply coloured inside it's top slit shaped like a plate with a bun, randomly over paper.

And added some stars. They look like flying spaceships. If I had added folk motifs, the design would get a rural touch.

For the festival season, you can wrap gifts in these papers or reach a kid to experiment with designs. Find everyday objects to try.

Pictures by Radhika M B

Write to radicreative@gmail.com

Friday, September 4

Bindi Packet Keepsake or purse photo-frame

Imprints pals, we are back. Starting off with something simple.

Did you know that the bindi, bottu or pottu that is so much a part of us Indian women, is not exactly confined to India alone? It is worn in India, Nepal, Sri Lanka, Pakistan and Bangladesh. Of late, the trend of Western celebrities wearing it has become the topic of chatpata debates in the online world.

But to think of it, this dot between the brows has gone places! I was amazed to know that in history, Chinese women wore a form of bindi, to decorate their foreheads. Only, it was more floral.

Apparently there are communities in Africa that use tattoos on their foreheads too. Is it not wonderful, that the little dot that was once a sign of a single culture has found existence elsewhere in the world!

I do not wear it on a daily basis. But when I wear something desi and grand, I love wearing the dot, big and bright.

Sticker bindis are the trend today, a long way from those Shringar and Eyetex chand tubes of liquid our moms used, and still long way from the skillful smearing of kumkum by our grandmas.

The question is, should the sticker bindi packets stay too? I would say, do anything to keep them away from landfills.

While I wait for some superbrain to design a more eco-friendly bindi packet, I look for ways to keep out of the trash can and eventually landfill. Here is the keepsake idea I worked on.


You could stick in

  • a picture of your favourite people or your wedding snap,
  •  a favourite quote or simply tuck in more stickers.

Still better, throw in a post-it slip that you need to preserve.

This keepsake works superb for wallets and purses that do not have an in-built frame in them, and complements those that do. Alternatively, you could place it in a book as a bookmark, or pin it up on your office desk (so that it does not leave a hole on the actual photo in it).

Please note: the above picture I have used for representation only. There are photo edits in this, to morph faces of people, and brand name of the bindi packet.

If the brand name is some pics, it is inadvertent.

Among items you need for this quickie project, are of course the used sticker bindi packets.


This is how it works...the plastic sheet front flap of a sticker bindi packet works beautifully to give it a photo frame feel.

And we're gonna exploit just that.

The super quick procedure can take less than 10 minutes with all that you have.


You need:

- a plier or something flat to remove the staples in the packet

- a pair of scissors to trim your picture  or the piece of paper with a quote

- glue

Optional items:

- sandpaper to remove any exisiting gloss while gluing the smaller flap to the packet's rear


- Stickers to embellish


Before you proceed, make sure  you remove the staples from the packet


You could use an old ice-cream stick or spoon too for this. Use the same tools to flatten out those visible holes. If the staple holes are visible on the packet's front side, you could use tiny stickers to cover up. Just a judgement of aesthetics there.

Next up, what are you waiting for?

Go on, cut up a keepsake picture from your old photos stash, or cut out a quote...

Just make sure that the picture or paper you fix, is large enough to fit the rear flap. Also, position it so you see the portion that you want to see through the plastic frame.

Once you finish gluing the picture in, remember to glue the flap behind, to the packet. You may notice in some cases, that the packet's rear is glossy.

Here is where sandpaper comes in handy, rub it a little on the area of the packet where you must glue the flap on.


I was in the mood for kitsch big time. So here it is, stickers from my stash that became a collage. 


Here is also an example for a wedding pic. Sorry folks, have blurred out our faces on the wedding picture here.


I love books...and found a cartoon very endearing. So here it is...another option...


Go on, improvise with what you have. Write in and mail in your own versions...you can use bindis to embellish too.

They fit perfect into that party clutch of yours, or a wallet. 


Just make sure they do not enter the dustbin.


Pictures by: M Radhika

For permissions, write to: radicreative@gmail.com


Thursday, January 31

Paper weaves: Woven bookmarks

During Christmas season, I found an excuse to save up coupon mail trash that I would not use for shopping.

Here's what became of some of that trash.

Recycle paper woven bookmarks


Bookmarks! Of course it had to be bookmarks! My creative cells overwork in that direction! For starters, let me tell you that if you want to make these, load yourself with super-patience and more patience.

On the surface of it, this process looks cool - cut strips, weave, and stick. But if you want neatness to show, you have to be slow. And steady. And not lose hope when things go wrong. Most of all, do not expect perfect pieces to turn out. Sometimes you may have to trim and chop till the pieces fit into a pattern.

Here is what you need for a start. AD FLIERS!

Mail trash for recycle

Much to the consternation of my husband, I save up a whole lot of these. And they come in handy in the most unusual of ways when I make bookmarks.

The Thanksgiving - Christmas season had a lot of reds and greens in these flier books, to my delight!

paper, knife, scissors, ruler for paper weave bookmarks

What you see in the picture is basic. I have a paper trimmer which may be hard on your pocket. So to substitute, you may use a thin ruler. This wooden ruler could cause some mess as it is thick. If you get plastic rulers that are thinnish, good. What is not in the picture, is some glue that you may need.

weave from coupon mail trash
These are pre-cut strips from the coupon mail trash. Alternatively, you could cut out strips from magazines, ideally in accented colours. Sometimes you may get the same page in a family of colours. And that works well for a good pattern in weaving.

Once you cut off strips from the cardstock or coloured cardboard, you need to

  • draw margins on the longer sides of the piece, leaving a 0.5 cms gap or one fourth of an inch
  • cut slits between these two margins, about one third of an inch apart, lesser or more depending on your choice
  • this takes time, because when you make the slits, you need to make sure that the thinnish and glossy flier paper passes through without tearing
  • ideally choose thick cardstock

Once you are finished with the slits, choose your strips from the pre-cut stash. Check for their width. They must fit well into the width of the slits.

Next step is simple.

Weave.

You will have left over strips protruding from either or both ends of the cardboard or paper.

Trim them enough to stick them up near the last slit on either ends.

Here is how my bookmarks turned out.

Paper weave bookmarks

You get plenty of white strips from coupon mail. Here, I used white with chocolate brown, besides using some orange-yellow-black strips from Halloween ad-fliers.

woven bookmarks

woven bookmarks

Greens and reds, are from the Christmas mail stash. Over to pale browns and coffee coloured strips.

Woven bookmarks

Notice, that Halloween colours have come in handy here too. Some red strips from Christmas season made their way to this set.

Once you are done with the gluing and trimming, make sure you erase the pencil marks that you made for the margins on the longer sides of the cardstock pieces.

paper woven bookmarks

 The trouble I have had with this cardstock set, is that it is not as thick as I would want, for a woven bookmark.

Am hoping I can laminate this set someday. And am hesitant to give it a coat of Mod Podge, as the paper strips are too thin.

Any ideas what to do?

Picture courtesy: Me/ Radhika M B
For permissions, write to: radicreative@gmail.com

Monday, January 21

Rangolis on my bookmarks

My love for rangolis on bookmarks continues.

I am a non-traditionalist. Certainly not the kind who washes the doorstep and decorates it with rice flour everyday. But I love the universality of rangolis, with their focus on the center, and expanse from there, the importance of dot...in creation, in design...

This time, I also tried out design inspired by Chittara, the rich folk art of Karnataka.


Rangolis, that adorned the doorstep and verandah in my grandma's home...rangolis, that changed with the festival and season in front of the doorstep at my parents' home.

The material did not have to be much...


This cardboard was what I saved from an earlier purchase of household repair threads. 

Some sandpaper...


And cardstock, known in India, simply as cardboard, with some cutting tools and glue.


I glued the sandpapered  cardboard to the deep blue cardboard, after cutting to a required size. When it comes to cutting the household cardboard, I am really not bothered about a standard size. It is because I want to use every inch of the material possible, instead of trashing it.

That is intrinsic to handmade crafts probably. And I like the lack of identical results.


And after enough gluing and trimming, I used white paint with a size zero paintbrush.

Here is how it turned out:


And here are the bookmarks with Chittara influenced design.


I read about Chittara art, and love the intricacy of this art, though I would not want to agree with its feudal origin based on caste.

Am hoping to use more of it in my other projects.

Try the designs yourself, and you will love yourself for not trashing household cardboard.


Pics Courtesy: Radhika M B
For permissions to use, write to: radicreative@gmail.com

All pics are watermarked.

Thursday, November 29

Cute kiddy costume bookmarks

Have there been times when a pile of ad-fliers got thrown around home for no reason? You had to toss them into the basket, but wondered what else could have been done!

Out here in US, that weekly mailbox flood of coupon fliers from local stores is a routine. Their volume and weight vary with changing occasions. And piles of fliers get heavier during the halloween-thanksgiving-christmas season.

Ahead of Halloween this year, my mailbox got full too, with some fliers of party stores. Cute pictures of kid costumes. I have not much use of them, as I do not have kids. Even if I did, am not sure the idea of all those cute but expensive costumes would draw me to the store.

So, I did what comes best to my head. Made bookmarks using some of those pictures.


It was not so much of an effort, considering I had supplies ready.
  • a pair of scissors, glue
  • felt pens, of the colour of paper that had to be used
  • cardboard from cartons of products that I buy
  • wooden beads, paper punch and yarn to match
  • most importantly, pictures cut out from coupon mail or ads 
First step, cut the strips or blocks of the pictures from the main flier.


Get to work next, with each of those pictures. Choose individual pieces that have minimal or no pricing prints on them.

Here, they resemble stickers that you buy at a bomb of price from stationery and craft stores.

If you do not make bookmarks, consider using some double-sided tape on their rear so you can use for some other projects, or simply stick them up on your kid's shelves and storage boxes.


 I love the `prisoner' costume at the bottom of this picture.

I cut out enough to store for later use. After all, it is not all times of the year that you get such pictures on fliers!

I cut some cardboard from cartons to size, sand-papered its glossy side, stuck brown craft paper on its sides for one bookmark, and patterned `tablecloth design' paper on the other.

I also made use of a heart shape that I had cut out from a used gift-wrap or wrapping paper.

Next step: Stuck the pictures up, and used felt pens to touch the bookmarks up. I used the paper punch on one of the two bookmarks, and strung some thread into a bead for its `tag' feel.

Here goes another picture.
That's not all,

I used another picture, of a baby, that I had cut out from another ad, to make the following bookmark. This one can be used as a gift tag too.


Try this using pictures you see around home. It only needs some patience, the paraphernalia apart.

For use of pictures, write to: radicreative@gmail.com

Photo courtesy: Radhika M B