Tuesday, January 31

Foam flowers for multi-use: DIY

We all get drawn to things floral. Flowers in vases, in paintings, on clothes, in the gardens, jungles...probably it's the innate pleasant memory emanated by flowers, that fascinates artists and perfume makers alike.

My friend Umme Haani, who sprung a surprise with this bunch of beautiful foam flowers, was gracious enough to share details of her project. This is not a full fledged piece where you make a décor piece or art end to end. It is a set of flowers made with glitter foam and embellished with sequins, that you make and keep aside for future use in either craft projects, decorating the walls or doors, or stick to barrette clips and decorate your little one's hair.


Haani lists out the materials needed for this little project made using multi-surface glue.

What you need:

-- Scissors
-- Glitter foam sheet
-- Fevi kwik
-- Beads
-- Newspaper
-- Iron (to get the embossed look in flower) 

She explains the steps in detail:

Firstly, draw five tear-drop shaped petals on a paper and cut them. Then trace the petals on to a foam sheet on the plain side or surface, and cut them out. You get five foam drop shaped petals.


At the narrow end of the petal, bend the corner in such a way that the rest of the petal bulges a little. Place a foam petal in between two sheets of a newspaper. Now, heat the electric iron to its maximum and place it on the newspaper carrying foam petal for three seconds. The petal will curve, resulting in a blooming shape. Repeat this for the four other petals.


You can now shape the petal as seen above. Turn the petal to its plain side and apply super-glue on the side of the petal. The glue should be used on its narrow end, to resemble a flower's center. Stick the narrow end to another flower petal's curved narrow end, and repeat the same for all the petals.

Lastly, apply Multi-Surface glue or super-glue, and place a bead at the center of the flower to embellish. Your foam flower is ready. Make a whole bunch of these flowers.


These flowers can be used as wall decoration or kept in a vase or can be stuck to children's hair clips and hair bands. You can make them in different sizes, and use them to simply throw on a party centre-table.


This is a safe project to do with children. Here, Umme Haani has placed the flowers over a plastic plate, adding zing to the look. Does it not look attractive for a party table?


Pictures courtesy: Umme Haani

Content: Umme Haani and Radhika MB

Monday, January 23

Silhouette wall decor with household cardboard


Try as we might, household cardboard overwhelms us like nothing else does. It's so invisible, but difficult to discard. It's messy, and seemingly essential. Among the many uses for household cardboard is how you can make quickie silhouette wall decor. Frame it, or stick it up the wall or hallway door, cardboard decor is not just inexpensive, but earthy and authentic too.

I had some boxes that came with shirts and baby frocks in them. And it got me thinking, if we could maybe just avoid trashing them right away. I am not so happy with the result, but it sure is something you can try at home, can find easy to modify to suit your needs and decor.

What you need as basic for the project is household cardstock - which is plain or patterned paper.
Besides, keep the following handy:

-- household use cardboard that needs to get trashed

-- a pair of scissors

-- craft glue

-- string, or burlap ribbon, or satin ribbon

-- wool, if need be

-- old newspapers

-- a rag cloth

-- a pen or pencil to mark and draw out sillouettes


Start by drawing silhouettes of your choice. I looked up the internet to find umpteen shapes of birds and animals, sometimes inaninimate household objects.


If you draw on the thicker cardboard, there is no need to add an extra layer or stick more cardboard to it for thickness. However, if you use patterned paper, try increasing thickness by adding a layer of cardboard to it. Use your pen or pencil to draw out shapes. I chose birds for a start, as something about flying birds appeals to me no end.


I made a bunch of vector shapes. Different bird silhouettes, a lion silhouette, a birdhouse, and the likes. If you have a cardboard that is design heavy, fret not. You never know how the final product will turn out.


For the next step, you can always pick up satin ribbons that are somewhat wider. I had some jute or burlap ribbon and cut it in the middle, to bring its width down. Stick the silhouettes up one by one. Remember - burlap or jute is porous, so the glue will bleed. Keep some newsprint beneath its surface.


If you notice, the size of my silhouettes are smaller than you would expect.Try diffeerent thicknesses. Let the glued pieces dry. If you notice bending of the cardboard, put it all up under a bundle of books so that the cardboard flattens out.

And lo, your cardboard silhouette is ready.


You can get artistic and use your imagination for the silhouteets when you stick. This is not just a classy piece, but a convenient alternative to temporary decor and during events such as baby shower.


Pictures and content: Radhika M B

Write for permissions to reuse: radiscribe@gmail.com

Tuesday, January 17

Use leaf cups to make jelly fish party decor

The most vivid of memories at my grandma's home during my childhood, was how we ate upma and curd rice on leaves that we just picked off the almond tree or badam tree in our compound. We also had sal leaf plates that were used for meals. I am glad to see their remnants still around in the form of small bowls used mostly for religious rituals and temple prasadam (offering). We have heard a great deal about decor using paper plates, cups , bowls, and the like. These leaf bowls can be used for similar crafts. 

I made jelly fish decor that can be used for a party, to brighten up a corner or simply adorn a window.  It does not take much effort. What you need to keep in mind is about the kind of colours you would want to show in the the end. Make up your mind about whether you want a classic look, a fun look, or simple look. I started off wanting to use wool extensively for the project, but abandoned the idea midway.


What you need for the project:

-- leaf bowls, used or new. If used, make sure to wipe their inside clean

-- a needle to poke hole in its centre

-- wool of two or three different colours

-- craft glue in plenty

-- some twine or thick decorative thread

-- a wooden ring, about one inch thick or old tiny bangles

-- a pair of scissors 

-- keep handy some burlap or jute cloth, chenille stems, etc, if need be

-- gift wrap tissue paper or kite paper of two or three different colours


If your leaf bowl is a used one, start off by wiping it clean. Poke a hole in its center using a large needle. Use a pen or sharp pencil to widen the hole a little. Now turn the cup for its inside to show.


Squeeze a dot of glue about an inch off the poked center. And use your finger to knudge the wool thread to form a little circle. Drop more glue on it. Cut the thread at about one feet. Use your fingers to knudge and stick more such wool pieces.


Midway through the project I realised that the wool was not giving it the zing I needed. So I cut some kite paper or gift wrap tissue paper into narrow strips, about one fourth of an inch wide. I folded them in their centre, gave each strip a little bend, glued it first between the folds and then on to the bowl, alongside the wool ends that were stuck.

Use more strips. Let this lot of glued in strips and bits dry. Use the cold setting on a hair dryer to dry it quicker.


After this, grab a small wooden ring, tie a piece of twine or thick decorative thread, and insert it from the inside of the bowl where you have all the stuck up pieces on to the other side.


Knot the inserted thread to firm it up. This way, when you hold the piece by this thread, the leaf bowl that is somewhat more delicate will not tear or bend. Instead of kite paper you may also use satin ribbon.


Tie up the ends of the left-over thread, and let it hang from a window corner, or hanging hook. It is something you can work with your young kids. It's simple and easy to make, although it cannot manage the aesthetic of jelly fish.


If you want to get a classic look, buy some gold colour satin ribbon and stick it up the way your threads and paper came in handy.

Pictures courtesy:Radhika M B

For permission to reuse, write to radiscribe@gmail.com

Tuesday, January 10

Use hole punch waste for decor DIY

During a recent visit to my neighbourhood photo-copying store, I went crazy when I found a heap of hole punch waste. It was from an industrial grade spiral binding machine, which the store used for commercial binding of academic papers, college notes for students of a college nearby and more. Never till now did I realize how much paper waste our mere act of punching a paper with the paper-punch brings about.

I requested the store-owner for a piece of waste paper, and packed a handful of this, something that I know can be used as party confetti on a later day.

Here are two simple things you can make out of such hole-punch waste. Hole punch craft is not as popular as the more captivating shapes-punch craft (such as birds, trees, flowers, Christmas trees and borders). But try it, and you will realize you do not need to spend big money on interesting crafts.


What you will need for these two pieces of craft-art:

-- a pair of scissors

-- punched paper dots or a paper hole-punch with colours that you want

-- a piece of wrapping ribbon or thread 

-- some gift wrap tissue paper with a small gift that you plan, I used a small notebook

-- cardstock of A4 size or less in the colour of your choice, I chose brick red

-- some acrylic paint in either green, black or dark brown colour and a paint brush 

-- craft glue in plenty

-- optional is some colourless duct tape for packing your gift

-- also optional is a tweezer and tissue paper


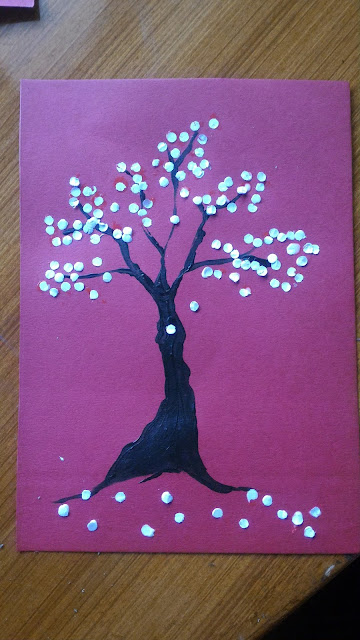
Pick cardstock of your choice, in the size that you desire. An A4 size sheet is ideal, but you can go for a smaller one too. Squeeze out some paint and use the paint brush to draw out a tree on the cardboard. Trees are universal, and as decor elements, they rock.


I used Olive Green, but it turned out looking more black on the brick-red/maroon background, which is great because of its earthy element. Stick each punched dot along the tips of the branches, to create the overall look of leaves on the tree. How many you plan to stick is up to you, depending on how full you want the tree to look, or how sparse the number of leaves you need on the tree to be.

'
Stick some dots randomly at the tree's bottom, to create the illusion of fallen leaves and give it the element of separation from ground. If the dots do not stick entirely, let them be, so you get a three dimensional effect. Remember, sticking may feel like the easiest thing in the world, but needs lots of patience. If you want to keep a tweezer and tissue paper handy, do it.


 For the second piece, you need to pull out the gift wrap tissue paper or kite paper, pack your little gift with transparent tape using the scissors that you will need for cutting the paper to size. And tie the piece up in thread.

 
Squeeze a little glue on to one of the corners and pour some punched dots over it. Once they stick, tilt the gift to let the rest fall off. You may stick some more glue, to add more dots. It gives an informal party-like look to your gift wrap.

 
Your two little pieces are ready for use. You may try to engage your kid in a stick-and-make project and keep the young one occupied an entire afternoon. Put the wall decor piece up on the wall after framing, and pat yourself on churning a thrifty decor piece, or pin it up over the desk.


Pictures and content courtesy: Radhika M B

For permissions write to: radiscribe@gmail.com