Showing posts with label Leaves. Show all posts

Saturday, November 21

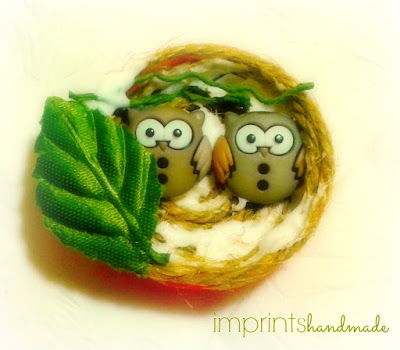
Owl nest fridge magnet with plastic bottle cap: a nest on my fridge

Owls are my favourite birds. Contrary to what I heard growing up, owls are wise, and that I say in the affirmative.

On an earlier visit to the crafts store, I chanced upon owl buttons. They found  their way into my cart with no reason to be bought at all. Today I put them to good use. I built a little nest for them in a plastic bottle cap. And made them sit on my fridge door.

Plastic bottle caps that we mindlessly throw away can come handy in a million ways. For the little owl nest, it was a large red plastic cap that made a perfect bowl for the nest.

The materials you need for the project are available easily, except for the owl buttons. You can opt for small owl stickers, stick them up a card board and cut through the shape to give them the 3-D effect, or simply buy 3-D stickers.

Here goes the list:


Things you need to make owl nest fridge magnet 

-- Owl buttons
-- a self adhesive magnet
-- plastic bottle cap
-- a pair of scissors
-- jute or burlap twine - one thick and one thin
-- cloth leaves that you get from craft stores for flower making projects
-- a tweezer to nudge the twine into the cap properly
-- straw or stirrer to use tacky glue
-- tacky glue

Jute rolled into disc for bird nest plastic bottle cap magnet

Roll the thicker twine into a disc that's enough in size to fit into the bottle cap. And glue this into the bottle cap. Use enough glue.
Tacky glue on plastic bottle cap recycle magnet project

Tacky glue with jute twine in plastic bottle cap

Now pick up those owl buttons or 3-D stickers and glue them on the disc, a little above half of the cap.
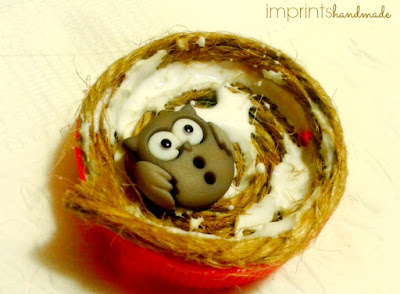
How to make a bird nest magnet for your fridge

buttons craft + DIY owl nest magnet for refridgerator

The flowers project leaves usually come with a wire attached. You can cut this wire and add randomly into the glued area, and fix the leaf on the bottle cap edge. The leaf can also go in before the owl buttons do, so you can nestle them on it. 

repurpose bottle cap to make it yourself fridge magnet

Add more pieces of the jute or burlap twine - thick here, thin there...you can also pull out strands from the pieces to stick randomly and give a mish mash effect. Images of owl nests I came across have mostly been with twigs. Here I have mounted the glued owls on a large twine roll.
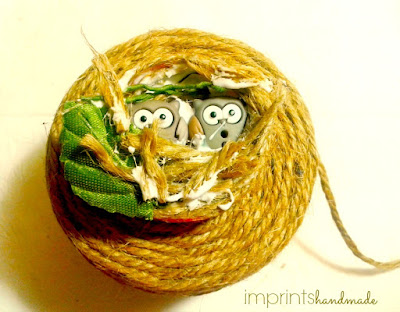
Burlap kids craft project +DIY owl nest fridge magnets

Let the piece dry out a little. And add the self-adhesive magnet. If the adhesive does not stick well, glue it with tacky glue.

Back to nature craft + Green craft + recycle repurpose reuse

Here they are, the owls, drying out in the bottle cap nest.

Green craft + plastic and jute with owl buttons fridge magnet

They acquire a different glow, almost Christmas tree like, when an LED bulb shines on them. If you want to quick dry them, try using a hair dryer in `cool air' setting. After an hour of drying, the piece is ready to sit on my fridge.

Owl nest fridge magnet easy crafts

This little DIY piece makes for an excellent gift that you can stash into an old earrings box and give away. You can earn those `recycled' stars with ease among peers. Get your kid to do this for a school crafts project. Or simply enjoy its beauty on your fridge.

If you do not have owl buttons or stickers, use tiny pebbles that look like eggs, or oval beads of plain colours. Enjoy the company of your new friends.

Pictures courtesy: Radhika M B
For permissions to re-use, write to: radicreative@gmail.com

Copyrights: Radhika M B

Wednesday, September 30

DIY Ganesha to go green this festival

Every year brings heartwarming efforts on the part of devotees to worship their favourite elephant god by respecting the earth that nurtures us. Every year brings heartbreaks too, when visuals of post-festival idols turn garbage of toxic proportions on our beaches.

The silver-lining - over the years, I see more interest in the effort to stick to unpainted clay Ganeshas, or to innovate with other materials.

Here is a quick round up of this year's efforts, as Navratri grandeur approaches soon.

My friend Hema Sampath, who misses her trips to Lalbaug Raja every year at Mumbai, continued her personal tradition of Ganesha worship this year. She dunked the painted Ganesha idols, for a homemade one.


``I had the clay in my fridge. I had kept it for my craft work. It came in handy for my Ganesha instead,'' says Hema, who loves lord Ganesha.


Creative in a lot of things herself, Hema is a super-busy mom to a beautiful one year old, who still manages to find time for craft ideas.


The deep blue box you see below her altar shelf, is not actually a box. It is a rangoli coaster that she uses to decorate the altar.

Worship has to come from the heart more than outside it, which is why one needs to set aside the conventional love for big size. In Mumbai, it can be a challenge, with the entire city and its outer cities turning the streets into Ganpati party zones, and large idols making the atmosphere euphoric during the nine days.

Still, a friend Sridevi Appari managed to do just that. All she needed was about half a kilogram of turmeric and water.


The result is divine, earthy and attractive at the same time.


Notice how a couple of vases with flowers add to the profusion of colour even more. And how the oleander strings sit comfortably on Ganesha and the kalash.

Sridevi's mom had such a Ganesha too, in a larger size. And needless to say, their steadfastness to stay green inspired TV coverage by a Mumbai TV channel. Here is how her Ganesha looked before the pooja.


Turmeric was what I used too, in my own personal tradition, of not buying the festival idol. I did not indulge in creativity to make the idol - just stuck to making the turmeric cone that is used in other festivals for a token Ganesha pooja, with some besan (chickpea flour).


Notice the little turmeric hill on the beetle leaf in this plate. A packet of flowers and some grass from the garden outside. And I was comfortable to go.


Those yellow circles with kumkum to decorate them, are symbolic of the lord's clothes. The bead-like cotton encircling is to symbolise his sacred thread.

I did manage to make a super quickie umbrella.


This one, is made with the end of a plastic garlic net bag, a bamboo skewer, some dried bamboo plant leaves, and rice in a brass crush bowl. Another flower to top it. The umbrella is integral to many households where people make it using cardboard. As the story goes, after all the war, Ganesha went for a stroll on his mouse, belly full and an umbrella on hand. And the moon laughed at him.

The rice went into our bellies later, while the leaves went back to soil. As for the net, it hangs around home for another use, perhaps in some other craft project.

I do not have a better picture of this, but it looked a lot better during the worship.


A chunk of my extended family still sticks to picking up paint-less Ganeshas a day or two before the festival. My own experience in Mumbai when I lived there, was their complete absence in the sea of painted idols.

An option when you get an idol that is not painted, is to add some decor element to it yourself.

My schoolmate Sujatha Ratnala and her family did just that. They got their idol through an NGO that makes, sells and teaches to make eco-friendly idols - To Make A Difference.


``They charge less than 50 per cent of the market rate. And they deliver it at the doorstep, just to save lakes,'' says Sujatha, who has been picking up these idols from them for the last four years. This year, nine of her neighbours got them too.

As for giving the deity a personal touch, she got her son to paint it a little.


The family used muggu rai - or the chalk used in millions of Indian homes for home rangolis. They dissolved it in water and the boy used a paint brush to decorate the idol.

Other embellishments around home came in handy.


``The crown, we had from earlier festivals. And the cloth too. For the forehead, we used a beaded rakhi,'' says Sujatha. As such, such crowns can be found in many religious shops.

A small piece of white cloth that makes for the dhoti, is a piece of Kerala dhoti tied using a string. She cut the cloth to the size of handkerchief, and tucked the pieces in pleats to the string neatly.


The highest form of worship is when you offer yourself to God, selflessly and in spirit. I remember a beautiful Hindi poem at school, that talked of offering to God, the flowers on trees, as they were, without plucking them, and water from the oceans and rivers, without taking from them.

Being aware of the environmental hazards of toxic paints going into the water bodies, and defying societal frenzy by staying true to your heart are essential to one of our most important festivals.

It is heartening, going by the rising number of hits that the DIY Ganesha posts on this blog get each year, that as a population we have been taking interest in going green for worship. Wish we did that for every festival, every day worship, and every activity.

--

Pictures courtesy: respective owners or devotees -- Hema Sampath for the homemade clay Ganesha, Sridevi Appari for the turmeric Ganesha, Radhika M B for the tiny turmeric cone Ganesha, and Sujatha Ratnala for the NGO sell eco-friendly Ganesha.

Pictures have been used with permission from respective owners.

Any further use of the pictures requires permission from Imprints Handmade, and needs to attribute the use of these pictures, to Imprints Handmade. Copyrights for the pictures rest with the owners.

Friday, March 29

A paper-clip for my book

Am always amazed at how the ubiquitous paper-clip can become an ornament to adorn the book you are reading. I love books. And bookmarks. And the fascination that an unfinished book holds.

The moment when you are forced to shut a page, setting you off on an a whirlwind of imagination, of how the story unfolds further and what happens to those characters...ever felt sleepless after leaving a book half-read and agonized about it? Making bookmarks and fixing them there, makes that agony less painful.

The web is full of lovely tutorials and images, of paper-clip bookmarks. Needless to say, I have been inspired to make some for myself. All you need, is some imagination. The ones I have made and fixed pictures of below, are simple ones.


For the paper-clip bookmarks, simple as they may seem to make, I used:

paper clips

cloth flower embellishments from dollar stores

needle and thread

some tissue paper type gift wrap, or Kite paper

scissors and Mod Podge (you may use glue too)


Satin roses with leaves

This set of cloth flowers, roses at that, costs about a dollar per packet, and a little under its equivalent rupee price in India. You may get these, with the leaf embellishments, or without them.

The next step, is to knot up your needle and thread, preferably in colours that match the cloth flowers, and stitch up the back side of your paper clips.

paper clip bookmarks

After this, cut out a circle or oval from a tissue paper wrap to match the flowers. Alternatively, you may use stickers that are in the shape of circles.

paper-clip bookmarks

Let them dry a while, and the paper-clip bookmarks are ready! Paper-clip bookmarks come in a huge variety - with buttons, paper flowers, and a whole lot of other embellishments. I made a bunch of them that may end up as li'l gifts.

paper-clip bookmarks

I toyed with the option of using a satin ribbon on each bookmark to give the gift-wrap feel. But abandoned it in favour of this no-fuss look. You could try this with other cloth flowers too, or make flowers of your own with satin, and try.

If you have plenty of books and want bookmarks that are handy to keep in your clutch purse or wallet while travelling, these are an ideal bet.

They could be used just as they are meant to originally too - as paper-clips to hold your documents! With a dash of décor that is.

Pictures courtesy: Radhika M B

For permission to re-use, write to me: radicreative@gmail.com

Monday, September 24

Gift Wrapping got innovative : Part Three Li'l Somethings

When you gift a pair of earrings to a friend, it's always a box - ideally a cutie red one, with that velvet feel, that you fall back on.

What if you don't have a box? The ever-so creative Lalitha Menon shows us how. I have all the reason to name her gift wrapping ideas - Back to Nature!

See on and read on:


We would hardly think two shells from the beach and a bit of banana leaf would do it, wouldn't we? Actually, the leaves in question here are bamboo leaves. Lalitha picked them up from a Goan beach.  And here is how she wrapped them:


A ribbon-bow like fold...and some tape to stick it up. She also used toothpicks to fasten.

She says she used glass-paper to cover the little gift further. Glass paper is paper that has a layer of pulverised glass, according to answers.com. But it is also another name for sandpaper. 


Satin ribbons - white and violet, finish the touching up.

Here is what she gifted her new friends recently.


The gorgeous looking shiny paper used here is actually re-purposed invitations. And a piece of Kerala dhoti to wrap around. As for what was in the wrap, the picture below shows it, and the beaming faces of her friends tell you her effort did not go in vain.

The gifts are leather wallets in bright colours and lovely designs!

For the next set of gifts, here is the picture.

She did this ensemble for her best friend. The card standing with her words and balloony hearts stuck with ribbons, is actually another re-purposed wedding cards that were discarded.  In the Fabindia brown sachet is a handmade soap bar. She used hand-made paper bought from a mall near her home for the heart-balloons.

To the extreme left in this picture is a teak-leaf wrap tied up in satin ribbon. The gift inside, is a little jar of payasam or sweet porridge that Lalitha made. She wrapped a few white lilies in teak leaves and satin-ribboned them on an end.


The other gifts are glass bangles, and some sandalwood cream from Khadi. I am in no doubt at all, that her best friend loved them all.

Way to go Lalitha, and looking for more from your creative table!

Pictures Courtesy: Lalitha Menon

Copyrights for pictures rest with Lalitha. Permission for use of pictures and content is a must.


Wednesday, September 12

Gift wrapping just got innovative : Second Part, Leaf and fabric wonders

For those of you who loved the post about Lalitha Menon's creative gift wrapping that is earth friendly too, here is more from her loving heart, thinking head and quicky hands.

In my earlier post about her work, you saw how she used banana leaves, cinnamon and Inja tree bark to wrap her simple yet thoughtful gifts.

Here are pictures from her recent gifting:


The picture is self explanatory. A glass jar of payasam or sweet porridge made with vermicelli. A piece of banana leaf to seal the jar mouth better and the lid to top. With absolutely no need of any other gift bag or wrapping paper, she fastened a satin ribbon around the lid. Whew! Economical yet creative! And no hiding of the yummy payasam!

Now for the next one:


It's an exquisite soap bar from Fabindia. Guess what's its wrapping paper! A piece of a Kerala dhoti. Here is how she wrapped it.


She added, rather strung wooden beads in for some more decor.

You can imagine a hundred things that could be in the pictures below.

The huge leaf in question is a teak tree leaf. Cannot imagine the size, is it not? Just google ` teak tree leaf'. I was surprised by the amazing size these leaves could grow to.


Here though, the leaves available in her garden have been used to make a lovely gift wrap for, a shirt. Lalitha pinned their edges carefully with coconut sticks which are common in Kerala too. She then wrapped its middle with the piece of a Kanchipuram saree. Hanging roots from the teak tree served as twine to tie the package up. But what amazed me was how the guava leaf and some dried flowers served as such good embellishments!


The most unusual of objects, sometimes even aging leaves that fell off the tree, can be thrown in to give a dramatic effect for your creative output! There is of course that glittery ribbon to top the pointed ends, but I guess the gift wrap would have looked good even without it.

Now for more! What you see in the picture below is actually brown paper (yeah, it is neither white nor off-white) and a saree border to give it the feel of a folded saree, leaves from the garden taped to the brown sheet.

It has been used to wrap a book gift.


Lalitha used some more border, for a bookmark to accompany the book gift. I love this, because I believe every book deserves a bookmark.

Check out: http://imprintshandmade.blogspot.com/2012/03/saree-border-bookmarks.html
Here, she stuck the piece of saree border on to a cardboard, and used the purple satin to give it a base. On it's upper end, she has punched a hole to string the ribbon piece through for a bow.

Look out for more - there is a part three to this post too! Thank you Lalitha, for your creativity that does not stop!

Pictures courtesy: Lalitha Menon

If you wish to use the pictures and content here, credit to Lalitha's pictures and Imprints Handmade's content is a must