Showing posts with label Colours. Show all posts

Tuesday, May 9

Animal earrings in polymer clay DIY


Ever experienced the thrill of wearing something you made with your hands? It could be a dress, a cap, a necklace, a pair of earrings, anything...

Learning to make and appreciate the value of labour is the need of the hour in today's consumerist world. My friend and the ever-dynamic Sankgetha Sripathy who runs Smudgy Trove, has shared a tutorial of making cute animal earrings with clay.  She has used polymer clay to make the stud earrings that you can easily learn and keep aside for a toddler, teen or wear yourself to show off at a party. 

These simple pieces are conversation starters.

What you need:

-- polymer clay black, and white

-- super glue or multi-surface glue 

-- knife

-- jump rings

-- cutting plier (jewellery tool)

-- nose plier

-- black stud with screw

-- headpin (jewellery finding)

-- and of course a must for these projects, an OTG oven

It's best to share one that a friend has bought if you do not have one yet and do not want to buy right away.


Roll two tiny round balls from the black polymer clay, using your palms and fingers. Press one ball between your palms and flatten it slightly. Repeat with the other ball.


Roll two tiny white balls and fix on the flattened clay to form an animal's eyes. You can add a super tiny ball to fix near the eyes, for effect.
For the eyes, use another set of black polymer clay dots and fix to form animal expressions.


Poke using a headpin to form its mouth, a little below the eyes and between them.


Use another little mound of the clay to roll a cone.
Repeat for other earring. Flatten the cones a little to form your animal's ear.

Fix the ears on top of the animal head that has come to shape.

Now insert the headpins through another cone that you roll, bigger than those weeny bit ears and the face, to form the creature's body.
Roll tiny balls and fix below this body-cone, to form legs.


Go back to the head or face now. Roll two tiny balls and place under the head.

Bake these two pieces that are ready, separately in the OTG oven for about 15 minutes. Allow them to cool down

Time to take the stud, glue it using the super glue on to the rear of the face.
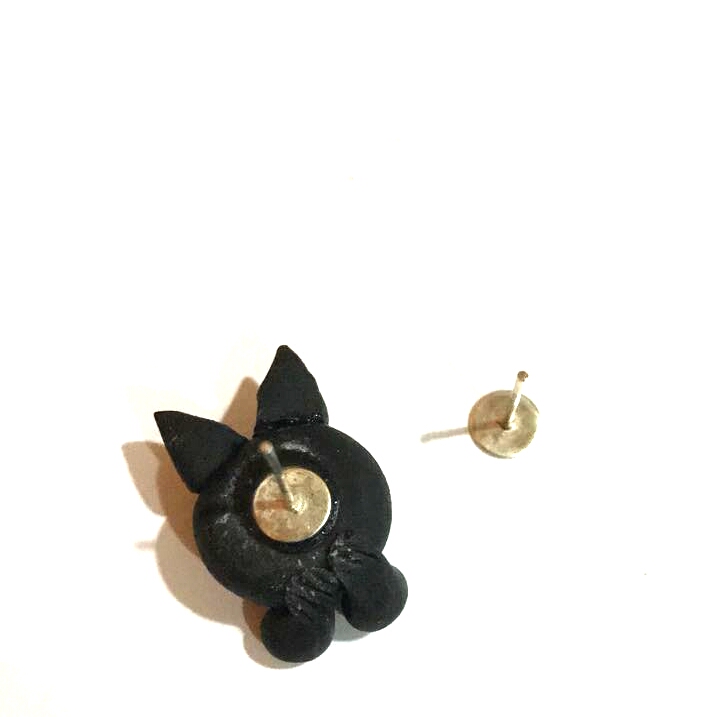
Repeat for the other earring too. Move over now, to the body pieces, where the headpin is protruding from the body. Use a nose plier and bend the piece that is jutting out, into a loop, towards the body. And then insert the stud through this. Use a stud screw to fasten to your ears.


The earrings are ready for use. You can experiment, and make them with animals of your choice, in different colours.


These earrings make for great personal gifts. They can be worn by teens and adults alike. And make for perfect gifts.

PICTURES COURTESY: Sankgetha Sripathy of Smudgy Trove

Content by  Sankgetha Sripathy and Radhika M B

Tuesday, April 4

Marker pens art piece fridge magnet DIY


If you have a fridge that can hold a ton of magnets, it is the best thing to rev up your dull day. Imagine thinking of that stew you want to prepare in the kitchen and drag yourself to the fridge, and a bright piece of art or travel souvenir magnet pops up on your face at the fridge door!

I discovered on the internet that you can actually make artistic fridge magnets rather easily. All you need is a bunch of marker pens that write or colour thick.

Here is a quick look at my experiment. I would give it a 6 on 10 rating for my first attempt. But I learnt a few things that would help you on the adventure:)


You will need:

- art canvas 5 inches by 5 inches

-- self adhesive magnet strips not more than five inches

-- a protective sheet to place underneath your working canvas

-- some cotton balls, or ear buds, paint brushes, rag cloth

-- a bunch of marker pens, of your choice. I used the Sharpie brand mostly

-- Rubbing alcohol..you get it in pharmacies

Optional is a glue gun or multi-surface glue


Start by scribbling the canvas away to your heart's content. Remember to fill all corners, and the edges where the canvas bends. Use more strokes if your marker is not too thick. I was more satisfied with my opaque colour marker.


Now is when your work with rubbing alcohol begins. Use an ink-filler or the cap of the alcohol bottle to drop a few drops on the canvas. Remember that you may take longer than you anticipate at this. Allow the drops to spread on the colours. Since it is canvas, it will dry or get absorbed more than it runs. Use a paint brush to blend the colours in.


You could tilt it at times to let the drops run. Or use a paint brush to blend the colours in, with circular strokes. Whatever you do, make sure that neither the paint brush nor the cotton take away colour from the canvas. You can gently squeeze the colour back on to blend areas on the canvas. Let the first round dry. And work on it again after it dries. Use your markers to dab, not with strokes, on white areas. Your choice if you want to leave the white gaps to show.


This is a process that took me about an hour. So if you left something on the stove thinking this is a quickie project, run and turn that thing off.

Once your art piece has reached a certain level of blending and you want to stop, leave the piece to dry for about 15 minutes. And fix the self adhesive magnetic strips to its rear. If the adhesive does not hold well, you can stick it with multi-surface glue or a glue gun.


Next step: Very important. Fix it on your fridge door! Or gift it to one special friend...

Tuesday, February 28

Coin purse with felt DIY

The hardest part about small change, is not finding it when you need it the most. Ever got mad when you thought you spotted coins around home, or in the handbag, but when the time came to pay a toll, or buy a toffee, you struggled?

I remembered making a Christmas tree ornament a few months back with felt. And thought of putting it to use again. The felt sheets we get in USA are soft, more of a cloth variety and easy to work with like fabric. And so I made a coin purse. I hope to make more of them, just to tuck them away in corners so I can stash away not just coins, but buttons, beads, twist-ties and more.


You will need:

-- a pair of scissors

-- some felt sheets, ideally one

-- embroidery skeins to either match the felt sheet or contrast

-- embellishments such as sequins, or cloth flowers

-- thread to match the embellishments

-- a marker pen

-- a pair of magnets or press buttons, or velcro tape

-- optional is a hot glue gun or super glue


Start by cutting a piece off the felt sheet, about five inches wide and 10-12 inches long. Fold this sheet into three-folds, in such a way that the upper flap is about half an inch or one inch lesser than the second fold. This serves as the flap of purse.


Where the second fold meets the first, mark with your pen.


Round off the corners of the flap. Use a matching coloured embroidery skein, and stitch up some cloth flowers on to this flap. Make sure you spare enough space to do the Blanket stitch.


You may use extra sequins like the flower stamen that you get from craft stores.


Start the Blanket stitch along the flap. Once you have finished with the flap, move to join the first and second folds on the edges using the stitch.


You need not use the stitch on the bottom of the purse.Once you have rounded off the Blanket stitch on one side of the purse edges, move to the other side. Your purse is almost ready.


Here is where you get those small magnets out, or maybe press-buttons or velcro tape. Magnets that I had were self-adhesive. So it was just about peel-and-stick. You may use the hot glue gun or super glue if you have no self-adhesive magnets.


Stick one magnet under the flap, and the other to pair with it on the purse .


Use this to hide your coins. If lying around your living room, it makes for a cute decor piece. It makes for a good pull-out for your vanity bag. Or a gift for your friends and colleagues.


Pictures and content: Radhika M B

For permissions to reuse, write to radiscribe@gmail.com

Tuesday, January 31

Foam flowers for multi-use: DIY

We all get drawn to things floral. Flowers in vases, in paintings, on clothes, in the gardens, jungles...probably it's the innate pleasant memory emanated by flowers, that fascinates artists and perfume makers alike.

My friend Umme Haani, who sprung a surprise with this bunch of beautiful foam flowers, was gracious enough to share details of her project. This is not a full fledged piece where you make a décor piece or art end to end. It is a set of flowers made with glitter foam and embellished with sequins, that you make and keep aside for future use in either craft projects, decorating the walls or doors, or stick to barrette clips and decorate your little one's hair.


Haani lists out the materials needed for this little project made using multi-surface glue.

What you need:

-- Scissors
-- Glitter foam sheet
-- Fevi kwik
-- Beads
-- Newspaper
-- Iron (to get the embossed look in flower) 

She explains the steps in detail:

Firstly, draw five tear-drop shaped petals on a paper and cut them. Then trace the petals on to a foam sheet on the plain side or surface, and cut them out. You get five foam drop shaped petals.


At the narrow end of the petal, bend the corner in such a way that the rest of the petal bulges a little. Place a foam petal in between two sheets of a newspaper. Now, heat the electric iron to its maximum and place it on the newspaper carrying foam petal for three seconds. The petal will curve, resulting in a blooming shape. Repeat this for the four other petals.


You can now shape the petal as seen above. Turn the petal to its plain side and apply super-glue on the side of the petal. The glue should be used on its narrow end, to resemble a flower's center. Stick the narrow end to another flower petal's curved narrow end, and repeat the same for all the petals.

Lastly, apply Multi-Surface glue or super-glue, and place a bead at the center of the flower to embellish. Your foam flower is ready. Make a whole bunch of these flowers.


These flowers can be used as wall decoration or kept in a vase or can be stuck to children's hair clips and hair bands. You can make them in different sizes, and use them to simply throw on a party centre-table.


This is a safe project to do with children. Here, Umme Haani has placed the flowers over a plastic plate, adding zing to the look. Does it not look attractive for a party table?


Pictures courtesy: Umme Haani

Content: Umme Haani and Radhika MB