Showing posts with label halloween. Show all posts

Tuesday, May 2

Travel tic tac toe case from Jewellery box DIY

What do you generally do with the jewellery cases from stores? I have forever been fascinated by the size and sturdiness of the jewel boxes that would find their way to mom's large cupboard made of iron, and get hidden away from prying eyes.

A box of that size can be put to umpteen uses after its original purpose gets served. I decided to embellish it, but not much. I love, love and love tic tac toe games.I love making tic tac toe boards. And the jewel box obviously came in handy. I have seen this game get used in umpteen spaces.

What I used for the piece:

-- a jewel box

-- cardstock to match or contrast it

-- optional is a thick felt sheet

-- a pair of scissors

-- hot glue gun loaded with a glue stick

-- embellishments are optional

-- paint pen (I chose metallic silver) to match the jewel box


In the jewellery case that I had at home, the velvet piece covering the hood of the box on its inside was missing. The other half it was half stuck on the inside. The first step, was to glue hanging pieces towards the cardboard.


I cut out a piece of cardboard from the cardstock I had. You get cardstock the width of large bookmarks. It is about trimming it to fit into the box. Insert it on the surface. I did not want to glue away everything. Just inserting worked.


Once you have adjusted them, use a paint pen to mark out the lines for tic tac toe game.


I used a popsicle stick, or an ice cream stick to mark out the straight lines.

For a tic tac toe box of this size, we would need small items to make it for the game. So the best bet for me was buttons.


You can also use beads.


If you noticed, there was an ugly sticker on the box. I just cut out another piece from the cardstock and stuck it on top of the jewel box. And your on-the-go tic tac toe case is ready. Tuck it into your bag or slide it into your pocket with the wallet, and indulge yourself with a fellow player on that plane, train or automobile.


Pictures and content: Radhika M B

Thursday, January 31

Paper weaves: Woven bookmarks

During Christmas season, I found an excuse to save up coupon mail trash that I would not use for shopping.

Here's what became of some of that trash.

Recycle paper woven bookmarks


Bookmarks! Of course it had to be bookmarks! My creative cells overwork in that direction! For starters, let me tell you that if you want to make these, load yourself with super-patience and more patience.

On the surface of it, this process looks cool - cut strips, weave, and stick. But if you want neatness to show, you have to be slow. And steady. And not lose hope when things go wrong. Most of all, do not expect perfect pieces to turn out. Sometimes you may have to trim and chop till the pieces fit into a pattern.

Here is what you need for a start. AD FLIERS!

Mail trash for recycle

Much to the consternation of my husband, I save up a whole lot of these. And they come in handy in the most unusual of ways when I make bookmarks.

The Thanksgiving - Christmas season had a lot of reds and greens in these flier books, to my delight!

paper, knife, scissors, ruler for paper weave bookmarks

What you see in the picture is basic. I have a paper trimmer which may be hard on your pocket. So to substitute, you may use a thin ruler. This wooden ruler could cause some mess as it is thick. If you get plastic rulers that are thinnish, good. What is not in the picture, is some glue that you may need.

weave from coupon mail trash
These are pre-cut strips from the coupon mail trash. Alternatively, you could cut out strips from magazines, ideally in accented colours. Sometimes you may get the same page in a family of colours. And that works well for a good pattern in weaving.

Once you cut off strips from the cardstock or coloured cardboard, you need to

  • draw margins on the longer sides of the piece, leaving a 0.5 cms gap or one fourth of an inch
  • cut slits between these two margins, about one third of an inch apart, lesser or more depending on your choice
  • this takes time, because when you make the slits, you need to make sure that the thinnish and glossy flier paper passes through without tearing
  • ideally choose thick cardstock

Once you are finished with the slits, choose your strips from the pre-cut stash. Check for their width. They must fit well into the width of the slits.

Next step is simple.

Weave.

You will have left over strips protruding from either or both ends of the cardboard or paper.

Trim them enough to stick them up near the last slit on either ends.

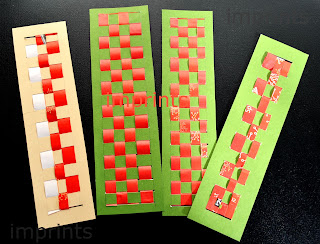
Here is how my bookmarks turned out.

Paper weave bookmarks

You get plenty of white strips from coupon mail. Here, I used white with chocolate brown, besides using some orange-yellow-black strips from Halloween ad-fliers.

woven bookmarks

woven bookmarks

Greens and reds, are from the Christmas mail stash. Over to pale browns and coffee coloured strips.

Woven bookmarks

Notice, that Halloween colours have come in handy here too. Some red strips from Christmas season made their way to this set.

Once you are done with the gluing and trimming, make sure you erase the pencil marks that you made for the margins on the longer sides of the cardstock pieces.

paper woven bookmarks

 The trouble I have had with this cardstock set, is that it is not as thick as I would want, for a woven bookmark.

Am hoping I can laminate this set someday. And am hesitant to give it a coat of Mod Podge, as the paper strips are too thin.

Any ideas what to do?

Picture courtesy: Me/ Radhika M B
For permissions, write to: radicreative@gmail.com

Thursday, November 29

Cute kiddy costume bookmarks

Have there been times when a pile of ad-fliers got thrown around home for no reason? You had to toss them into the basket, but wondered what else could have been done!

Out here in US, that weekly mailbox flood of coupon fliers from local stores is a routine. Their volume and weight vary with changing occasions. And piles of fliers get heavier during the halloween-thanksgiving-christmas season.

Ahead of Halloween this year, my mailbox got full too, with some fliers of party stores. Cute pictures of kid costumes. I have not much use of them, as I do not have kids. Even if I did, am not sure the idea of all those cute but expensive costumes would draw me to the store.

So, I did what comes best to my head. Made bookmarks using some of those pictures.


It was not so much of an effort, considering I had supplies ready.
  • a pair of scissors, glue
  • felt pens, of the colour of paper that had to be used
  • cardboard from cartons of products that I buy
  • wooden beads, paper punch and yarn to match
  • most importantly, pictures cut out from coupon mail or ads 
First step, cut the strips or blocks of the pictures from the main flier.


Get to work next, with each of those pictures. Choose individual pieces that have minimal or no pricing prints on them.

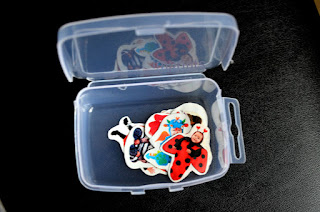
Here, they resemble stickers that you buy at a bomb of price from stationery and craft stores.

If you do not make bookmarks, consider using some double-sided tape on their rear so you can use for some other projects, or simply stick them up on your kid's shelves and storage boxes.


 I love the `prisoner' costume at the bottom of this picture.

I cut out enough to store for later use. After all, it is not all times of the year that you get such pictures on fliers!

I cut some cardboard from cartons to size, sand-papered its glossy side, stuck brown craft paper on its sides for one bookmark, and patterned `tablecloth design' paper on the other.

I also made use of a heart shape that I had cut out from a used gift-wrap or wrapping paper.

Next step: Stuck the pictures up, and used felt pens to touch the bookmarks up. I used the paper punch on one of the two bookmarks, and strung some thread into a bead for its `tag' feel.

Here goes another picture.
That's not all,

I used another picture, of a baby, that I had cut out from another ad, to make the following bookmark. This one can be used as a gift tag too.


Try this using pictures you see around home. It only needs some patience, the paraphernalia apart.

For use of pictures, write to: radicreative@gmail.com

Photo courtesy: Radhika M B