Every year brings heartwarming efforts on the part of devotees to worship their favourite elephant god by respecting the earth that nurtures us. Every year brings heartbreaks too, when visuals of post-festival idols turn garbage of toxic proportions on our beaches.
The silver-lining - over the years, I see more interest in the effort to stick to unpainted clay Ganeshas, or to innovate with other materials.
Here is a quick round up of this year's efforts, as Navratri grandeur approaches soon.
My friend Hema Sampath, who misses her trips to Lalbaug Raja every year at Mumbai, continued her personal tradition of Ganesha worship this year. She dunked the painted Ganesha idols, for a homemade one.


``I had the clay in my fridge. I had kept it for my craft work. It came in handy for my Ganesha instead,'' says Hema, who loves lord Ganesha.

Creative in a lot of things herself, Hema is a super-busy mom to a beautiful one year old, who still manages to find time for craft ideas.

The deep blue box you see below her altar shelf, is not actually a box. It is a rangoli coaster that she uses to decorate the altar.
Worship has to come from the heart more than outside it, which is why one needs to set aside the conventional love for big size. In Mumbai, it can be a challenge, with the entire city and its outer cities turning the streets into Ganpati party zones, and large idols making the atmosphere euphoric during the nine days.
Still, a friend Sridevi Appari managed to do just that. All she needed was about half a kilogram of turmeric and water.

The result is divine, earthy and attractive at the same time.

Notice how a couple of vases with flowers add to the profusion of colour even more. And how the oleander strings sit comfortably on Ganesha and the kalash.
Sridevi's mom had such a Ganesha too, in a larger size. And needless to say, their steadfastness to stay green inspired TV coverage by a Mumbai TV channel. Here is how her Ganesha looked before the pooja.


Turmeric was what I used too, in my own personal tradition, of not buying the festival idol. I did not indulge in creativity to make the idol - just stuck to making the turmeric cone that is used in other festivals for a token Ganesha pooja, with some besan (chickpea flour).

Notice the little turmeric hill on the beetle leaf in this plate. A packet of flowers and some grass from the garden outside. And I was comfortable to go.

Those yellow circles with kumkum to decorate them, are symbolic of the lord's clothes. The bead-like cotton encircling is to symbolise his sacred thread.
I did manage to make a super quickie umbrella.

This one, is made with the end of a plastic garlic net bag, a bamboo skewer, some dried bamboo plant leaves, and rice in a brass crush bowl. Another flower to top it. The umbrella is integral to many households where people make it using cardboard. As the story goes, after all the war, Ganesha went for a stroll on his mouse, belly full and an umbrella on hand. And the moon laughed at him.
The rice went into our bellies later, while the leaves went back to soil. As for the net, it hangs around home for another use, perhaps in some other craft project.
I do not have a better picture of this, but it looked a lot better during the worship.

A chunk of my extended family still sticks to picking up paint-less Ganeshas a day or two before the festival. My own experience in Mumbai when I lived there, was their complete absence in the sea of painted idols.
An option when you get an idol that is not painted, is to add some decor element to it yourself.
My schoolmate Sujatha Ratnala and her family did just that. They got their idol through an NGO that makes, sells and teaches to make eco-friendly idols - To Make A Difference.


``They charge less than 50 per cent of the market rate. And they deliver it at the doorstep, just to save lakes,'' says Sujatha, who has been picking up these idols from them for the last four years. This year, nine of her neighbours got them too.
As for giving the deity a personal touch, she got her son to paint it a little.
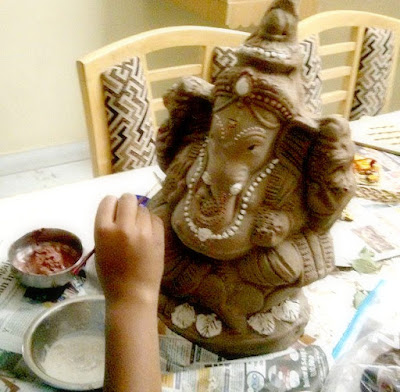
The family used muggu rai - or the chalk used in millions of Indian homes for home rangolis. They dissolved it in water and the boy used a paint brush to decorate the idol.
Other embellishments around home came in handy.

``The crown, we had from earlier festivals. And the cloth too. For the forehead, we used a beaded rakhi,'' says Sujatha. As such, such crowns can be found in many religious shops.
A small piece of white cloth that makes for the dhoti, is a piece of Kerala dhoti tied using a string. She cut the cloth to the size of handkerchief, and tucked the pieces in pleats to the string neatly.

The highest form of worship is when you offer yourself to God, selflessly and in spirit. I remember a beautiful Hindi poem at school, that talked of offering to God, the flowers on trees, as they were, without plucking them, and water from the oceans and rivers, without taking from them.
Being aware of the environmental hazards of toxic paints going into the water bodies, and defying societal frenzy by staying true to your heart are essential to one of our most important festivals.
It is heartening, going by the rising number of hits that the DIY Ganesha posts on this blog get each year, that as a population we have been taking interest in going green for worship. Wish we did that for every festival, every day worship, and every activity.
--
Pictures courtesy: respective owners or devotees -- Hema Sampath for the homemade clay Ganesha, Sridevi Appari for the turmeric Ganesha, Radhika M B for the tiny turmeric cone Ganesha, and Sujatha Ratnala for the NGO sell eco-friendly Ganesha.
Pictures have been used with permission from respective owners.
Any further use of the pictures requires permission from Imprints Handmade, and needs to attribute the use of these pictures, to Imprints Handmade. Copyrights for the pictures rest with the owners.
The silver-lining - over the years, I see more interest in the effort to stick to unpainted clay Ganeshas, or to innovate with other materials.
Here is a quick round up of this year's efforts, as Navratri grandeur approaches soon.
My friend Hema Sampath, who misses her trips to Lalbaug Raja every year at Mumbai, continued her personal tradition of Ganesha worship this year. She dunked the painted Ganesha idols, for a homemade one.


``I had the clay in my fridge. I had kept it for my craft work. It came in handy for my Ganesha instead,'' says Hema, who loves lord Ganesha.

Creative in a lot of things herself, Hema is a super-busy mom to a beautiful one year old, who still manages to find time for craft ideas.

The deep blue box you see below her altar shelf, is not actually a box. It is a rangoli coaster that she uses to decorate the altar.
Worship has to come from the heart more than outside it, which is why one needs to set aside the conventional love for big size. In Mumbai, it can be a challenge, with the entire city and its outer cities turning the streets into Ganpati party zones, and large idols making the atmosphere euphoric during the nine days.
Still, a friend Sridevi Appari managed to do just that. All she needed was about half a kilogram of turmeric and water.

The result is divine, earthy and attractive at the same time.

Notice how a couple of vases with flowers add to the profusion of colour even more. And how the oleander strings sit comfortably on Ganesha and the kalash.
Sridevi's mom had such a Ganesha too, in a larger size. And needless to say, their steadfastness to stay green inspired TV coverage by a Mumbai TV channel. Here is how her Ganesha looked before the pooja.


Turmeric was what I used too, in my own personal tradition, of not buying the festival idol. I did not indulge in creativity to make the idol - just stuck to making the turmeric cone that is used in other festivals for a token Ganesha pooja, with some besan (chickpea flour).

Notice the little turmeric hill on the beetle leaf in this plate. A packet of flowers and some grass from the garden outside. And I was comfortable to go.

Those yellow circles with kumkum to decorate them, are symbolic of the lord's clothes. The bead-like cotton encircling is to symbolise his sacred thread.
I did manage to make a super quickie umbrella.

This one, is made with the end of a plastic garlic net bag, a bamboo skewer, some dried bamboo plant leaves, and rice in a brass crush bowl. Another flower to top it. The umbrella is integral to many households where people make it using cardboard. As the story goes, after all the war, Ganesha went for a stroll on his mouse, belly full and an umbrella on hand. And the moon laughed at him.
The rice went into our bellies later, while the leaves went back to soil. As for the net, it hangs around home for another use, perhaps in some other craft project.
I do not have a better picture of this, but it looked a lot better during the worship.

A chunk of my extended family still sticks to picking up paint-less Ganeshas a day or two before the festival. My own experience in Mumbai when I lived there, was their complete absence in the sea of painted idols.
An option when you get an idol that is not painted, is to add some decor element to it yourself.
My schoolmate Sujatha Ratnala and her family did just that. They got their idol through an NGO that makes, sells and teaches to make eco-friendly idols - To Make A Difference.


``They charge less than 50 per cent of the market rate. And they deliver it at the doorstep, just to save lakes,'' says Sujatha, who has been picking up these idols from them for the last four years. This year, nine of her neighbours got them too.
As for giving the deity a personal touch, she got her son to paint it a little.

The family used muggu rai - or the chalk used in millions of Indian homes for home rangolis. They dissolved it in water and the boy used a paint brush to decorate the idol.
Other embellishments around home came in handy.

``The crown, we had from earlier festivals. And the cloth too. For the forehead, we used a beaded rakhi,'' says Sujatha. As such, such crowns can be found in many religious shops.
A small piece of white cloth that makes for the dhoti, is a piece of Kerala dhoti tied using a string. She cut the cloth to the size of handkerchief, and tucked the pieces in pleats to the string neatly.

The highest form of worship is when you offer yourself to God, selflessly and in spirit. I remember a beautiful Hindi poem at school, that talked of offering to God, the flowers on trees, as they were, without plucking them, and water from the oceans and rivers, without taking from them.
Being aware of the environmental hazards of toxic paints going into the water bodies, and defying societal frenzy by staying true to your heart are essential to one of our most important festivals.
It is heartening, going by the rising number of hits that the DIY Ganesha posts on this blog get each year, that as a population we have been taking interest in going green for worship. Wish we did that for every festival, every day worship, and every activity.
--
Pictures courtesy: respective owners or devotees -- Hema Sampath for the homemade clay Ganesha, Sridevi Appari for the turmeric Ganesha, Radhika M B for the tiny turmeric cone Ganesha, and Sujatha Ratnala for the NGO sell eco-friendly Ganesha.
Pictures have been used with permission from respective owners.
Any further use of the pictures requires permission from Imprints Handmade, and needs to attribute the use of these pictures, to Imprints Handmade. Copyrights for the pictures rest with the owners.