Thursday, January 31

Paper weaves: Woven bookmarks

During Christmas season, I found an excuse to save up coupon mail trash that I would not use for shopping.

Here's what became of some of that trash.

Recycle paper woven bookmarks


Bookmarks! Of course it had to be bookmarks! My creative cells overwork in that direction! For starters, let me tell you that if you want to make these, load yourself with super-patience and more patience.

On the surface of it, this process looks cool - cut strips, weave, and stick. But if you want neatness to show, you have to be slow. And steady. And not lose hope when things go wrong. Most of all, do not expect perfect pieces to turn out. Sometimes you may have to trim and chop till the pieces fit into a pattern.

Here is what you need for a start. AD FLIERS!

Mail trash for recycle

Much to the consternation of my husband, I save up a whole lot of these. And they come in handy in the most unusual of ways when I make bookmarks.

The Thanksgiving - Christmas season had a lot of reds and greens in these flier books, to my delight!

paper, knife, scissors, ruler for paper weave bookmarks

What you see in the picture is basic. I have a paper trimmer which may be hard on your pocket. So to substitute, you may use a thin ruler. This wooden ruler could cause some mess as it is thick. If you get plastic rulers that are thinnish, good. What is not in the picture, is some glue that you may need.

weave from coupon mail trash
These are pre-cut strips from the coupon mail trash. Alternatively, you could cut out strips from magazines, ideally in accented colours. Sometimes you may get the same page in a family of colours. And that works well for a good pattern in weaving.

Once you cut off strips from the cardstock or coloured cardboard, you need to

  • draw margins on the longer sides of the piece, leaving a 0.5 cms gap or one fourth of an inch
  • cut slits between these two margins, about one third of an inch apart, lesser or more depending on your choice
  • this takes time, because when you make the slits, you need to make sure that the thinnish and glossy flier paper passes through without tearing
  • ideally choose thick cardstock

Once you are finished with the slits, choose your strips from the pre-cut stash. Check for their width. They must fit well into the width of the slits.

Next step is simple.

Weave.

You will have left over strips protruding from either or both ends of the cardboard or paper.

Trim them enough to stick them up near the last slit on either ends.

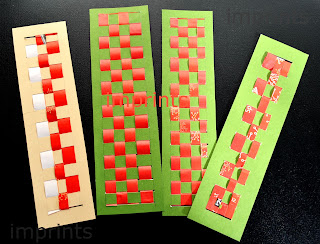
Here is how my bookmarks turned out.

Paper weave bookmarks

You get plenty of white strips from coupon mail. Here, I used white with chocolate brown, besides using some orange-yellow-black strips from Halloween ad-fliers.

woven bookmarks

woven bookmarks

Greens and reds, are from the Christmas mail stash. Over to pale browns and coffee coloured strips.

Woven bookmarks

Notice, that Halloween colours have come in handy here too. Some red strips from Christmas season made their way to this set.

Once you are done with the gluing and trimming, make sure you erase the pencil marks that you made for the margins on the longer sides of the cardstock pieces.

paper woven bookmarks

 The trouble I have had with this cardstock set, is that it is not as thick as I would want, for a woven bookmark.

Am hoping I can laminate this set someday. And am hesitant to give it a coat of Mod Podge, as the paper strips are too thin.

Any ideas what to do?

Picture courtesy: Me/ Radhika M B
For permissions, write to: radicreative@gmail.com

Tuesday, January 22

Paper magic: quill-dolls and earrings

My friend Pooja had the time of her life this week. The high-schooler and her friends made a 100 per cent profit at their school event, by selling things they made - trinkets and snacks!

Reminds me of the time we scampered at school and college, organising exhibitions and fests. Pooja made paper-quill earrings and dolls that I am drooling over. Wanna know why? Here they are:


Notice the delicate rolling of pink and black in this doll with cute hair curling in the ends. Notice the lovely flower too. Kudos Pooja.


This one, is of a woman in saree. Pooja made these dolls, and 40 pairs of earrings over 20 days, spending about three hours a day on the project.


She spent on quilling strips available at local stores in Bangalore, each pack costing Rs 40 to Rs 50.


``I used a glue bottle, quilling tool, earring hooks,'' says Pooja, suggesting one can use bedazzle stones for ``some bling''.

``It takes about 20 minutes to make a pair which is simple. Intricate patterns take more time. I used earring hooks too,'' Pooja adds in.

I am zapped. Firstly, I never knew paper-quill packets including tools were available for a price. I thought it was all about rolling paper over a skewer or toothpick!

Back in school, I remember making necklaces using paper beads that we made using this method.

Secondly, to spend so much time on a project of this sort needs patience. She made a 100 per cent profit along with her friends! Inspiring Pooja!

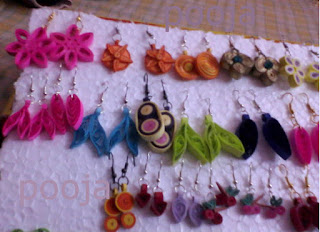
Here is a picture of her earrings that sold out during the school event:


 Look at the colour choice! My favourite is the fourth pair in the second row from the top of the picture (the picture at the bottom that is).

Am itching to do something with newsprint and recycle paper. Thanks Pooja.

Go ahead folks! Try something with paper that is lying around at home!

Pics Courtesy: Pooja Komarath
For permission to use, write to radicreative@gmail.com

Monday, January 21

Rangolis on my bookmarks

My love for rangolis on bookmarks continues.

I am a non-traditionalist. Certainly not the kind who washes the doorstep and decorates it with rice flour everyday. But I love the universality of rangolis, with their focus on the center, and expanse from there, the importance of dot...in creation, in design...

This time, I also tried out design inspired by Chittara, the rich folk art of Karnataka.


Rangolis, that adorned the doorstep and verandah in my grandma's home...rangolis, that changed with the festival and season in front of the doorstep at my parents' home.

The material did not have to be much...


This cardboard was what I saved from an earlier purchase of household repair threads. 

Some sandpaper...


And cardstock, known in India, simply as cardboard, with some cutting tools and glue.


I glued the sandpapered  cardboard to the deep blue cardboard, after cutting to a required size. When it comes to cutting the household cardboard, I am really not bothered about a standard size. It is because I want to use every inch of the material possible, instead of trashing it.

That is intrinsic to handmade crafts probably. And I like the lack of identical results.


And after enough gluing and trimming, I used white paint with a size zero paintbrush.

Here is how it turned out:


And here are the bookmarks with Chittara influenced design.


I read about Chittara art, and love the intricacy of this art, though I would not want to agree with its feudal origin based on caste.

Am hoping to use more of it in my other projects.

Try the designs yourself, and you will love yourself for not trashing household cardboard.


Pics Courtesy: Radhika M B
For permissions to use, write to: radicreative@gmail.com

All pics are watermarked.

Thursday, January 10

Salt n Sand: Salt box turns brush holder

In US, we do not get salt packed in packets, the way we do at supermarkets in India. If in India we pick up those plastic sachets with brand names such as Tata and Annapurna glistening bright on them, the containers here are more welcoming. Made with cardboard I mean.

Still, trashing the boxes is a pain. So this time, I decided to re-use. And touched it up. A bit.


Needless to say, am happy about it. My brushes found a home. Maybe my pens and pencils will too. If you want to try this DIY, here is how I went about it.

Here are the pictures - Before and After look:)


I used a craft knife to remove the top base that holds the lid. It came out somewhat uneven, as this one needs superb skill. I did not mind though, as long as it served a purpose.


I turned to the stash of pre-punched flowers I had ready, from mail trash - postal envelopes that is.


I am so so in love with this flower punch! My other new love is Mod Podge. It comes in so handy to seal fragile work and decoupage!

I simply stuck these flowers randomly to the outer side of the box.  Yeah, before this I did make sure there were no salt remnants inside though. If any when you do, wipe it clean.

After sticking the flowers...I used the glue brush to paint a layer of Mod Podge on to the surface. But not before I used a bit of white paint, to touch the surface up, and also the base, which had paled from use over the month.


And this is how it finally looks.


To take it further, I tried it on another box - curd plastic carton from the Desi curd that sells in Indian groceries in New Jersey.


The trouble with this box is those folds you see on its left side. That's because I did not knead the air bubbles out when I stuck a gift wrap. This gift wrapping paper, in bright red, was one of those cheaper ones we picked up during Christmas sales. I used the left-over paper on this. Since the top edge would get messy with paper, I used red craft paint (acrylic), to blend the colours in.  In the botton, I cut it into ridges and stuck it one over the other. After that, it was about painting...and two layers of Mod Podge over it all.

If you do not have Mod Podge, you can make it with Fevicol and other Craft glue by adding water.

Here is a link to one such tutorial from Woodooz

I just made a beginning with decoupage. All the best for your new beginnings!


Pictures Courtesy: M Radhika
For permissions to use, please mail: radicreative@gmail.com


Friday, January 4

Flowers, fabric and love to gift wrap

Here is another bunch of thoughtful gift wraps from Lalitha Menon.

For those of you following this blog, she is all familiar, using her back-to-nature consciousness and love to wrap gifts for friends and family.

Her latest set of gift wrapping and embellishing here:

Ever thought of tucking in fresh flowers to wrap your gift? Not the roses and carnations variety, but wild flowers that grow randomly in your garden! Try it sometime, and you will like it, for that personal touch.


Here, Lalitha has used a saree border fabric to tie her wrapped gift up and tucked in flowers that add a magic touch to the wrap.


These are the Ixora flowers, or Chethi flowers (Malayalam) that I adore. Wild flowers that found a place in worship and gardens, these flowers became a perfect embellishment for Lalitha's pink paper wrapped birthday gift for a friend. A perfect example of how we can move beyond stickers and ribbons for gift wrapping. In the pictures below, you can see how she has cut motifs from old clothes and stuck them up to embellish her brown sheet wraps.


If you have the store-given wrap replete with its logo and brand names, do not bother, as long as some embellishments can take care of the decor touch.

Thank you Lalitha, for sharing this!

Here is another one she made to mark the season's spirit.

Hope you all had a great Christmas and strode into the new year with happiness.


Pictures courtesy Lalitha Menon
For re-use and permissions, write to: radicreative@gmail.com


Cereal Box Organiser

`Power is back'! For once in life, I the words mean music to my ears. Sandy, the hurricane threw life out of gear for the last two weeks.

But in its own way, it kept me busy with activities other than Facebook and Gmail. It's taken a long time to get past Sandy in my head. It altered a lot of a things at home for long. I am happy still, that there were little things I learnt to appreciate and do, offline. In the first two days after the hurricane and no power at home, I picked up one of the cereal boxes I saved, and made an organiser. Remember the cereal box effort by Ashwini, my friend?


This one is not perfect. Yet, I have managed to put it to good use. My non-prescription medicines, cough drop sachets, they all go into this. I labelled this box `Daily Medicines' and tucked it into my hallway closet that holds household miscellany.

I do not have all the pictures of the step-by-step do, but here are some that may give you an idea.

I used wrapping paper. I love brown wrapping paper, popularly known as `brown sheet' back in India. Since I could not find any at the stores here, had to make do with this one with bright leaves imprints.

I cut the box into a container with user-friendly dimensions. On one side, I let the height remain more, while on the other side I brought the height down.

This is similar to file organisers, or file boxes.


Tips: When you glue, make sure you use just the right amount depending on the thickness of the paper. Here, I misjudged the quantity and so you see those tacky folds on its inside. I did not bother much about it, because it is not visible once you fill it with your stuff anyways.


The cereal box sits now in the middle of my other files, cosmetics and home supplies, happy to hold my medicines:)

Give this a shot with your household cartons too. Thanks Ashwini, for prompting me to do this in your sweet way!

Pictures Courtesy: Radhika M B
For re-use, write to: radicreative@gmail.com