Rangolis are fascinating. Nothing like the smell of cow dung smeared with a coconut broom in the wee hours on a village street, and rice flour strewn in intricate designs. I could never master the doorstep rangoli art though.
What I did try this time, was an experiment on felt, that is gaining ground in the crafting scene. Here is how it went.
What you need for the project:

-- a pair of scissors
-- a ruler
-- a pencil
-- satin ribbon (I chose chocolate brown)
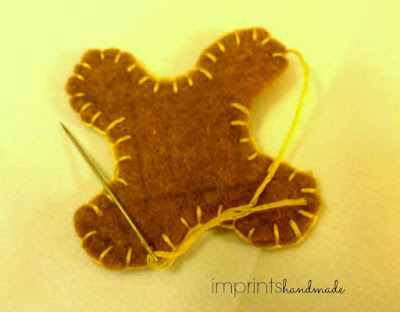
-- felt sheet (I had mustard brown)
-- embroidery skeins
I first marked out squares on the felt sheet, of approximately two inches each. I cut them, drew out a rangoli, simple one, and cut them along its edges, leaving a little gap.


After the button stitch was done, it was about using a stem stitch along the marked lines for the rangoli.

The next step, was to insert the satin ribbon and stitch up over it.

I was not satisfied with the result. So for a second piece to attach on the other end, I cut two more squares on the felt sheet, and this time, used the square shape.


And attached the ribbon by inserting it into a little gap that I left while using the button stitch, and sealing it with another stitch.
It is easier when you finish stitching the rangoli on a single patch before running the button stitch.

Try this on a lazy afternoon. It takes about an hour to finish up, depending on the design you choose.
It is a typical teen project, so you can get your son or daughter to make it and gift it to friends.
Pictures courtesy: Radhika M B
For permission to use: radicreative@gmail.com
What I did try this time, was an experiment on felt, that is gaining ground in the crafting scene. Here is how it went.
What you need for the project:

-- a pair of scissors
-- a ruler
-- a pencil
-- satin ribbon (I chose chocolate brown)
-- felt sheet (I had mustard brown)
-- embroidery skeins
I first marked out squares on the felt sheet, of approximately two inches each. I cut them, drew out a rangoli, simple one, and cut them along its edges, leaving a little gap.

Next on, it was about a button stitch to embellish the edges. I left a little gap between the sheets towards the end, to insert a satin ribbon in later.


After the button stitch was done, it was about using a stem stitch along the marked lines for the rangoli.

The next step, was to insert the satin ribbon and stitch up over it.

I was not satisfied with the result. So for a second piece to attach on the other end, I cut two more squares on the felt sheet, and this time, used the square shape.


And attached the ribbon by inserting it into a little gap that I left while using the button stitch, and sealing it with another stitch.
It is easier when you finish stitching the rangoli on a single patch before running the button stitch.

Try this on a lazy afternoon. It takes about an hour to finish up, depending on the design you choose.
It is a typical teen project, so you can get your son or daughter to make it and gift it to friends.
Pictures courtesy: Radhika M B
For permission to use: radicreative@gmail.com
No comments:
Post a Comment