Plastic credit cards and gift cards are a bane, in spite of their convenience. They are a pain once past expiry date or use, which is when you twiddle thumbs about what to do with them.
They get tucked away in some wallet, occupying space and raising the wallet weight, or pop up in between books and desktop chaos, prompting you to trash them.
You do not need to trash them if you can put some energy into upcycling them, or engage your kids to do some project with them.
I made fridge magnets. And am tempted to make more.
I made three magnets with two methods. The result is somewhat different with them.
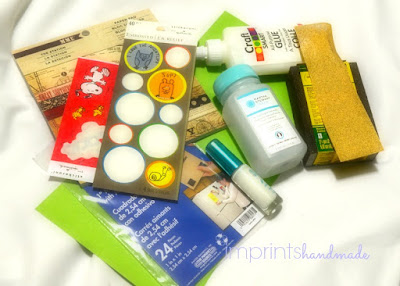
Keep the following materials handy for the two methods:
METHOD ONE:
I picked up a red piece of paper from my cardstock book and kept aside.
1. You need to use the sand paper, to roughen up both the sides of the plastic credit card or gift card.
2. And glue the plastic card to the cardstock neatly.
3. Let it dry.
4. Use the nail polish to draw out a design. I made a rangoli to blend with the red-oxide floor like paper - and added the word `Home'
5. Apply decoupage glue and sealant -- two coats is ideal. First coat adheres, second seals. This gives the piece a glossy finish
6. Once both its sides dry out from the sealant's stickiness, peel and stick the square magnets to the decorated card's rear
In this picture are -- the rangoli design credit card and my favourite cartoon sticker on another card, both smeared with the decoupage glue and drying out.
METHOD TWO:
You can avoid using the sandpaper to sand the card for this. Such a method is useful for people allergic to the fine powder emanating when you sand the card.
1. Fold the card stock over the card, in a way you would gift wrap a small gift - folds and tucks, and all
Here I have cut out the protrudng parts so I can tuck them into the folds. This design I have tried with the black paper. A similar effort went into the green cardpaper. Make sure you glue out any dry gaps. And the paper must stick to the paper and not the plastic beneath it.
2. Fix your favourite sticker and use the decoupage glue to give its front and back sides a glossy finish.
3. Let the cards dry
4. Peel at least two pieces of magnet each from the magnet strips, and stick firmly on the rear side of these cards.
If need be, give these another coat of sealant for the shine and longevity.
Your brand new fridge magnets are ready to sit proudly on the fridge.
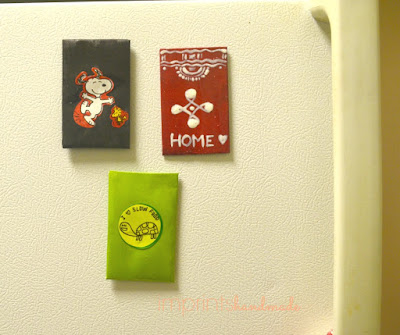
Here they are - the Snoopy magnet or Peanuts magnet, rangoli magnet, and I love Slow Food magnet.
I am happier with the sanding and sticking method for its firmness. If you have other ideas, please implement and send me the pictures.
I hope to make differently shaped magnets someday. But be rest assured that these rectangles will do the job just fine.
Go ahead and try your bits for the fridge magnets.
PICTURES COURTESY: Radhika M B
For permissions to use, write to: radicreative@gmail.com
Kindly avoid use of Snoopy picture. It is for representation only.
They get tucked away in some wallet, occupying space and raising the wallet weight, or pop up in between books and desktop chaos, prompting you to trash them.
You do not need to trash them if you can put some energy into upcycling them, or engage your kids to do some project with them.
I made fridge magnets. And am tempted to make more.
I made three magnets with two methods. The result is somewhat different with them.
Keep the following materials handy for the two methods:
-- peel and stick square magnets
-- sanding sponge or sandpaper
-- old nail polish or acrylic paint with brush
-- decorative stickers
-- decoupage glue and sealant (I used Martha Stewart...you can try it with Mod Podge)
-- variety of card paper or card stock
-- multi-surface craft glue, and do not forget
most importantly -- used and old credit cards and gift cards
-- a pair of scissors...
The picture below is of square magnets
METHOD ONE:
I picked up a red piece of paper from my cardstock book and kept aside.
1. You need to use the sand paper, to roughen up both the sides of the plastic credit card or gift card.
2. And glue the plastic card to the cardstock neatly.
3. Let it dry.
4. Use the nail polish to draw out a design. I made a rangoli to blend with the red-oxide floor like paper - and added the word `Home'
5. Apply decoupage glue and sealant -- two coats is ideal. First coat adheres, second seals. This gives the piece a glossy finish
6. Once both its sides dry out from the sealant's stickiness, peel and stick the square magnets to the decorated card's rear
In this picture are -- the rangoli design credit card and my favourite cartoon sticker on another card, both smeared with the decoupage glue and drying out.
METHOD TWO:
You can avoid using the sandpaper to sand the card for this. Such a method is useful for people allergic to the fine powder emanating when you sand the card.
1. Fold the card stock over the card, in a way you would gift wrap a small gift - folds and tucks, and all
Here I have cut out the protrudng parts so I can tuck them into the folds. This design I have tried with the black paper. A similar effort went into the green cardpaper. Make sure you glue out any dry gaps. And the paper must stick to the paper and not the plastic beneath it.
2. Fix your favourite sticker and use the decoupage glue to give its front and back sides a glossy finish.
3. Let the cards dry
4. Peel at least two pieces of magnet each from the magnet strips, and stick firmly on the rear side of these cards.
If need be, give these another coat of sealant for the shine and longevity.
Your brand new fridge magnets are ready to sit proudly on the fridge.
Here they are - the Snoopy magnet or Peanuts magnet, rangoli magnet, and I love Slow Food magnet.
I am happier with the sanding and sticking method for its firmness. If you have other ideas, please implement and send me the pictures.
I hope to make differently shaped magnets someday. But be rest assured that these rectangles will do the job just fine.
Go ahead and try your bits for the fridge magnets.
PICTURES COURTESY: Radhika M B
For permissions to use, write to: radicreative@gmail.com
Kindly avoid use of Snoopy picture. It is for representation only.


No comments:
Post a Comment