Pangs of guilt kill me every time I have to toss those One Gallon (3.8 liters) water jugs we haul over from Costco for home use.
My husband and I prefer water from the tap (filtered by the tap-attachable Brita filters). Our family finds it hard though. For over a month, I have stashed those jugs after use, in the hope of making something. But soon my pantry had a mountain of empty plastics mocking at me. With a heavy heart, we dumped them in the Recycle Dust bin outside our apartment.
But I saved the caps. And wondered what to do with them. And wondered. And wondered till I yawned.
My earlier attempt at punching a hole in a sea-shell to make earrings was a disaster. The shell broke into three pieces. This time, I tried a hole-prick with a needle instead, into the cap. It worked!
And yeah, I had some scope for an experiment!
This was the result. Plastic earrings made from water jug caps.
It was my first ever attempt with plastic caps after a whole lot of dreaming ideas about them. To make it easier for you to try, let me share what exactly I used. Remember this jug? It was what I used to make the ball-catcher some weeks back.
I began by pricking a hole into the cap, with a needle. This was because the cap's ridges were making it difficult to use a small-hole punch.
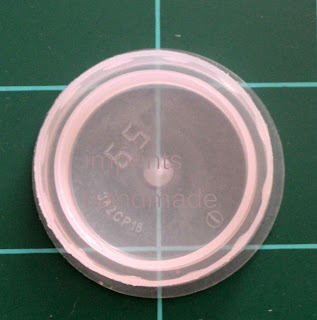
On its inside surface, every such a cap has a number. Unless you want these numbers to show beneath your ears to make a statement, they look tacky.
Obviously, you know by now that we need a needle. Keep a tooth-pick handy to widen that needle-hole. And then, fix a jump-ring. Do the same with another bottle cap.
Next thing, gather your other paraphernalia.
As the picture shows, I used
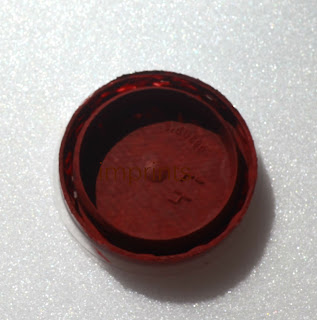
I painted the dorsal side.
Point to note here - I should have ideally sand-papered the surface for a start. Painting the cap's smooth surface is a challenge. So you need about three coats to be on the safer side. Use the dab technique, which could make it easier for a start.
Another bit to remember. Use brush strokes from the center towards the edge or from the edge to center after a coat of dab and fill dries. It makes the finish look better. My pieces turned out a li'l faulty. If you look at the pictures close, you will notice the paint peeling at some places. So be careful when you paint.
This is how the cap looks from its main side, after you paint it. Have pictured it against other caps to give you an idea about how different it looks. Use the flat brush and thin brush to fill out any gaps.
Once the paint dried, I stuck the yellow punched paper flowers on the main side. I had half a thought of doing a design with white paint, but gave it up as this was my first attempt.
Allowing the plastic pieces to dry, I used a coat of Mod-Podge with the glue brush - again, using strokes from the center towards the edges.
After this, I fixed extra jump-rings to the existing ones that were already fixed into these caps. This was because the first set were too stuck into the plastic, with no flexibility. An extra jump-ring gave the pieces some breathing space to hang.
Next step: Fixing the earring hooks. For the jump rings and earring hooks, you will need the nose plier and blunt pliers to bend and turn.
The diameter of each cap is about 1.5 inches. So you know now, that they make the large and flashy kind of earrings. You could use the same jump-ring method to convert the caps, into pendants.
I have not painted on the inside. But when I tried them on, I realised that they would look better, painted on both sides.
The plastic used for these caps is somewhat elastic. It could behave differently when you pick up coloured caps that have screw-ridges. Am yet to experiment with those. If you have done so already, please share info.
Meanwhile, try this out for earrings, and other ideas!
Aren't they cool to wear for summer! Try other colours and designs, using other materials. Maybe you would come up with something better too!
Pictures by : Radhika M B
For permissions to re-use: radicreative@gmail.com
All pics are water-marked. Any re-use requires permission from me.
My husband and I prefer water from the tap (filtered by the tap-attachable Brita filters). Our family finds it hard though. For over a month, I have stashed those jugs after use, in the hope of making something. But soon my pantry had a mountain of empty plastics mocking at me. With a heavy heart, we dumped them in the Recycle Dust bin outside our apartment.
But I saved the caps. And wondered what to do with them. And wondered. And wondered till I yawned.
My earlier attempt at punching a hole in a sea-shell to make earrings was a disaster. The shell broke into three pieces. This time, I tried a hole-prick with a needle instead, into the cap. It worked!
And yeah, I had some scope for an experiment!
This was the result. Plastic earrings made from water jug caps.
It was my first ever attempt with plastic caps after a whole lot of dreaming ideas about them. To make it easier for you to try, let me share what exactly I used. Remember this jug? It was what I used to make the ball-catcher some weeks back.
I began by pricking a hole into the cap, with a needle. This was because the cap's ridges were making it difficult to use a small-hole punch.
On its inside surface, every such a cap has a number. Unless you want these numbers to show beneath your ears to make a statement, they look tacky.
Obviously, you know by now that we need a needle. Keep a tooth-pick handy to widen that needle-hole. And then, fix a jump-ring. Do the same with another bottle cap.
Next thing, gather your other paraphernalia.
As the picture shows, I used
- Craftsmart acrylic craft paint (for multi-purpose surfaces) - Brick Red colour
- Craft glue
- Mod Podge
- Paint brushes, flat and thin
- glue brush -- and I also used
- four jump-rings
- two earring hooks
- nose plier for bending and fixing (you may need a jewellery plier to bend too)
I painted the dorsal side.
Point to note here - I should have ideally sand-papered the surface for a start. Painting the cap's smooth surface is a challenge. So you need about three coats to be on the safer side. Use the dab technique, which could make it easier for a start.
Another bit to remember. Use brush strokes from the center towards the edge or from the edge to center after a coat of dab and fill dries. It makes the finish look better. My pieces turned out a li'l faulty. If you look at the pictures close, you will notice the paint peeling at some places. So be careful when you paint.
This is how the cap looks from its main side, after you paint it. Have pictured it against other caps to give you an idea about how different it looks. Use the flat brush and thin brush to fill out any gaps.
Once the paint dried, I stuck the yellow punched paper flowers on the main side. I had half a thought of doing a design with white paint, but gave it up as this was my first attempt.
Allowing the plastic pieces to dry, I used a coat of Mod-Podge with the glue brush - again, using strokes from the center towards the edges.
After this, I fixed extra jump-rings to the existing ones that were already fixed into these caps. This was because the first set were too stuck into the plastic, with no flexibility. An extra jump-ring gave the pieces some breathing space to hang.
Next step: Fixing the earring hooks. For the jump rings and earring hooks, you will need the nose plier and blunt pliers to bend and turn.
The diameter of each cap is about 1.5 inches. So you know now, that they make the large and flashy kind of earrings. You could use the same jump-ring method to convert the caps, into pendants.
I have not painted on the inside. But when I tried them on, I realised that they would look better, painted on both sides.
The plastic used for these caps is somewhat elastic. It could behave differently when you pick up coloured caps that have screw-ridges. Am yet to experiment with those. If you have done so already, please share info.
Meanwhile, try this out for earrings, and other ideas!
Aren't they cool to wear for summer! Try other colours and designs, using other materials. Maybe you would come up with something better too!
Pictures by : Radhika M B
For permissions to re-use: radicreative@gmail.com
All pics are water-marked. Any re-use requires permission from me.


