Friday, February 22

Yippeeee!!!

Imprints just found a mention and space in Indulge Ashscorner blog of Ashwini Deshpande.

Ashwini is running an event on her blog, about recycling household trashables. Need I say more about Imprints Handmade and the wonderful people who contribute ideas!

For now, Indulge picked up a few of my projects for the blog event.

Here is the link:

Save the Earth - Indulge Ashscorner

Ashwini, a working mom of two, finds time in the middle of all her chaos for her everyday dishes that she makes and innovates too, at Indulge. Her blog is in its fifth year now. She occasionally crafts too.

Some of the craft posts I loved from Indulge Ashscorner are linked here:

Homemade goatmilk soap that I hope to make sometime soon

DIY with pista shells and cardboard

Felt flower pins that she made and gifted to me too - an easy craft that I shall post in Imprints Handmade soon.

Thank you, all of you who helped nurture Imprints Handmade. Meanwhile, take a look at earlier posts and get started on your own projects. 


Wednesday, February 20

Duct tape bookmarks by kids

This weekend that went by, two young angels came home and made the time superbly memorable.

I craft like crazy. But it was such a thrill to see their eyes light up the moment I showed my trash-filled craft space to them! And that eagerness with which they went about using tools too! They showed me just how limited creative thinking by adults can be, through the cute pieces they made.

I had some duct tape, and gave them my sheets of stickers too.

The challenge, was to make bookmarks out of them.

I showed them my method, of using household cardboard and sand-papering its glossy side.

To make things easier, I also helped them fix the duct tape on the cardboard pieces that in their different sizes, became `bookmarkable'.

Big hugs to you Sowmya and Saahitya! Here is how their pieces turned out:

duck tape bookmarks

Duct tape bookmarks! Are they not grab worthy? I love the variety of duct tape, called `cello-tape' in India and corrupted to become `duck tape' out here in US, available in craft stores.

I had only two types of the tape, but that did not deter them from using it creatively.


Left to me, I would have thought a lot about how many stickers to use on each of these, for the right look, and battled over the look in my head. But give them the material and they attack it like pros, not worrying a bit about how the piece may turn out.

Sowmya, the elder among the two, loves owls, just like me. Am so glad to know another owl loving pal!

Notice the owl love stickers pervading these pieces!

bookmarks with duct tape and 3-D stickers
Owl stickers duct tape bookmarks

I gave them another challenge.

It was, to use only the butterfly paper punch that I had, for making a colourful bookmark. Sowmya got to it with gusto, punching, gluing and designing.

And here is her bookmark:

paper craft punched butterflies bookmarks

The patterned paper base you see beneath this butterflies profusion, is actually a piece cut out from postal envelopes that arrived in my mail box.

This is how it looks after a coat of Mod Podge, to give it a glossy finish and to prevent it from household water spilling damage.

If you want to try your bit with duct tape, do so, and experiment gleefully.

Pictures by: me

For permissions to use, write to: radicreative@gmail.com

Friday, February 15

How to recycle old jeans: quilt place-mat

The Web is flooded with countless ideas of reusing and upcycling pairs of old jeans and clothes. But never tried the bit myself.

I don't know why, but every time I decide to cut up an old dress, pangs of sentiment kill me enough to abandon it. Am inspired now though, with a beautiful recycle project my friend Saritha just completed.

It's a quilt. It's a coffee table spread. It could work as a floor mat. Or even pinned up a wall. She used old jeans and her hubby's old striped shirts for this. Am so in love with this piece that I am inspired to make one soon.

Old jeans recycle by Sarita
 It's classy. It's warm. And a perfect size for multiple uses. Sarita was an angel to send me a more detailed picture progress of this lovely project.

She used;
  • a pair of scissors, 
  • a base cloth of cotton or blended fabric, 
  • quilt pins, 
  • needle and threads of about three colours and 
  • of course, two shirts and a pair of jeans.

``I hand-stitched the whole thing. But you can make it quicker if you use a sewing machine,'' says Sarita.

She first cut strips of 8 centimeters or 3.1 inches long from the fabric.


She used quilt pins to hold these strips in place over a base cloth.

As for the base cloth, she used two layers of it, stitched up three sides and inserted a foam sheet between the layers before stitching up the fourth side.

This was to give it the cushion feel and thickness.

She gave a gap of an inch each on each strip towards each of four sides over the base, to enable neat stitching.


She arranged one type of strips horizontal and the other type vertical over these strips, and pinned them for the weave.


 Next step, was to weave them.


Cut the excess cloth and stitch it up in a way that the excess pieces on the strips are attached below the foam base cloth.

The shirt strips pictures above are for representation only. She used this method, with the strips cut from her pair of old jeans.

``I used blanket stitch to seal the ends,'' says Sarita.


The size of strips she used was 8 centimeters long each, or 3.1 inches, but she says you could use your discretion depending on how big you want the final piece to turn out. Her place mat or quilt-mat turned out 56 cms by 56 cms or 22 inches by 22 inches, leaving aside the extra inch on each strip that was used to stitch up on the sides.

Here is how here piece turned out after stitching the sides up.

To give it a better look, she drew spirals, squares and diamonds on the jeans part of the mat, and did a running stitch over the designs.


And now, for how the piece finally turned out.


Isn't this lovely? You can use this method by adding thicker foam or cushion sponge, to make throws probably.

My head is already on the ideas mode.

As for the jeans pocket that got left behind in this quilt project, here is what she did with it.

Old jeans recycle: pen holder
A pen holder! All you need now is a tack or nail to fix it on the wall, or simply stick or hang it from a table top.
Thanks Sarita, for sharing this wonderful project! And the meticulously shot pictures. An amazing recycle-upcycle idea. 
Remember, not to trash your old pairs of jeans from now on. Use your imagination and start off on a project!
Pictures by : Ratnala Sarita
For permissions to use: radicreative@gmail.com
Please note: all pictures are watermarked. 

Wednesday, February 13

DIY mini paper garlands

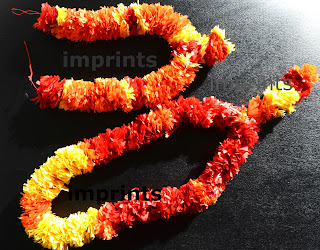
At school, we learnt to make garlands with paper. Kite paper it was called then. I don't know what they call it now, but did manage to find it in the craft store this Christmas season.

The shelf that holds divine knick-knacks in my kitchen could do with some decoration, with strung flowers looking extinct in this part of the globe. Besides, am awaiting my friend's visit soon and her home mandir could look nice too with garlands.

Over to nostalgia's rescue. I put those `kite papers' that get sold as cheaper gift wrapping paper at craft stores and Dollar stores out here, to use.

What I did was not the recycle variety. But can be modified to suit your needs, using recycle paper, or otherwise. For party decor, or simply to do up a corner of your desk.


To me, the yellows, oranges and reds bring back images of marigolds that adorn stalls and pavements during festive season. Reds are for red roses that make up for the more expensive garlands.

You don't need much of craft paraphernalia for this.


Scissors

Colour papers - assorted

Ruler or scale (optional)

Pencil (optional too)
Needle and thread, a must
Cut the colour papers into strips. Fold-roll each strip and make thin cuts on either side of the strip towards the center, leaving just enough room for a needle and thread to pass.


This is how the strips turn out after all the cutting.


Get the needle and thread ready.

Knot the thread in such a way that you get a loop knot...a loop and a knot that is.
Now, do the running stitch through the center of the strips.


And let the folds collect at the bottom. Twist the folds a little as you go, to even out on all sides.


Use your imagination, and play with the colours. Some doses of green to show as leaves, some yellow...and even blue. And marvel at how the folds become an illusion for strung flowers.


I made them in smaller sizes to fit my shelf. You could get flexible with the width and make door decor too. Or you can string small cut strips to form round flowers, so they work as greeting card embellishments.

Pictures by Radhika M B
For permission to use, write to: radicreative@gmail.com


Please note that all pictures are watermarked.