Friday, September 18

How to make plastic bottle cap stamp

Hi all, how did your Ganesha festival go?

Mine was good, super simple and satisfying. I tried something new for the elephant lord's umbrella, that I shall share in a later post. For now though, here is something I have been thinking aloud.

What exactly do we do with plastic bottles that only threaten to gobble up our lives with their volumes? The ideas are many, but there is an option, to recycle them.

We would of course wait for the local recycle shop guy who comes by the doorstep to collect them, in my parents' place.

In USA, the options to recycle plastic bottle caps are limited. It is not encouraged to put bottle and cap together into the recycle bins.

How about thinking up ideas for crafts with such caps? The possibilities are big.

I looked up the internet and was overawed with things one can do! But a simple idea struck me. And that of course is about converting them into stamping tools for home crafts! If you have kids who need to be kept busy, nothing like this.

The project I tried, gives a way out for the thermocol and styrofoam food containers that have inundated grocery stores and supermarkets too.

bottle cap recycle + handmade stamp

That is my new plastic bottle cap stamp, sitting against my favourite mug.

What you need for this super quickie project:
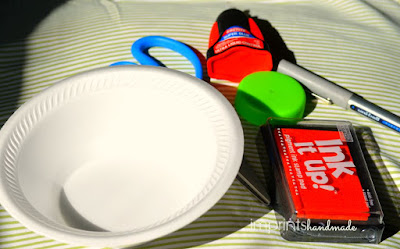
Materials for plastic bottle cap stamp + stamping ink pad + thermocol container


-- a used thermocol or styrofoam container...wash it thoroughly, and wipe off any residue of food

-- stamping pad or alternatively, some paint and brush

-- important important ....a plastic bottle cap of the size you want

-- a pair of scissors

-- multi-surface glue

-- pen or marker


Next on:

Thermocol container for plastic bottle cap stamp

DIY thermocol container stamp

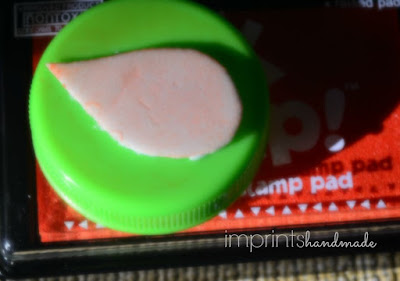
Draw out a shape you like, or make your kid draw one. And cut it. Be sure, to draw on the flat surface of the container...a curved surface may not sit well with the glue.

All that needs to be done now, is to stick the foam on to the cap.

Tips here: 

If you want the glue to sit well on the cap, rub the surface of the cap with sandpaper a little. And delicately roughen up the glue-side of your foam shape.

A problem that may crop up in the project -- the foam sheet may be too thin for the cap if you need it to protrude enough for stamping. As a back up, cut the same shape twice or thrice.

You can use the foam shapes for kid projects that most craft stores sell these days instead of this cut and paste  bit. But using a discardable foam container is more satisfying...what say ya?

Stick on now.
Plastic bottle cap + bottle cap repurpose + make your own stamp + DIY

In case the shape is too thin, or the glue is excess, stick another piece of the shape on top of the current one. And another still if you are not happy with the protrusion yet.

For my piece, I thought the super glue I used was a mistake because it was spreading too much while getting absorbed the foam surface. 

So I cut out another teardrop shape and stuck it on top of the layer, with multi-surface craft glue.

And here it is:
Make your own stamp + plastic bottle cap +

You can stick a layer or two more of the shape, going by the result after stamping...see what works for you.

Styrofoam and plastic bottle cap for stamps

That is how my piece of paper looked after stamping up a little. I love the different texture this stamp brings in. It's gonna be rockin' useful for my projects - bookmarks, greeting cards, gift envelopes and more.

Don't throw away that water bottle cap or grocery item cap. Keep it and experiment.


Pictures Courtesy: Radhika M B

Permissions to use: Write to Radhika M B at radicreative@gmail.com

Friday, September 11

`Fruity' barrette clip with used 3-D stickers

Hi gals, am back with another post, thanks to the gentle nudging by a friend.

A few weeks back, my cutest little neighbour kept me on toes with her need to play and do stuff at home. My sweet toddler friend knows where exactly at home things that amuse her the most get stashed - my craft paraphernalia. Ribbons, stickers, beads, papers, tools, embellishments and more! And heads for them every time she fancies. Her dad was surprised by how familiar his darling girl was with stuff around our place.

Her objects of affection on this visit, were the bundles of stickers that I use for various craft projects. All I gave her was a white sheet or two. Peel and stick, peel and stick, she picked up whatever she liked by the second, and off they went, to stick to the paper. What a sight that was! I loved watching the enthusiasm in the little girl. And wondered how exhausted her mom must be, in keeping her occupied.

Kids love their stickers don't they?


I just love the abandon with which she sticker-painted this sheet.

At the same time, we adults get a headache trying to keep our hair ornaments and other jewellery together. They get lost, break or simply find no use after a while. When you end up with those barrette clips from which the decor pieces fall off, what do you do? Here is where my idea fits in.

For this quickie project, I have used new barrette clips. You could use a functional old clip that has either lost its charm, or you want to give a makeover, or a new one that you can pick up from craft stores online and offline. I peeled off the 3-D stickers from that sheet and used them for a kiddy barrette clip.

Here is how they can look on completion:


Let me tell you, my arrangement was slightly different when I started off. Read on.

What you need for the project, is of course, barrette clips to begin with.


You also need,


-- some multi-surface glue...I have used Superglue (such glue is available in craft stores, and stationery stores...make sure you check the instructions before buying)

-- a stirring stick and toothpick (optional)

-- some acrylic paint, or whitener

-- an old cloth, or newspaper, tissue paper, or packaging sheet to absorb spills if any

Now, for the how of it.

Carefully read the instructions on the glue container or packet before you start. When you apply glue, you must be cautious enough not to let any amount of the liquid touch your skin. Make sure you adhere to first aid if it accidentally spills.

Meanwhile, pull out a few stickers to see which of them fit your barrette.

I arranged the emoticon-type fruity stickers to get an idea of the dimensions. Some left over adhesive on them helped as it stuck on and did not fall off.

Now gently squeeze a drop or two on the barrette surface that is bulged up. Place the sticker on it, and press the two surfaces hard. Use the blunt end of a pencil, the stirrer or your fingers.

If using fingers, careful please. Should some glue squeeze out when you press, do not try setting anything right. If it falls off, let it drop on to the cloth or paper below.

Let it dry for a while. And move to the next sticker.

In my case, I messed up a little on gauging the size of these stickers with their angles. So the apple sticker that you see in the picture above, did not stick well. I pulled out a few more stickers - melons, bananas...finally a pear sticker came to my rescue.

It is not the most perfect fitting one, but good enough to fix on a little girl's hair.

This is how it looks. You can bask in how well it turned out. But wait... Flip over.


 You don't mind these smudge marks on the rear don't you. I did not mind one bit. But then, I realized that the left over glue can mess up a little girl's hair. Wait till the barrette and stickers have dried. And dab a little white paint on the stirring stick, apply on the surface that is not sticking to the barrette clip.


Let this dry out as much as possible. Optional: I did not try it out, but you could probably pad on some decoupage glue or Mod Podge to give the rear a glossy finish. Otherwise, simply use it on a little princess' hair.

Let her go rock at that party...and you can stay happy these stickers did not go into trash.

Try this using cloth flowers and other materials, and let me know how it went.


Pictures Courtesy: Radhika M B

For permissions, write to: radicreative@gmail.com


Friday, September 4

Bindi Packet Keepsake or purse photo-frame

Imprints pals, we are back. Starting off with something simple.

Did you know that the bindi, bottu or pottu that is so much a part of us Indian women, is not exactly confined to India alone? It is worn in India, Nepal, Sri Lanka, Pakistan and Bangladesh. Of late, the trend of Western celebrities wearing it has become the topic of chatpata debates in the online world.

But to think of it, this dot between the brows has gone places! I was amazed to know that in history, Chinese women wore a form of bindi, to decorate their foreheads. Only, it was more floral.

Apparently there are communities in Africa that use tattoos on their foreheads too. Is it not wonderful, that the little dot that was once a sign of a single culture has found existence elsewhere in the world!

I do not wear it on a daily basis. But when I wear something desi and grand, I love wearing the dot, big and bright.

Sticker bindis are the trend today, a long way from those Shringar and Eyetex chand tubes of liquid our moms used, and still long way from the skillful smearing of kumkum by our grandmas.

The question is, should the sticker bindi packets stay too? I would say, do anything to keep them away from landfills.

While I wait for some superbrain to design a more eco-friendly bindi packet, I look for ways to keep out of the trash can and eventually landfill. Here is the keepsake idea I worked on.


You could stick in

  • a picture of your favourite people or your wedding snap,
  •  a favourite quote or simply tuck in more stickers.

Still better, throw in a post-it slip that you need to preserve.

This keepsake works superb for wallets and purses that do not have an in-built frame in them, and complements those that do. Alternatively, you could place it in a book as a bookmark, or pin it up on your office desk (so that it does not leave a hole on the actual photo in it).

Please note: the above picture I have used for representation only. There are photo edits in this, to morph faces of people, and brand name of the bindi packet.

If the brand name is some pics, it is inadvertent.

Among items you need for this quickie project, are of course the used sticker bindi packets.


This is how it works...the plastic sheet front flap of a sticker bindi packet works beautifully to give it a photo frame feel.

And we're gonna exploit just that.

The super quick procedure can take less than 10 minutes with all that you have.


You need:

- a plier or something flat to remove the staples in the packet

- a pair of scissors to trim your picture  or the piece of paper with a quote

- glue

Optional items:

- sandpaper to remove any exisiting gloss while gluing the smaller flap to the packet's rear


- Stickers to embellish


Before you proceed, make sure  you remove the staples from the packet


You could use an old ice-cream stick or spoon too for this. Use the same tools to flatten out those visible holes. If the staple holes are visible on the packet's front side, you could use tiny stickers to cover up. Just a judgement of aesthetics there.

Next up, what are you waiting for?

Go on, cut up a keepsake picture from your old photos stash, or cut out a quote...

Just make sure that the picture or paper you fix, is large enough to fit the rear flap. Also, position it so you see the portion that you want to see through the plastic frame.

Once you finish gluing the picture in, remember to glue the flap behind, to the packet. You may notice in some cases, that the packet's rear is glossy.

Here is where sandpaper comes in handy, rub it a little on the area of the packet where you must glue the flap on.


I was in the mood for kitsch big time. So here it is, stickers from my stash that became a collage. 


Here is also an example for a wedding pic. Sorry folks, have blurred out our faces on the wedding picture here.


I love books...and found a cartoon very endearing. So here it is...another option...


Go on, improvise with what you have. Write in and mail in your own versions...you can use bindis to embellish too.

They fit perfect into that party clutch of yours, or a wallet. 


Just make sure they do not enter the dustbin.


Pictures by: M Radhika

For permissions, write to: radicreative@gmail.com


Tuesday, March 17

Inching back

Dear faithful followers of Imprints Handmade,
Long absence from here. Thank you for checking in often. All I can say about why no posts have come up for long is, `life happens' at times, throwing one off balance. It has been one of those phases when you need to drop everything that's part of you for a while and move in another direction, out of necessity.

Am taking one step at a time to get back with my creative best. Let us hope together, that Imprints Handmade returns to churning out wonderful ideas and work by the bunch of us who have been part of it. Imprints Handmade needs your hand of support to get back into action.

May creativity flow unlimited...