Showing posts with label newspaper art. Show all posts

Monday, October 3

Make your own cardboard stencils

Stencilling as an art has gained momentum in the recent years. The creative form that bore the burden of disregard as an uninteresting one, is today the toast of interior decorators.
At home you do not have to invest on expensive damask or chevron stencils if you want them on smaller objects that get get a new lease of look. Grab the cardboard of household boxes and get started. Go for easy to make designs. Intricate cuts are for experts. And think of how little objects can be used.

You will need:

- household products cardboard, plain and pieces with packing slits

- a pair of scissors

- marking pen

- used 3 D or thick stickers or collants

- pen knife or craft knife

- small hole punch

- bangle

- cardboard strip of dark colour

- craft paper or construction paper of light colour

- some brush pens, or stamping pad with paint sponge

- colour pens or pastels


For my little project, I pulled out a flower shaped sticker from my stash of used 3D stickers and outlined it on a piece of product cardboard.

Next on, it was about carefully cutting the shape off with a craft knife. I used this on a sheet with brush pens to colour away.

You can also use paper punches to create some stencil designs.

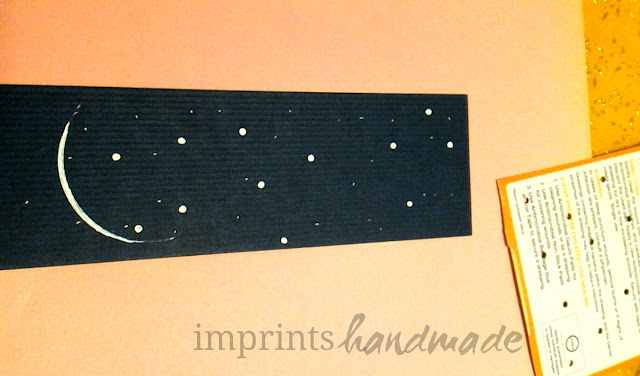
I used a small hole punch on a piece of cardboard, to create random small holes.
I the placed this cardboard on a royal or navy blue strip of cardboard to create a design for a bookmark.


It was stars, and a crescent moon. I used a bangle to get the shape of the moon right. And dots with a pen to create a night sky.

If you get cardboard with pre-punched shapes to hold a product, you can utilize it to make other designs. 
The piece I had was useful.

I simply coloured inside it's top slit shaped like a plate with a bun, randomly over paper.

And added some stars. They look like flying spaceships. If I had added folk motifs, the design would get a rural touch.

For the festival season, you can wrap gifts in these papers or reach a kid to experiment with designs. Find everyday objects to try.

Pictures by Radhika M B

Write to radicreative@gmail.com

Tuesday, September 6

Tissue roll cardboard napkin holders DIY

Have you ever spent more than you wanted to on party decor and regretted it? The trouble with such decor items is their horribly temporary nature. After the show they losectheir charm unless you reuse them in some way. If you are a recycler at heart, go for decor that will not hit your pocket.  Go for something that will last.
In the past few years I have gotten into a habit I want to wean myself out...using kitchen tissue rolls.  If you are not in the habit of tearing out those tissue sheets by the half hour during your kitchen work, stay that way.
Left over tissue roll cardboard for those of you who use, can  contribute to a variety of crafts. Go grab your pair of scissors and a glue gun.

I made napkin rings in three different patterns so you can get a glimpse of how such rolls work.

You will need:

- kitchen or toilet tissue roll

- a pair of scissors

- hot glue gun

- saree border rolls that that you
Get in craft stores

- loads of cloth flowers ... about 15 of them maybe

- A piece of felt sheet

- decorative rope in golden colour or other metallic colours

- a pen for marking


Beein by cucutting a piece off the tissue roll cardboard. You can use a pen To mark out the length of the tissue roll piece. Use the hot glue gun and start applying glue to the tissue roll piece.


Quickly fix the Saree border on to the glued roll along the piece, or horizontally.

Once the roll reaches its glued beginning, apply more glue and join the ends, crease them. Cut off the border and adjust the glued ends to stick well.


Do this with as many pieces as the tissue roll cardboard will allow you. The napkin rings are ready to impress on your party table top.

Or, take another piece, grab a thick decorative rope...thick enough to hold a gift bag made of paper, but not the heavy duty twine variety. Roll the rope from outside the tube to inside, and bring it back out. Do this till you have covered the span of the tube piece.


Glue the ends inside the tube. And once it gets dry, fix a cloth flower to decorate. For the next style, all you need is to glue the flowers on to the outer surface of the tube.

Your hot glue gun comes in handy.


Similarly, use a felt piece by gluing it to a tube piece and embellish on its joint with cloth flowers.

Make a bunch of these pieces and gift them away this festive season. Feel content you gave new life to a piece of cardboard. But don't head to a store to buy a tissue roll for the project. Resist that temptation.

Picture courtesy:  Radhika M B

For permissions, write to radicreative@gmail.com

Saturday, August 18

Newspaper on the wall

Would you ever dare to put up newspaper on the wall other than for protecting them during a painting session?

Vidya Nair of www.whatsurhomestory.com, an amazing DIYer I have just met online, actually put up vintage newspaper on her wall, as decor! I wouldn't have believed that pieces of newspaper you would throw away as trash would liven up a wall, but for those pictures.

For me, it's always that `Ah! the smell of old newspaper!' feeling. Still it would be a dilemma in my visual head if newspapers could actually work as decor...never mind if the best of brains managed to make furniture out of that ubiquitous thing!

Take a look at these:

Is that not gorgeous! She has used painted birch bark and gingko leaves for that dry-souvenir look.
For those of you who do not know how gingko leaves look, here is a link:

http://en.wikipedia.org/wiki/File:GinkgoLeaves.jpg

Here is a couple of pictures more.


Me thinks it would have made lovely impact on wall decor of other dark colours too. But love this look here anyways.

For an idea how she made it, you could visit Vidya Nair's wonderful DIY website. Here is the link - Recycled Newspaper Art

Meanwhile, look out for more from Lalitha Menon and some `not so recycled' bookmarks from my end too.

Photo courtesy: Vidya Nair