Showing posts with label Art. Show all posts

Tuesday, March 28

DIY Buntings or doorstep Thoranam


It's festival time. A bunch of Indian States' people celebrate their New Year according to the Lunar Calendar. We in the South call it Ugadi. It's that time of the year when I rejoice in the visual treat of tendrils on trees. I adore the fresh green colour of mango leaves, and the Ugadi pachadi (chutney), a special for the festival. 

I love the sight of mango leaf thoranam or thoran to welcome visitors on people's door-step tops. As kids we would stitch the leaves up using their stalk and create thoranam using a twine. That's a luxury I long for where I live in USA. 

But it's officially spring time out here, and stores are bursting with spring-summer colours for clothing, accessories and more. I decided to give the doorstep garland a twist. 

This one is a super quick tutorial that does not require much time. If your child is not too young, it's a project you can assign one of the holidays.

It's popularly called a paper bunting. I see these extensively used for party decor out here. 


What you need:

-- a pair of scissors

-- patterned paper of your choice

(I chose paisely designed one from my stash, with cool colours instead of warm. You can use old gift wraps, or cupcake holder cups.)

-- tacky glue or craft glue

-- satin ribbon (about one centimeter wide, or less)

-- marking pen or pencil

-- a stencil to draw out circles (a small plate or compass) ..I used an old ribbon spool


Reverse the patterned paper and draw out circles using your stencil. Depending on the thickness of the paper you can fold it to cut more than one circle at a time.


I made more than 10 circles from the single sheet. You will notice some brand printing on some circles, which is fine because you can fold it to the rear and it will not be visible. Also, the number of circles depends on the size you cut out, so if one sheet is not enough, keep a couple more. You do not need the same print. Related patterns or colours would do just fine.


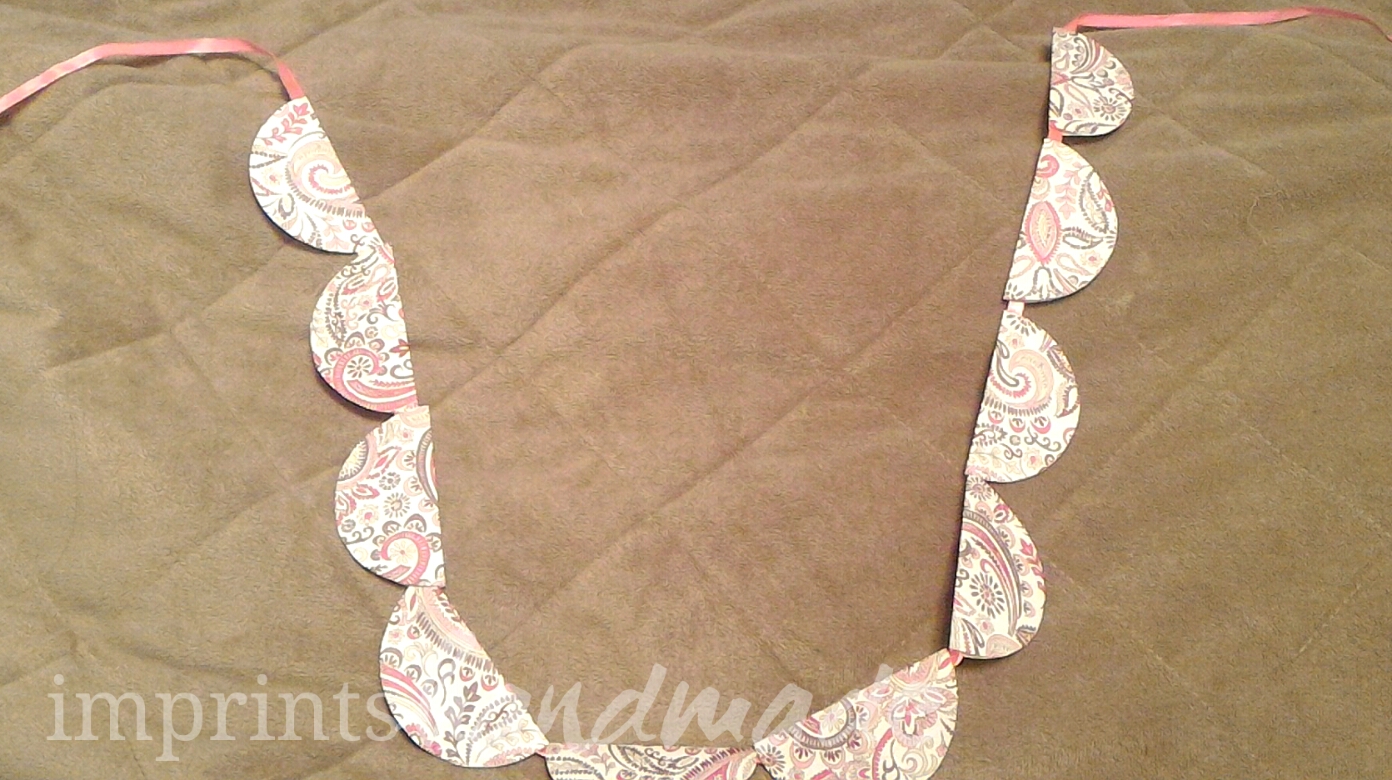
Fold all these circles in half.


Place the satin ribbon on the crease of the fold.


Glue the inside of the bottom half in such a way that you leave a little gap for the ribbon to move.


Fix them all in a row. You can fix large beads between each half circle if you wish.

You may apply a little glue to the cut edges of the satin ribbon for it to stay stiff instead of threading out. Use this bunting or thoran to decorate your doorstep, a bare wall, or a table edge.


You can also embellish a plain circle with stickers. Enjoy the festival, and the new beginnings that come forth.

Content and pics: Radhika M B

Write to: radiscrbie@gmail.com

Tuesday, March 21

Spring-Summer wreath DIY

It's that time of the year when tendrils on branches turn a feast for your eyes. In the tropics it's summer already. Out here where I live, the last snow melts quick with the rising temperatures. The clock just sprang forward, and home-sters wait eagerly to fix their yard decor. As during any season, wreaths are common to door decor in the West.

A good wreath can cost your pocket too much though. If you are willing to spend a few dollars, and arm yourself with loads of patience, you can make wreaths at home. This project is available on the internet in plenty.

I used a pizza carton lid that was not soiled with the cooked pizza, and cut out a ring from it.

What you really need for this project, is a ton of gift-wrap tissue paper, or the paper we use to make kites in India, also known as Kite paper.

You will need:

Besides a pizza carton lid,

A pair of scissors

Gift wrap tissue paper or Kite paper (at least 15 sheets) in colours of your choice

Hot glue gun with a bunch of glue sticks for refill

pressing tool or maybe a popsicle stick

Tissue paper to wipe after using your glue gun

Plates of two sizes to draw out a wreath form or ring

Ribbon.

It's common for stores to entice you into buying wreaths for each season. So grab your scissors and spread out the sheets.


Use a steel plate that fits the pizza carton lid, and draw a circle.


Use a smaller plate and draw out another circle. This circle becomes a ring, allowing you to begin decorating.


I cut pieces from the colour sheets, of five inches by seven inches. The diameter of this circle ?(big one) is 8 inches. Now, roll the tissue pieces into irregularly shaped flowers. 


One end of the piece must be narrow, which you can twist. Stick this in with hot glue.Work on the outer part of this ring and then move towards the inner side.


The wreath I made looks like this, with the gap being hidden. But it is really the ring. Be careful when you work with hot glue gun. Keep it away from children, and certainly not in the proximity of your study. Also, when you work with the piece, use the vertical narrow end to twist and turn. And then stick. Fill in the gaps after sticking the outward looking folds by spreading out the broader end of the vertical rectangle piece.  Use a ribbon to hold the wreath.

When you use the glue gun, hot glue may stick to your hands, causing the fingers to burn. Keep a first aid kit ready. I love how the greens protrude.


Cut ribbon, about two feet long, so you can tie up the wreath to a door.


Enjoy the green wreath.

Pictures and content: Radhika M B

Write to: radiscribe@gmail.com

Tuesday, January 31

Foam flowers for multi-use: DIY

We all get drawn to things floral. Flowers in vases, in paintings, on clothes, in the gardens, jungles...probably it's the innate pleasant memory emanated by flowers, that fascinates artists and perfume makers alike.

My friend Umme Haani, who sprung a surprise with this bunch of beautiful foam flowers, was gracious enough to share details of her project. This is not a full fledged piece where you make a décor piece or art end to end. It is a set of flowers made with glitter foam and embellished with sequins, that you make and keep aside for future use in either craft projects, decorating the walls or doors, or stick to barrette clips and decorate your little one's hair.


Haani lists out the materials needed for this little project made using multi-surface glue.

What you need:

-- Scissors
-- Glitter foam sheet
-- Fevi kwik
-- Beads
-- Newspaper
-- Iron (to get the embossed look in flower) 

She explains the steps in detail:

Firstly, draw five tear-drop shaped petals on a paper and cut them. Then trace the petals on to a foam sheet on the plain side or surface, and cut them out. You get five foam drop shaped petals.


At the narrow end of the petal, bend the corner in such a way that the rest of the petal bulges a little. Place a foam petal in between two sheets of a newspaper. Now, heat the electric iron to its maximum and place it on the newspaper carrying foam petal for three seconds. The petal will curve, resulting in a blooming shape. Repeat this for the four other petals.


You can now shape the petal as seen above. Turn the petal to its plain side and apply super-glue on the side of the petal. The glue should be used on its narrow end, to resemble a flower's center. Stick the narrow end to another flower petal's curved narrow end, and repeat the same for all the petals.

Lastly, apply Multi-Surface glue or super-glue, and place a bead at the center of the flower to embellish. Your foam flower is ready. Make a whole bunch of these flowers.


These flowers can be used as wall decoration or kept in a vase or can be stuck to children's hair clips and hair bands. You can make them in different sizes, and use them to simply throw on a party centre-table.


This is a safe project to do with children. Here, Umme Haani has placed the flowers over a plastic plate, adding zing to the look. Does it not look attractive for a party table?


Pictures courtesy: Umme Haani

Content: Umme Haani and Radhika MB

Monday, October 3

Make your own cardboard stencils

Stencilling as an art has gained momentum in the recent years. The creative form that bore the burden of disregard as an uninteresting one, is today the toast of interior decorators.
At home you do not have to invest on expensive damask or chevron stencils if you want them on smaller objects that get get a new lease of look. Grab the cardboard of household boxes and get started. Go for easy to make designs. Intricate cuts are for experts. And think of how little objects can be used.

You will need:

- household products cardboard, plain and pieces with packing slits

- a pair of scissors

- marking pen

- used 3 D or thick stickers or collants

- pen knife or craft knife

- small hole punch

- bangle

- cardboard strip of dark colour

- craft paper or construction paper of light colour

- some brush pens, or stamping pad with paint sponge

- colour pens or pastels


For my little project, I pulled out a flower shaped sticker from my stash of used 3D stickers and outlined it on a piece of product cardboard.

Next on, it was about carefully cutting the shape off with a craft knife. I used this on a sheet with brush pens to colour away.

You can also use paper punches to create some stencil designs.

I used a small hole punch on a piece of cardboard, to create random small holes.
I the placed this cardboard on a royal or navy blue strip of cardboard to create a design for a bookmark.


It was stars, and a crescent moon. I used a bangle to get the shape of the moon right. And dots with a pen to create a night sky.

If you get cardboard with pre-punched shapes to hold a product, you can utilize it to make other designs. 
The piece I had was useful.

I simply coloured inside it's top slit shaped like a plate with a bun, randomly over paper.

And added some stars. They look like flying spaceships. If I had added folk motifs, the design would get a rural touch.

For the festival season, you can wrap gifts in these papers or reach a kid to experiment with designs. Find everyday objects to try.

Pictures by Radhika M B

Write to radicreative@gmail.com