Monday, March 28

Mini paper garlands with magazine page DIY

Often we are hung up about how we decorate our Gods. Some of us like our deities big, some small. Some of us waste resources in worship. The rest of us love  thrift. When I was growing up, I watched how diligently our neighborhood women saved milk packets after use. Some women proceeded to make garlands with such packets. Others cut them to pieces after washing thoroughly to serve snacks.
Here I ha e tried using a magazine page to wrap up a tiny garland project.
What you need  for the home craft:


-gift wrap tissue paper of one or two colors
- magazine pages old
 -a pair of scissors
- ruler and pencil
 -needle and thread
-Beads with large holes
- paper trimmer

Firstly, use the ruler to mark lines three fourth of an inch wide on the colour paper and magazine page.


Use the paper trimmer to cut strips from the sheets.


Now cut through these strips towards the center but leaving enough space to run a needle and thread.
(


You will notice that the magazine sheet is thicker than the colour paper. Fret not. Do so for the two colors with patience. Next, run a knotted needle and thread into a bead to get it ready for the garland.

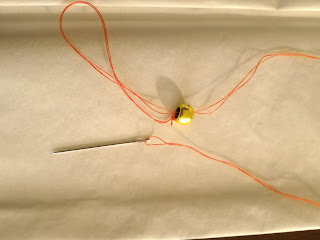
Use a running stitch to needle your way through the strip.

After a little length, use your fingers to push the strip down to pile up towards the bead. The strip will be brittle. But continue. After about half an inch, run the needle through red strips that are cut.

Continue till you reach a desired length and knot into another bead.

You can use a piece of bread twist or thick thread to finish it through the end. Use it around home or gift it during festivities.

Picture courtesy: Radhika M B

Write for permissions.

Friday, March 11

Gorgeous magazine paper beads pendant DIY

The world of jewellery/jewelry is a multi-billion dollar industry. Gold, silver, platinum, precious stones....they all rule the accessories industry while influencing the economy in their own way.

Yet it is something as simple as used paper that can add zing to your neck. Forget the glitz of gold dug up from the earth's underbelly.

The ever innovating Sankgetha Sripathy of Smudgy Trove is on an experiment mode with paper. Her specialty is terracotta and polymer clay jewellery, that she is a master at. Of late though, she has forayed into recycle experiments with paper.

Here is a quick pendant tutorial by her, with used brochures or thick pages of magazines.

The materials:


-- a pair of scissors
-- cord or jewellery rope
-- embellishments
-- magazine sheets
-- a ruler
-- toothpicks
-- a pen
-- paints of your choice of colours (here she has used antique gold paint)
-- Mod Podge

Firstly, cut the magazine sheet into strips of desired width. She used roughly an inch and half. Make sure there is uniformity in the width.


Next on, pick up one strip and roll it into a bead gently using your fingers and the tooth pick or pen to guide you.


Towards the end, use Mod Podge to stick the edge on to the roll. Make a bunch of such beads, all of the same length. One bead, you may make of half their size. Next, stick these beads together with Mod Podge.


She stuck them all in a row, and fixed the smallest of the lot on one end.


She let this set dry. Sankgetha then used some Mod Podge, to apply over the wavy surface, and let it dry. This is to help the paint stick better to the otherwise smooth surface of the magazine paper.


The next step is to paint the surface using your desired colours. Here is where you can experiment a great deal.

She used the antique gold finish paint. And embellished it.


The pendant is ready. You only need to cord it with jewellery cord and adorn it.

Use a bead for the cord if needed, to string it better.


Here is the finished pendant necklace.


This pendant is useful, as work accessory, as well as for an ethnic do. If you want to keep it funky, do not paint. Simply string it and wear.

It is one of those school projects that you can do with your child, or spend time to make it an innovative conversation starter just ahead of a get-together. It reminds you, that looking good need not be expensive at all. You certainly do not need that yellow metal to charm your way.


Pictures courtesy: Sankgetha Sripathy

For permissions to use, write to: radicreative@gmail.com


Monday, March 7

Bookmarks from used styrofoam containers: DIY

I detest styrofoam containers, otherwise also known as the handy thermocol boxes that have become a craze for packing cooked food.

Much as they look inevitable, I long for those days of the steel and brass boxes. I long for days when packing a dosa into banana leaves and using a twine to tie the dish up with a newspaper to wrap it was the most normal thing to do.

Today we are left with tonnes of the menacing material flooding global garbage. In my own home, I have grown tired of having to trash styrofoam food containers. Needless to say, they come in handy in a million ways. I would not recommend you go looking for those boxes, but if you do have pieces that land on your hands, use a wet tissue to wipe them clean and get started.

I made full use of the lid of one such container, and made bookmarks.

Here goes the procedure:

You will need,

-- a pair of scissors

-- wet tissue or a slightly damp clean cloth

-- decorative stickers to embellish

-- thick threads of matching colours

-- a hole-punch

-- paper-trimmer

Start by cutting the sheet to size, by doing away with the curves.


I did not want to stick to the standard measurements of bookmarks that are accepted internationally.


I made use of all the length it provided.

The next step is to use the paper trimmer and trim it to size. If you do not have a paper trimmer,
use a ruler and craft knife, or a ruler-pencil-scissors combo.


I then cut the sheet into three pieces. The sheet's width was enough for three bookmarks. You can choose the number by making a judgement call on how many pieces a sheet of this size can yield.


Out came my stash of stickers.


I had tacky glue handy. Unlike the normal craft glue, tacky glue is less messy when it comes to sticking paper and styrofoam. In this case, it was about stickers that were made with glossy paper, plastic sheet, and the likes.

Hot glue is also said to help. In case you are wondering why glue them at all when they come with glue attached anyways, there is no telling how such ready-glue surface will stick on the synthetic surface of thermocol.


Choose your stickers with a theme in mind, or arrange them in a way that pleases your eye.


You can use these bookmarks. I was not satisfied yet. 

So I used the easily available paper punch.


And threads of matching and contrasting colours...red and silver in this case.

After punching a hole, it was all about knotting the twine-size thick threads into the bookmarks.


If you have a corner rounder, nothing like it. I tried to round off the corners of two bookmarks. Am longing for a corner rounder someday soon. Let the pieces dry before use.

Use this upcycled set of bookmarks for yourself, to gift to friends, or as party favours. They are non-fussy, easy to make, perfect for kids though you must supervise them with the use of scissors and knife...

Enjoy your book and mark that `fell asleep here' page with some elan.


That's my latest book in the picture...am hoping to finish reading it soon.


Pictures Courtesy: Radhika M B

For permissions to use pictures and content, write to: radicreative@gmail.com