Saturday, November 28

Earrings with a face cream tube: how to make

Every time a cosmetics tube goes into trash, it adds that much to landfills. Not a lot of us would give thought to it, but even tubes containing face creams, scrubs or face packs can be repurposed.

It is all about figuring out what material such tubes are made of. I picked up one of my old tubes that ran out of cream, and used its empty container to experiment with making earrings. The result is somewhat rugged. But it has given me loads of ideas for future projects.

Things you will need to make these earrings:

-- used and old cream tube...wash it thoroughly
-- keep handy lots of sequins and beads for the experiment
-- a pair of scissors
-- 3-D outliners of the colours of your choice
-- some beads and buttons (optional)
-- jump rings and fish hooks
-- jewellery/jewerly pliers
-- multi-purpose craft glue
-- small hole punch


Firstly, wash the tube thoroughly. This takes time.


Cut the flattened edge of the tube off. You are now left with a hollow piece.


Cut its surface in such a way that you get two flat pieces. These pieces have a bend, which you could use to your advantage.


IIf there is residual cream, wipe it off with a wet tissue or wash it and dry it again. You will also notice that some tubes have vinyl sticker packaging, You may remove this with hot and soapy water. The process may be messy. Load yourself with some patience.

After this, you could cut it to shapes of your choice. And embellish with sequins.


Use a small hole punch to make a hole on one end of the pieces each.


Fix jump rings to these holes. Here I have tried my hand with the 3-D outliner. You will notice it is still not dry.

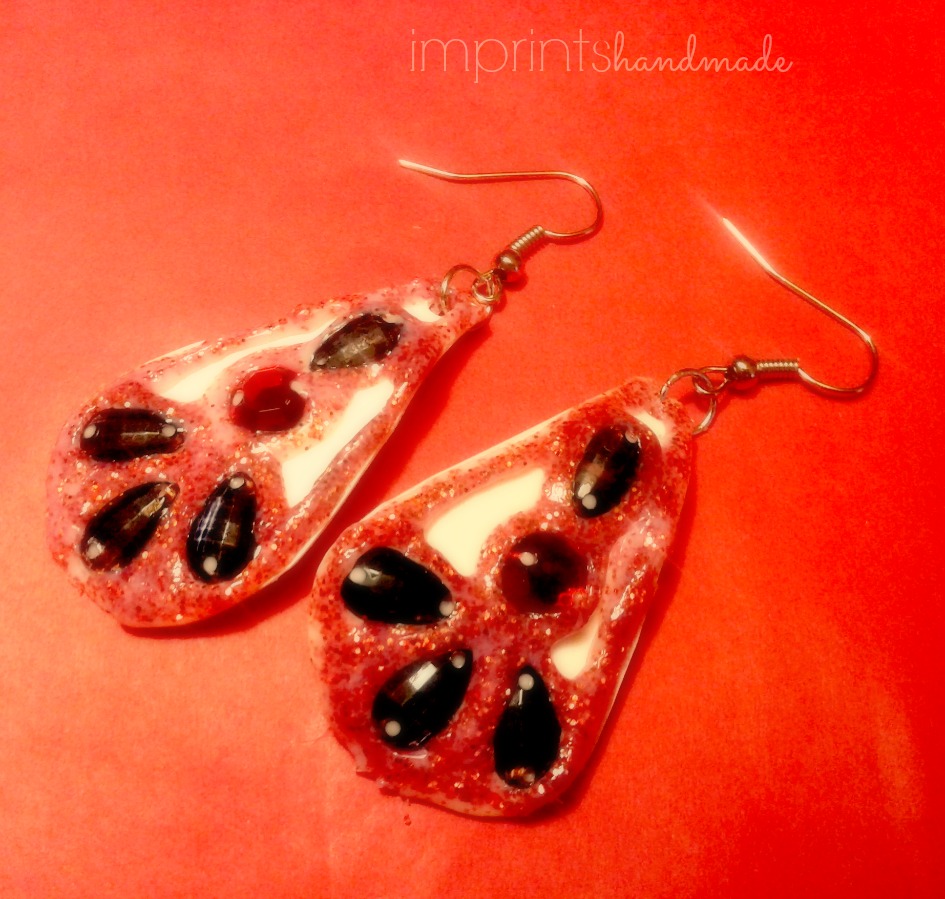
Allow the pieces to dry and fix the fish hooks. And your pair of repurposed cream tube earrings is ready for use.

T

Try them on a day you want to do something new. The pair I made is not so perfect, but is bound to draw compliments. Run your head on other ideas with cream tubes too. Crafting is all about trying new experiments using existing objects. And not fretting about imperfect pieces.

Picture Courtesy: Radhika M B

For permissions to use, write to: radicreative@gmail.com

Saturday, November 21

Owl nest fridge magnet with plastic bottle cap: a nest on my fridge

Owls are my favourite birds. Contrary to what I heard growing up, owls are wise, and that I say in the affirmative.

On an earlier visit to the crafts store, I chanced upon owl buttons. They found  their way into my cart with no reason to be bought at all. Today I put them to good use. I built a little nest for them in a plastic bottle cap. And made them sit on my fridge door.

Plastic bottle caps that we mindlessly throw away can come handy in a million ways. For the little owl nest, it was a large red plastic cap that made a perfect bowl for the nest.

The materials you need for the project are available easily, except for the owl buttons. You can opt for small owl stickers, stick them up a card board and cut through the shape to give them the 3-D effect, or simply buy 3-D stickers.

Here goes the list:


Things you need to make owl nest fridge magnet 

-- Owl buttons
-- a self adhesive magnet
-- plastic bottle cap
-- a pair of scissors
-- jute or burlap twine - one thick and one thin
-- cloth leaves that you get from craft stores for flower making projects
-- a tweezer to nudge the twine into the cap properly
-- straw or stirrer to use tacky glue
-- tacky glue

Jute rolled into disc for bird nest plastic bottle cap magnet

Roll the thicker twine into a disc that's enough in size to fit into the bottle cap. And glue this into the bottle cap. Use enough glue.
Tacky glue on plastic bottle cap recycle magnet project

Tacky glue with jute twine in plastic bottle cap

Now pick up those owl buttons or 3-D stickers and glue them on the disc, a little above half of the cap.

How to make a bird nest magnet for your fridge

buttons craft + DIY owl nest magnet for refridgerator

The flowers project leaves usually come with a wire attached. You can cut this wire and add randomly into the glued area, and fix the leaf on the bottle cap edge. The leaf can also go in before the owl buttons do, so you can nestle them on it. 

repurpose bottle cap to make it yourself fridge magnet

Add more pieces of the jute or burlap twine - thick here, thin there...you can also pull out strands from the pieces to stick randomly and give a mish mash effect. Images of owl nests I came across have mostly been with twigs. Here I have mounted the glued owls on a large twine roll.
Burlap kids craft project +DIY owl nest fridge magnets

Let the piece dry out a little. And add the self-adhesive magnet. If the adhesive does not stick well, glue it with tacky glue.

Back to nature craft + Green craft + recycle repurpose reuse

Here they are, the owls, drying out in the bottle cap nest.

Green craft + plastic and jute with owl buttons fridge magnet

They acquire a different glow, almost Christmas tree like, when an LED bulb shines on them. If you want to quick dry them, try using a hair dryer in `cool air' setting. After an hour of drying, the piece is ready to sit on my fridge.

Owl nest fridge magnet easy crafts

This little DIY piece makes for an excellent gift that you can stash into an old earrings box and give away. You can earn those `recycled' stars with ease among peers. Get your kid to do this for a school crafts project. Or simply enjoy its beauty on your fridge.

If you do not have owl buttons or stickers, use tiny pebbles that look like eggs, or oval beads of plain colours. Enjoy the company of your new friends.

Pictures courtesy: Radhika M B
For permissions to re-use, write to: radicreative@gmail.com

Copyrights: Radhika M B

Friday, November 13

Quickie plastic bottle caps Tic Tac Toe

Tic Tac Toe, is the easiest doodle game one can think of when bored. All you need is a pen and paper. Four lines to form nine boxes. Circles and cross-marks. And you can go on endlessly.

As kids, we used tamarind seeds. We sanded out one side of the seed over rough cement stairs to show its beige inner layer - three to be precise, and let the other three seeds stay whole. Lemon sized granite stones heaped along street construction sites were equally handy for the game. That was then.

You can add a colourful twist to the game and keep its casual flavour and portable essence. Use bottle caps that you would throw away otherwise. Just make sure you have three each of two different colours. Else, you can simply embellish them into such colours.

The supplies for this project are simple, and available around the household usually. It's a perfect one to keep your child engaged on a rainy day. Make it, and play away.

You need:

-- a pair of scissors (paper trimmer is optional in addition to this)
-- cardstock or thick cardboard of the colour of your choice, or any cardboard from diwali gifts
-- decorative tape or duct tape, about half inch thick
-- stickers to embellish which is optional
-- six plastic bottle caps...use your discretion while choosing their size and that of your cardboard's
-- a ruler and pencil to cut the cardboard into a square


Before you get started with any of the steps, make sure to wash the bottle caps and dry them out for a while.

Firstly, use the ruler and a pair of scissors to mark your cardpaper into a square and cut. My favourite for cutting paper is a paper trimmer.
You do not need it for this project. If you have one, use it by all means.

Next step: Roughly mark out the square piece, and fix the tape spanning it at one third the width. To keep it neat, it's alright to let the tape spill over to the other side.

Gauge the left over space adjoining this tape, and run it again at the two thirds marked area. Note that the dimensions need not be accurate to the point. You need an approximate division.
Now, use the same method and run another piece of the tap across these two lines at one third and two third divisions of the cardboard.

Next on, you could embellish your bottle caps. I chose to embellish the green bottle caps with stickers, as the print on them looked tacky.  The game is ready to use.

If you are a pro at using decorative tape, you can make it a reversible sheet with the tape running on both the sides.

The piece I made is 8 and half inches wide. The tape with less than an inch came in handy. This size is perfect to get tucked into your office folder. The caps, you can tuck into a string gift bag and carry in your purse. Or simple drop them into the laptop bag. And the game is ready to go to work.

It's a game your kid can take for a school picnic too. Make sure you smooth out any sharp edges on the cap. If it's a project you do with your child, watch over the child's use of scissors.

Pictures Courtesy: Radhika M B
For permissions to use content and pictures, write to: radicreative@gmail.com

Saturday, November 7

Scrubber with grocery mesh bags

What happens to those onion and garlic mesh bags once you finish using them? Ever thought of creative ideas with such produce bags?

However hard I try to avoid them, every once in a while, I end up with a plastic mesh bag and wonder what to do with it.

What I tried out has been tried a good deal by creativists across the world. It was still an experiment for me - converting them into a scrubber for use either in bath, or at the sink.

Interestingly, the quick project did not need a drop of glue at any point. Wash and dry the bags before you do any experiment.

What you need for the homemade scrubber:

recycle upcycle plastic mesh bags onion and garlic

-- some plastic mesh bags that come with onions or garlic, or other items
-- a pair of scissors
-- tapestry needle with a wide hole
-- plarn (plastic yarn) made from a fairly thick plastic cover
-- optional is a skein of embroidery thread

I had in my stash, plastic netted bags that were bundle-taped at one end, and also bags that were heat-compressed to make for the bottom. The advantage was that I could use the bundle-ended bags to stuff into the flat ended ones.

onion plastic mesh bags craft

You will need to cut off the bundle ends. And spread the mesh bag out. Stretch it well, so you can fold it. Do it with two bags.

mesh bags net bags plastic repurpose
what to do with mesh plastic bags

Fold these bags in a way that they fit into the the flat-ended mesh bag. This is trial and error. You can try out the folds in different ways.

grocery mesh bag re-used

Gently push the folded set into the flat mesh bag. Make sure that the edges of these folds do not jut out from the mesh bag.

vegetable mesh bag repurpose
 Now fold this bag. Thread plarn into your tapestry needle and start sewing the edges. I used button stitch for two sides and overcast stitch on other two sides.You will need to crease the plarn from time to time. It gets rough with each passing stitch too, thanks to the sharp plastic in the mesh.


Stitch any left over plarn into the existing stitches. Your homemade scrubber is ready. You may use it this way. I had another idea to make it look better.
Plastic reuse grocery mesh bag scrubber

Out came my crochet hook. Using the existing hooks in the edges, crochet a single crochet chain around the scrubber.
plarn crochet ideas plastic mesh bag scrubber scrubbies
plastic mesh bag scrubber with button stitch and overcast stitch


I crocheted two lines with the plarn. Stitching plarn on to a plastic mesh, and crocheting it, are more difficult than working them with an embroidery skein or other threads. Do not give up. Here is where you can alternatively try edging off with embroidery skein. Am not sure about how long it would last with the scrubber though.

Plastic grocery mesh bag scrubbies
The scrubber is ready for use. I am happy with the result. It is not perfect. It's functional. It is satisfying.

I was lucky to have a red plarn ready. If you do not, try using contrasting colours. Experimenting has no end with such projects. Tutorials to convert a plastic bag into a single plastic yarn exist on the internet. They are easy and fun. If you do not have plarn, try using the plastic thread available from thread stores. Just make sure it is not too sharp on the skin. You can add more mesh bags into the flat ones for a fluffy piece. Fine mesh bags are more suited for bathing, while the rough ones come in handy for dishes in the sink. Use your discretion. At no point should you let the piece of plastic hurt you though.

Try your hand at upcycling those plastic mesh bags and save on some scrubber bucks.

Pictures Courtesy: Radhika M B

For permission to use, write to: radicreative@gmail.com