Thursday, March 22

Saree border bookmarks

Saree is a sensual costume. Still, it is attributed to conformity. I like the sheer variety of possibilities with saree - with its pleats, pallu, borders, motifs...

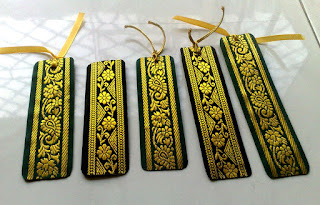
Here, I have used the readily available saree borders from the craft store, and cardboard carton that would have found its way to trash otherwise.

All you have to do is, cut the cardboard carton side that fits between two layers of the saree border. Sandpaper the glossy side of the carton and glue the rears of the border roll pieces on to either side of the cardboard.

Home made bookmarks with saree borders


Make sure they align perfect. Now place the bookmark under a pile of books. Just make sure the bookmark does not stick to books in the pile, by placing a plastic sheet between the two.

Saree border recycle bookmarks

Leave it overnight. Next day, punch a hole at one end of the bookmark. This could be messy, with the thread zari not cutting so easily. To ease your trouble, you could pre-punch the cardboard and fabric before sticking up. Use a corner rounder to trim the edges for that professional look.

Insert a satin ribbon or thread and tie up. Your traditional bookmark is ready.

PS: Dark colours work better. With lighter colours, the glue could stain out, messing with the look.

Monday, March 19

Lacy bookmarks

Wanna get dressy? Remember the time lace-work was in?

When all things floral and thread-y meant class? Embroidery and lace-work invaded our homes - on frocks, curtains, teapot covers, tables! These days, you only need some inclination to patch up your clothes, and the threaded stuff comes ready-made!

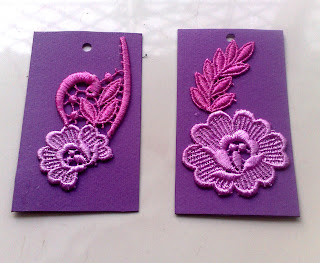
During one of those trips to the craft shop at Adyar, I came across sets of thread-patch flowers that one could patch on to dresses - more inclined towards embroidery. I did not quite know how they would fit into my bookmarks, but bought them on instinct.

Here is what came of them.

Lace for bookmark decor

I glued together sheets of craft paper, cut them to sizes, and glued the pale yellow, baby pink, peach, pale brown and baby blue thread-flowers on to them. If you notice the red bookmark in the center, it is a whole piece. You could use parts of it and try playing with colours, as I have here. The butterfly and rose sticker did not quite help. But kids loved it.

Go ahead, have fun. Grab your pair of craft scissors, some satin, and glue.

Keep in mind, that when you glue together craft paper or cardstock, you press it under a pile of books, or place it beneath your couch cushions.

Here is another picture, with my favourite lavender-pink combination.

lace thread patch bookmarks

They're yet to get a satin ribbon or thread to tag along. Bookmarks of this size can be used as gift tags too.

Monday, March 12

Spring usher simple bookmark

Am loving every bit of the warmer sun out here at Delaware. Dry trees around my home have not started flowering yet. But anticipation of green is so heart-warming in itself!

Last week, I had picked up a Martha Stewart set of flower stickers, more on impulse.


They came in handy this weekend when I started out experimenting with the `card-stock'. Back in India, card-stock is called...cardboard. If you get lucky with the right stationery store, you could get lucky with cardboards of varying thickness and colours. I was lucky to have Ananda Stationery at Adyar (Lattice Bridge Road).

The card-stock I picked up here at Michaels, is a lot less thick. Its amazing variety of paper patterns floored me still.

So here they are, two simple bookmarks - one with the Martha Stewart flower stickers, and another, with doll-eyes (again from Michaels).


For the flower bookmark:
You need a paper trimmer and/or a pair of paper scissors, flower stickers, Mod-Podge all purpose craft glue or Fevicol if in India, a ruler (depending on your measurement preferences).

A corner rounding machine would be helpful of you want to give it that professional touch.

Trim the card stock to a strip one-inch wide and six inches long. Peel the flower from the sticker sheet of plastic and glue it to one end of the paper.


Now pick up another flower and use the glue-dot that comes with it (centre-black core) in such a way that it sits against the earlier flower. To avoid wear and tear, add bits of glue between the two flowers and press their rears against each other. You're done.

For the friendly owl bookmark:

Cardstock, craft glue, a marker or sketch-pen as they call in India, a pair of doll-eyes that you could pick up from any craft store.

Sketch out an owl on a one inch and half wide, five inches long piece of cardboard. Make sure you leave the right amount of space for the owl's eyes. Glue the eyes just above the nose.

You can round off the corners for a better look.


Thursday, March 8

Felt creativity in circles

I love bookmarks. Because I love books. I love making bookmarks too. Which is why it was so delightful when a friend put up pictures of her just made felt bookmarks in Facebook.

Inspired by similar pieces on the net, she turned out these lovely bookmarks I would want to have some day!

Here they are, bookmarks by Sarita Tukaram:

Felt satin ribbon bookmarks

Sarita has cut different coloured felt pieces and stitched them together. Some also have pieces of old cloth such as duppattas, bedsheets and the likes stitched on to them.


Satin ribbon felt cloth bookmarks

Old clothes sure can find their way back to something beautiful!

What this blog is about

Guess what? I posted a lovely post with a picture of my handmade bookmarks and it vanished when I went about redesigning this blog.

Although I will mention the purpose of this blog on the side bar, here is some forethought. I love going green - really. Which is why I collect paper trash in the hope of turning it into something useful, longer lasting.

In my darkest moments of bad health, I came up with some brilliant handmade bookmarks - most of them from recycled cartons of my medicines, soaps and cosmetics.

When I had no money for decor that spelt luxury at my home as a newly-wed, I rearranged things that came to me as freebies, gifts and scrap, to decorate my home. I did not  forget those ever so useful gift vouchers from friends.

The two exercises were part of my personal journey to see beauty in a different light - adrift from the consumerist notion of things beautiful that we get fed with.


This blog, will be of my efforts at creativity through art and craft, and sometime of others too - learning all along.

While the focus is on cost-effective decor, craft and art, I might end up putting up something really beautiful even if extravagant at times - if I love it. It will include things - paper, indoor, outdoor, DIY things that did not turn out so well too. I mean, what are we if we don't fail? We learn through failures, don't we? It's about stuff I post on the go.

Be prepared for some inspiring stuff from the internet as well:)

I aspire to put up a lot of India inspired material up here.

In case you are unhappy with the pictures, please bear. Am yet to own a good camera. So what I put up for pictures on this blog will be from my mobile camera, or others' cameras. When I do get to own a good one, I hope to put up great quality pictures.

Meanwhile, enjoy your journey with me. Guide me as I move on. I would love feedback.